skip to content

AI-Powered Product Search for eCommerce: How to Reduce Zero Results and Increase Conversions

Introduction – Why Your eCommerce Search is Quietly Losing Your Sales

Why are users leaving your eCommerce site without finding products, even when you have them?

Because your search understands keywords, not intent.

Most default eCommerce searches rely on exact keyword matching. But real users do not search that way; they describe needs like “comfortable office chair for long hours” or “Nike Air Max but cheaper.” When your search cannot interpret this, it returns irrelevant results, or worse, nothing at all.

These zero-result searches are not just a UX issue. They directly impact revenue by:

  • Hiding products that actually exist in your catalog
  • Increasing bounce rates
  • Sending users to competitors

Modern shoppers expect search to work like Google or Amazon – fast, intuitive, and context-aware. If your search cannot meet that expectation, it becomes a conversion bottleneck.

This is where AI-powered product search changes the game, by understanding intent, not just matching words.

eCommerce site search audit to identify zero result queries and improve product search performance

Why Default eCommerce Search Fails (And Costs You Sales)

Most eCommerce search systems don’t break; they underperform quietly.

Everything looks functional. Users type queries, results appear, and the system seems to be doing its job. But the real issue is not whether search works; it is how well it understands what users actually mean.

1. It Matches Words, Not Intent

A typical search engine is built to find exact matches.

So when a user searches for “blue running shoes,” results show up easily. But when the query becomes more natural, like “comfortable shoes for daily jogging,” the system starts struggling.

The intent is clear, but the wording does not match your catalog. And that is where relevance begins to drop.

2. User Language Does Not Match Product Language

Customers do not think in your internal naming system.

One person searches for a “sofa,” another types “couch.” Someone looks for a “hoodie,” while your catalog says “sweatshirt.” Without the ability to connect these variations, your search treats them as completely different requests.

The result? Products exist, but remain undiscovered.

3. Real Searches are Messy (And Systems Are Not Ready for it)

Users don’t type perfectly structured queries.

They make typos, use long phrases, and search conversationally:

  • “Nik shoes”
  • “Red dress for wedding party”
  • “Laptop for coding under 1 Lakh”

Traditional search is not built for this behavior. It expects precision, while users operate with approximation.

4. Relevance Breaks Even When Results Appear

Even when your search returns results, the ordering often feels off.

That’s because most systems prioritize keyword presence, not user intent or likelihood to convert. So users see generic or loosely related products first, while the most relevant ones are pushed down.

At this point, the issue is not just discovery; it is confidence. If the first few results don’t feel right, users stop trusting the search altogether.

5. The Critical Failure Point: Zero-Result Searches

This is where the real damage happens.

A user searches, hits enter, and sees “No products found.”

From their perspective, it is simple: You do not have what they need.

But in many cases, the product is actually there. The system just failed to interpret the query correctly.

That gap between what you have and what users can find is where conversions are lost.

What This Means for Your Business

When search fails at any of these levels, the impact compounds:

  • High-intent users leave without exploring further
  • Paid traffic does not convert as expected
  • Inventory visibility drops without you noticing
  • Customer trust erodes with every poor experience

Search is not just a navigation tool; it is a decision-making layer. And when it does not perform, it quietly limits your growth.

Transition

Improving this is not about adding more filters or manually tweaking keywords. It requires a shift, from reacting to queries to actually understanding them.

What is AI-Powered Product Search?

AI-Powered product search is not just an upgrade to your existing search; it is a different way of understanding what users are actually trying to find.

Instead of relying on exact keyword matches, it focuses on intent, context, and meaning behind every query.

From Matching Words to Understanding Meaning

In a traditional system, a query is treated like a string of words to match.

In an AI-Powered system, the same query is treated like a problem to interpret.

So when someone searches for: “comfortable office chair for long hours”, the system does not just scan for those exact words. It understands:

  • The user needs ergonomic support
  • Likely prefers cushioned seating
  • Maybe looking for durability and adjustability

And then it surfaces products that actually fit that need, even if those exact words are not present.

How AI Search Actually Works (Simplified)

At a high level, AI-powered search combines three key capabilities:

  • Understanding the query: It interprets what the user means, not just what they type.
  • Connecting Meaning to Products: It maps the query to products based on relevance, not keyword overlap.
  • Improving Over Time: It learns from user behavior – clicks, purchases, refinements – and continuously improves results.

What Makes it Different From Traditional Search

The difference becomes clearer when you compare how both systems respond to the same query.

ScenarioTraditional SearchAI-Powered Search
Long, Descriptive QueryOften fails or weak resultsUnderstands intent and returns relevant matches
Synonym & VariationsLimited or manual setupAutomatically interpreted
Typos & Messy InputBreaks or degrades resultsHandled intelligently
Result RankingKeyword-basedIntent + behavior-based
Learning AbilityStatic rulesContinuously improves

The Core Building Blocks of AI Search

To deliver this level of understanding, AI-powered search typically relies on a combination of:

  • Semantic Search: Matches meaning, not just words
  • Natural Language Processing (NLP/LLMs): Understands conversational queries
  • Machine Learning Models: Improve ranking based on behavior
  • Vector Embeddings: Represent products and queries in a way machines can compare meaningfully.

You don’t need to go deep into the technology to benefit from it, but understanding these components helps in making the right implementation decisions.

Why This Matters for eCommerce

When the search starts understanding intent:

  • Users find products faster
  • Fewer searches lead to dead ends
  • Product discovery improves significantly
  • Conversions increase without increasing traffic

In simple terms, AI search does not just help users search better; it helps them decide faster.

Transition

Now that the concept is clear, the next step is understanding what this looks like in practice. Because AI-powered search isn’t one feature, it is a combination of capabilities working together.

Key AI Search Capabilities Transforming eCommerce

AI-Powered search is not a single feature; it is a combination of capabilities that work together to make product discovery faster, more intuitive, and conversion-driven.

Instead of forcing users to adapt to your system, these capabilities allow your system to adapt to how users naturally search.

Natural Language Product Search (LLM-Based Understanding)

Modern users don’t search for keywords; they describe what they want.

Queries like “affordable formal shoes for interviews” or “best phone for gaming under 30K” carry clear intent, but traditional systems struggle to interpret them. AI-powered search, especially with large language models (LLMs), processes these queries contextually.

It understands qualifiers like “affordable,” “for interviews,” or “under 30k,” and translates them into meaningful filters and product attributes.

This makes search feel less like a tool and more like a conversation, one where users don’t have to simplify their thinking to get results.

Semantic Search (Understanding Meaning, Not Just Words)

Semantic search ensures that even if users don’t use the “right” keywords, they still get relevant results.

For example, a search for “summer outfit” might return:

  • Lightweight dresses
  • Linen shirts
  • Breathable fabrics

Even though the phrase does not explicitly mention those products, the system understands the context behind it.

This is powered by vector embeddings, where both queries and products are represented based on meaning, allowing accurate matching beyond exact text.

Visual Search (Search Using Images, Not Words)

Sometimes users don’t know how to describe what they are looking for, but they can recognize it instantly.

Visual search allows users to:

  • Upload an image
  • Click on a product photo
  • Find visually similar terms

This is especially powerful in categories like fashion, furniture, and home decor, where visual similarity plays a major role in decision-making.

Instead of guessing keywords, users can directly express intent through images, reducing friction significantly.

AI-Powered Autocomplete (Guiding Users in Real Time)

Autocomplete is often underestimated, but it plays a critical role in shaping the search journey.

With AI, autocomplete goes beyond basic suggestions. It:

  • Predicts user intent as they type
  • Suggests complete queries, not just keywords
  • Surfaces popular or high-converting searches

This helps users refine their queries faster and reduces the chances of zero-result searches before they even happen.

Personalized Search Results (Behavior-Driven Relevance)

Not all users should see the same results for the same query.

AI-powered systems use behavioral signals like:

  • Past searches
  • Browsing history
  • Purchase patterns

To adjust search rankings dynamically.

For example, a returning user who frequently buys sportswear might see athletic products ranked higher, even for a general query like “jackets.”

This level of personalization improves relevance and increases the likelihood of conversion.

What This Means in Practice

When these capabilities work together, the search experiences shift from:

  • Reactive -> to Predictive
  • Rigid -> to Adaptive
  • Functional -> to Conversion-focused

Users don’t just find products, they find the right products faster, with less effort.

AI product search optimization for eCommerce to improve intent understanding and increase conversions

Transition

Understanding these capabilities is one part of the equation. The next step is knowing how to apply them effectively, especially if your goal is to reduce zero-result searches and improve conversions.

eCommerce Site Search Best Practices to Reduce Zero Results

Reducing zero-result searches is not about fixing one issue; it is about improving how your system responds when it does not immediately understand a query.

The goal is not just to “return results.” The goal is to never leave the user at a dead end.

Start by Fixing Query Interpretation, Not Just Results

Most zero-result issues begin before results are even generated.

When a user types something unexpected, whether it’s phrased differently, too long, or slightly incorrect, traditional systems fail early. AI-powered systems address this by rewriting and interpreting queries before searching.

For example, a query like “cheap gym shoes for beginners” can be internally mapped to:

  • “Budget running shoes”
  • “Entry-level sports shoes”

This layer of interpretation ensures the system searches with meaning, not just literal text.

Replace “No Results” With Intelligent Fallbacks

A zero-result page should never be the final outcome.

Instead of showing nothing, your system should:

  • Display closely related or semantically similar products
  • Suggest alternative queries
  • Highlight popular or trending items

Even if the match is not perfect, it keeps the user engaged and moving forward.

Because in most cases, users don’t need an exact match, they need a good enough starting point.

Strengthen Synonym Handling and Catalog Mapping

One of the simplest but most overlooked improvements is aligning how users search with how your products are structured.

This means:

  • Mapping common synonyms (sofa = couch, sneakers = running shoes)
  • Enriching product data with meaningful attributes
  • Avoiding over-reliance on exact product titles

When your catalog and search language are aligned, discovery becomes significantly smoother.

Design Search Around Real User Behavior

Your best source of improvement is not assumptions; it is actual search data.

By analyzing:

  • Frequent queries
  • Failed searches
  • Drop-off points

You can identify patterns where users struggle and continuously refine how your system responds.

This is where AI-powered systems have an advantage; they do not just collect data, they learn from it and improve results automatically over time.

Make Autocomplete Do More Than Just Suggest

Autocomplete is your first opportunity to prevent failure.

Instead of waiting for users to complete a query, guide them early by:

  • Suggesting refined, high-intent queries
  • Highlighting categories or products as they type
  • Steering them away from queries that historically fail

This reduces friction before it even becomes a problem.

Continuously Optimize Ranking Based on What Converts

Even when results are found, ranking determines what users actually see.

Instead of relying on static logic, modern systems prioritize:

  • Products that get more clicks
  • Items that convert better
  • Results that match similar user journeys

This ensures your search is not just functional; it is aligned with business outcomes.

Before vs After: What Actually Changes

Without these improvements, search behaves like a rigid system that either works or fails.

With the right approach, it becomes adaptive – able to interpret, adjust, and guide users even when queries are not perfect.

That shift alone can dramatically reduce zero-result searches and improve overall discovery.

Transition

At this point, the strategy is clear, but the next question most businesses ask is:

  • What technology actually powers this?
  • And how do you choose the right approach?

AI Search Tech Stack Explained (Algolia vs Elasticsearch + AI Layer)

Once you decide to improve your search experience, the next question is not whether to use AI; it is how to implement it correctly.

And this is where most businesses get stuck.

Because AI-powered search is not a single tool. It is a layered system made up of a search engine, an intelligence layer, and the user experience that connects everything.

Understanding the Core Layers (Without Overcomplicating It)

At a practical level, your AI product search stack consists of three parts.

The first is the search engine, which retrieves products quickly. This is where tools like Algolia or Elasticsearch come in.

On top of that sits the AI layer, which interprets queries, understands intent, and improves relevance. This includes technologies like embeddings, natural language processing, and machine learning models.

Finally, there is the experience layer, the part users interact with. This includes your search bar, autocomplete, filters, and result layout.

If any of these layers are weak, the entire search experience suffers.

Implementing this layer effectively requires seamless AI integration across query processing, embeddings, and ranking systems.

Algolia vs. Elasticsearch: What Should You Choose?

This is one of the most common decisions teams face when implementing an eCommerce product search engine. ‘

Both are powerful, but they solve different types of problems.

Algolis is designed for speed and simplicity. It is a hosted solution that works well out of the box, with fast implementation and minimal infrastructure overhead. For teams that want to move quickly without deep technical customization, it is often the preferred choice.

Elasticsearch, on the other hand, offers much deeper control. It is open-source and highly customizable, which makes it suitable for businesses that want to build an advanced, tailored search experience, especially when integrating AI models or custom ranking logic.

Here is how the choice typically plays out in real scenarios:

FactorAlgoliaElasticsearch
Setup SpeedFaster, ready-to-useRequires setup and configuration
FlexibilityLimited customizationHighly customizable
AI IntegrationBasic built-in featuresFull control with external AI layers
Cost StructureSaaS pricing (scales with usage)Infra + development cost
Best FitStartups, fast-growing storesEnterprises, custom platforms

The decision is not about which is “better”, it is about which aligns with your scale, complexity, and long-term goals.

Where AI Actually Fits In

This is where many teams get confused.

Tools like Algolia or Elasticsearch handle retrieval.

AI handles understanding and relevance.

For example:

  • A user enters a query
  • The AI layer interprets intent and converts it into a meaningful representation
  • The search engine retrieves matching products
  • A ranking model reorders results based on relevance and behavior

In more advanced setups, vector embeddings are used to match queries and products based on meaning rather than text. This is what enables semantic search and natural language understanding.

A Simple Architecture View

To make this concrete, here is how a typical AI-powered search system flows:

User Query -> Query Processing (LLM/NLP) -> Embeddings/Intent Mapping -> Search Engine (Algolia/Elasticsearch) -> Ranking Layer -> Results UI

Each step plays a role in ensuring that what the user sees is not just fast, but relevant.

 What This Means for Your Implementation

Choosing the right stack is not just a technical decision; it directly affects:

  • How quickly can you launch
  • How flexible your search can become
  • How much control do you have over relevance and ranking
  • How easily you can scale and optimize over time

This is why many businesses do not just pick a tool; they work with a partner who can design the right combination of tools and AI layers based on their specific use case.

Transition

At this point, you understand what goes into building AI-powered search.

The next logical question is:

  • What does it actually cost to implement this?
  • And how do you estimate it for your store?

AI Search Architecture (How it Works in Practice)

Understanding the stack is helpful, but what really brings clarity is seeing how everything connects when a user actually performs a search.

Below is a simplifies view of how an AI-powered product search system works end-to-end.

Architecture Flow (Simplified)
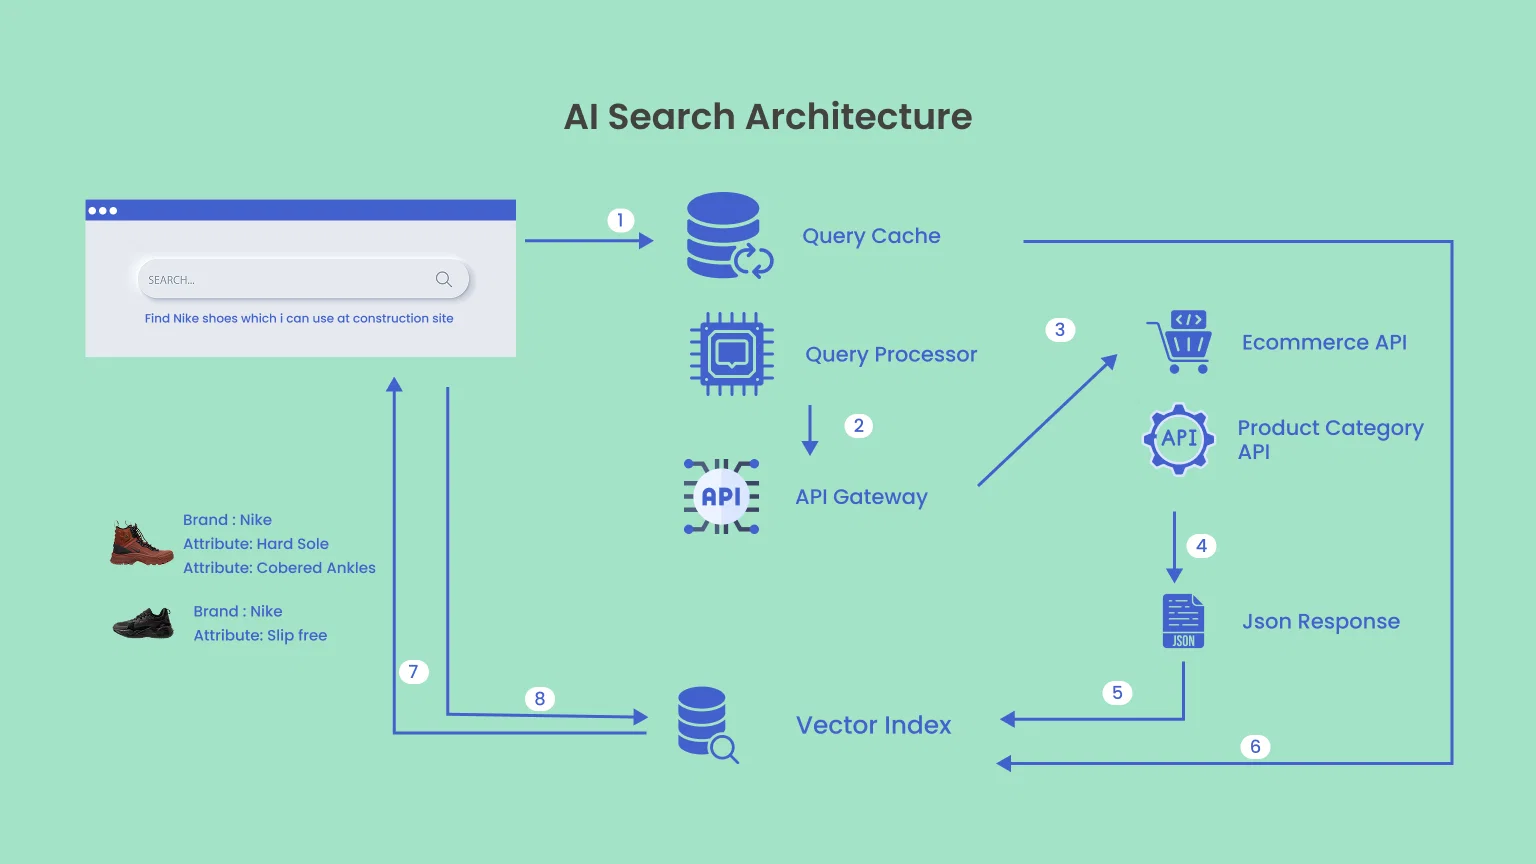
AI search architecture for eCommerce product search including query processing, vector index, API integration, and natural language search using LLM

Step 1 – Users Enter a Query

Everything starts with a real, often imperfect query.

This could be:

  • Short (“running shoes”)
  • Descriptive (“comfortable shoes for long walks”)
  • Messy (“ik shoes under 5k”)

Instead of treating this as plain text, the system prepares to interpret it.

Step 2 – Query Processing (LLM/NLP Layer)

The query is analyzed using natural language processing or an LLM.

At this stage, the system:

  • Understands intent
  • Extracts meaning (price sensitivity, category, use case)
  • Rewrites or refines the query internally

So “budget-friendly shoes for gym” might translate into structured intent like:

  • Category: Sports shoes
  • Attribute: affordable
  • Use case: gym

Step 3: Embeddings & Semantic Mapping

The processes query is converted into a vector representation (embedding).

Products in your catalog are also represented in the same way.

This allows the system to match:

  • Meaning <-> Meaning, Instead of
  • Word <-> Word

This is what powers semantic search and enables accurate results even when wording differs.

Step 4 – Search Engine Retrieval (Algolia / Elasticsearch)

Now the system retrieves relevant products.

Depending on your setup:

  • Algolia handles fast, optimized retrieval with built-in features
  • Elasticsearch allows deeper customization and hybrid search (keyword + vector)

At this stage, the goal is speed + broad relevance.

Step 5 – Ranking & Personalization Layer

Once results are retrieved, they are not shown immediately.

They are refined based on:

  • Relevance to query intent
  • User behavior (clicks, past interactions)
  • Business logic (stock, margins, popularity)

This is where search becomes a conversion engine, not just a retrieval tool.

Step 6 – Results Delivered to the User

Finally, results are displayed through your UI:

  • Search results page
  • Autocomplete suggestions
  • Filters and sorting options

A well-implemented system ensures:

  • Fast response time
  • High relevance in top results
  • Minimal friction in refining queries

Why This Architecture Matters

When all these layers work together:

  • Users don’t need perfect queries
  • Products don’t need perfect naming
  • Search adapts instead of failing

This directly reduces zero-result searches and improves product discovery.

Transition

Now that the system is clear, the next question becomes practical:

  • What does it actually take to build something like this?
  • And how much should you budget?

Implementation Cost Breakdown ($10K – $50K)

When businesses consider AI-powered product search, cost is usually the first concern, and often the most misunderstood.

The range can vary significantly, bust most implementations fall between $10,000 and $50,000, depending on complexity.

What Influence the Cost?

The cost is not about “adding AI.” It depends on how deeply you want to transform your search experience.

A smaller catalog with basic semantic search will cost far less than a large-scale system with personalization, visual search, and custom ranking models.

Key factors include:

  • Catalog size and complexity: More products mean more data processing, indexing, and optimization effort.
  • Features you want to implement: Natural language search, semantic search, autocomplete, and visual search each add layers of complexity.
  • Technology choices: Using a hosted solution like Algolia reduces infrastructure effort, while Elasticsearch with custom AI layers increase flexibility, but also development time.
  • Integration requirements: Connecting search with your existing eCommerce platform, analytics tools, and backend systems can impact both cost and timeline.

Typical Cost Ranges (What You Can Expect)

Instead of a single estimate, it is more useful to think in tiers.

  • Basic AI Search Implementation ($10k – $20K): Suitable for smaller stores or initial updates. Includes semantic search, improved autocomplete, and basic ranking improvements.
  • Mid-Level Implementation ($20K – $35K): Adds natural language understanding, better query handling, and more refined ranking logic. Ideal for growing eCommerce businesses focused on improving conversions.
  • Advanced AI Search Systems ($35K – $50K): Includes visual search, personalization, hybrid search (keyword + vector), and deeper analytics. Best suited for large catalogs or competitive markets.

Timeline Expectations

Most implementations take between 4 to 12 weeks, depending on scope.

A phased approach is often more effective:

  • Start with core improvements (semantic + autocomplete)
  • Then layer advanced capabilities like personalization and visual search.

What You Are Actually Paying For

Beyond development, you are investing in:

  • Better product discovery
  • Higher conversion rates
  • Reduced dependency on paid traffic
  • A scalable search foundation

In many cases, the ROI becomes visible within months, not years.
AI-powered product search cost estimation for eCommerce stores based on catalog size and requirements

Transition

Cost answers “Can we do this?”

But the real decision depends on:

What impact will this have on conversions and revenue?

Conversion Impact of AI Search (Data + Business Value)

At this point, the technology and implementation are clear.

But the real question decision-makers care about is simple: Will this actually increase conversions and revenue?

The short answer, when implemented correctly, is yes. And not marginally.

Where the Impact Actually Comes From

AI-powered search improves conversions not by adding features, but by removing friction at critical decision moments.

When users search, they are already in an active buying mindset. Unlike casual browsing, search users typically know what they want, or at least have a clear direction.

If your search helps them reach the right product faster, conversion becomes a natural outcome.

By combining relevance with AI eCommerce personalization, businesses can significantly improve repeat conversions and customer retention

If it does not, they leave.

Faster Discovery = Higher Conversions

One of the most immediate impacts is reduced time to discovery.

Instead of refining queries multiple times or scrolling through irrelevant results, users quickly land on products that match their intent.

This leads to:

  • Shorter decision cycles
  • Fewer drop-offs during search
  • Higher engagement with product pages

Even small improvements here can create a noticeable lift in conversion rates.

Reducing Zero-Result Searches Recovers Lost Revenue

Every zero-result search is a missed opportunity.

By introducing semantic understanding, fallback logic, and query interpretation, AI search systems significantly reduce these dead ends.

What changes is subtle but powerful:

  • Queries that previously failed now return relevant alternatives
  • User stay engaged instead of exiting
  • More sessions move forward into product exploration

This alone can recover a meaningful portion of otherwise lost revenue.

Better Ranking Drives Better Decisions

Search is not just about showing results, it is about showing the right results first.

When ranking improves:

  • High-converting products appear earlier
  • User don’t need to dig for relevance
  • Decision fatigue is reduced

This directly impacts both conversion rate and average order value, especially when related or higher-value products are surfaced intelligently.

Personalization Increases Repeat Conversions

AI-powered systems learn from behavior over time.

This allows search to adapt based on:

  • Past interactions
  • Purchase history
  • User preferences

As a result, returning users experience more relevant results, which increases:

  • Repeat purchases
  • Customer Lifetime Value
  • Overall Retention

What Businesses Typically See

While results vary by industry and implementation quality, common outcomes include:

  • Noticeable improvement in conversion rates (often in the 20-60% range)
  • Reduction in bounce rates from search-driven sessions
  • Increased engagement with product listings
  • Higher average order values due to better discovery

The key point is this: AI search does not just help users find products, it helps them decide with confidence.

Before vs After: The Real Shift

Before AI search:

  • Users struggle to express queries correctly
  • Relevant products are buried or missed
  • Search acts as a filtering tool

After AI search:

  • Users search naturally
  • Results align with intent quickly
  • Search becomes a decision accelerator

That shift is what drives measurable business impact.

Common Mistakes to Avoid

Implementing AI-powered search can significantly improve your eCommerce performance, but only if it is done with the right priorities.

Many businesses invest in the technology but still struggle to see results. Not because AI does not work, but because the implementation missues what actually drives impact.

Here are the most common mistakes that limit outcomes.

1. Over Engineering Too Early

One of the biggest traps is trying to build everything at once.

Teams often jump straight into advanced capabilities like visual search, deep personalization, or complex ranking models, before fixing foundational issues like query handling or relevance.

The result is a system that is technically sophisticated but still fails on basic searches.

The smarter approach is phased: Start with semantic understanding and zero-result reduction, then layer advanced capabilities gradually.

2. Ignoring Search Data and User Behavior

Search is one of the richest sources of user intent, but it is often underutilized.

If you are not analyzing:

  • What users are searching
  • Where searches fail
  • How users interact with results

Then you are optimizing blindly.

AI systems improve over time, but only is they are fed with real behavioral insights. Without that feedback loop, performance stagnates.

3. Focusing Only on Backend, Not User Experience

Even the best AI model won’t help if the interface creates friction.

Common UX issues include:

  • Poorly designed search bars
  • Weak autocomplete suggestions
  • Cluttered or confusing result pages

Search is not just about accuracy, it is about how easily users can act on that accuracy.

4. Treating Search as a One-Time Implementation

Search is not a “set it and forget it” feature.

User behavior evolves, product catalogs change, and new search patterns emerge constantly. If your system is not continuously monitored and refined, its performance will degrade over time.

AI helps automate improvement, but it still requires strategic oversight.

5. Choosing Technology Without Business Alignment

Many decisions are made based on tools rather than outcomes.

Selecting between Algolia, Elasticsearch, or any AI layer should depend on:

  • Your catalog complexity
  • Your growth stage
  • Your customization needs

Not just trends or recommendations.

A misaligned stack can either limit your capabilities or create unnecessary complexity and cost.

What This Means for You

Most of these mistakes don’t come from poor execution, they come from misplaced priorities.

When implementation focuses on:

  • Solving real user problems
  • Improving discovery and relevance
  • Aligning with business goals

AI-powered search delivers measurable results.

Transition

At this stage, you have seen what works, and what to avoid.

The final piece is understanding how to approach this strategically: Should you build and manage this internally, or work with a specialized partner?

Why Choose a Service Partner Instead of DIY

On paper, implementing AI-powered search might seem manageable. There are tools available, documentation is accessible, and the core concepts are widely discussed.

But in practice, most eCommerce businesses realize the challenge is not access to technology, it is making all the pieces work together effectively.

1. It is Not a Tool, It is a System

AI-powered search is not something you install and forget.

It involves:

  • Structuring product data correctly
  • Interpreting real user queries
  • Designing ranking logic that aligns with conversions
  • Continuously improving based on behavior

Each of these requires a different layer of expertise. Missing even one can limit the overall impact.

2. Implementation Complexity is Often Underestimated

Many teams start with a tool like Algolia or Elasticsearch expecting quick wins.

But they soon encounter questions like:

  • How do we handle ambiguous queries?
  • How do we balance relevance with business priorities?
  • How do we integrate AI models without slowing down performance?

Without prior experience, solving these challenges takes time, and often leads to trial-and-error decisions that delay results.

3. Optimization is Where Real Value Comes From

Getting search “working” is not the goal, getting it to consistently drive conversions is.

That requires:

  • Continuous analysis of search behavior
  • Regular tuning of ranking and relevance
  • Adapting to changes in catalog and user expectations

This ongoing optimization is what separates a functional system from a high-performing one.

4. Faster Time-to-Value With the Right Expertise

Working with a specialized partner accelerates the entire process.

Instead of:

  • Experimenting with different approaches
  • Debugging unexpected issues
  • Learning through slow iterations

You move directly toward:

  • Proven implementation patterns
  • Optimized search configurations
  • Measurable business outcomes

This reduces both time and risk.

5. A More Strategic Approach to Search

A good implementation partner does not just focus on technology.

They align search with:

  • Your conversion goals
  • Your product structure
  • Your user behavior patterns

This ensures that search becomes a growth lever, not just a feature upgrade.

Where We Fit In

WEDOWEBAPPS help eCommerce businesses design and implement AI-powered product search systems thar are built for real-world usage, not ideal scenarios.

From choosing the right stack to optimizing for conversions, the focus is always on one outcome:

Helping your users find the right products faster, and convert with confidence.

Our expertise combines AI-powered search with custom eCommerce development, ensuring your search fits your platform, not the other way around.

Transition

Search has evolved from a basic utility to a critical part of the buying experience.

The difference between a store that “has products” and one that help users discover them effortlessly often comes down to how well search performs.

Conclusion – Search is No Longer a Feature, It is a Revenue Driver

For a long time, eCommerce search was treated as a basic utility, something that simply needed to function.

That’s no longer enough.

Today, search sits at the intersection of user intent and purchase decision. When it works well, users move forward quickly, discover relevant products, and convert with confidence. When it does not, even high-intent traffic fails to translate into revenue.

Tha gap is not in your products, it is how easily users can find them.

AI-powered product search addresses this gap by shifting the focus from matching keywords to understanding intent. It reduces zero-result searches, improves relevance, and helps users reach the right products faster.

And that is what ultimately drives results:

  • Better discovery
  • Faster decisions
  • Higher conversions

The opportunity here is not just improving search, it is unlocking revenue that your store is already generating demand for, but not capturing effectively.

If your current search experience still relies on basic matching logic, the limitation is not technical, it is strategic.

The question now is not whether AI-powered search matters. It is whether your current setup is helping users buy, or quietly holding them back.

AI-driven eCommerce search experience optimization to improve user engagement and conversions


WooCommerce to Shopify Plus Migration: Complete Step-by-Step Guide

Introduction

Moving from WooCommerce to Shopify Plus is one of the biggest decisions a growing eCommerce development approaches. But when done right, it sets you up for faster growth, better performance, and fewer technical headaches. But when done wrong, it can cost you SEO rankings, customer data, and revenue.

This guide covers everything you need to know, from deciding whether to migrate, all the way through to launch day and beyond. Whether you are doing it by yourself or hiring a Shopify Plus migration expert, this is your complete playbook.

Plan WooCommerce to Shopify migration roadmap

When Should You Migrate From WooCommerce to Shopify Plus?

Not every store is ready to migrate. But there are clear signs that tell you when it is time to make the move.

Signs Your WooCommerce Store Has Hit Its Ceiling

WooCommerce is a solid platform, but it has limits. Over time, you may notice that managing the platform is taking more time than actually growing your business. Here are the most common warning signs:

  • Page load time keeps getting slower despite ongoing fixes.
  • Plugin conflicts are breaking features regularly.
  • Hosting costs keep climbing as your traffic grows.
  • Your checkout experience has not improved in years.
  • Your development team spends more time on maintenance than on new features.

If any of these sound familiar, your WooCommerce store has likely hit its ceiling.

The Business Triggers That Make Migration Urgent

Some business situations make migrating from WooCommerce to Shopify not just a good idea but urgent. These include:

  • Rapid product catalog growth with a Shopify developer that is straining your database.
  • Expanding into international markets that need multi-currency support.
  • Launching a wholesale or B2B channel that needs proper account management.
  • A funding round or acquisition that requires enterprise-level infrastructure.
  • Preparing for a peak season where downtime or slow performance is not an option.

Is Standard Shopify Enough, or Do You Need Shopify Plus?

Standard Shopify works well for stores making up to around $500,000 – $1 million per year. If your store is beyond that or if you need any of the following, Shopify Plus is the right choice:

  • Custom checkout scripting
  • B2B and wholesale functionality
  • Advanced automation via Shopify Flow
  • Multiple storefronts from one admin
  • A dedicated merchant success manager

The cost difference between Shopify and Shopify Plus is real, but for a store at scale, the return on investment almost always justifies it.

What Actually Happens When You Move from WooCommerce to Shopify: The Full Picture

Moving from WooCommerce to Shopify is not just a platform switch. You are transferring:

  • Your entire product catalog
  • Customer accounts and purchase history
  • Order records and transaction data
  • SEO metadata and URL structure
  • Payment gateway integrations
  • Every plugin and its functionality

When this is done correctly, your customers notice nothing except a faster and cleaner store. When it is done incorrectly, you can lose search rankings, break your checkout, and fragment years of order history.

Who Should Not Migrate Yet (And What to Fix First)

If your WooCommerce development data is messy, like duplicate products, broken image links, incomplete customer records, and inconsistent SKUs, then migrating will just move that mess to a new platform.

Before you migrate WooCommerce to Shopify, make sure you:

  • Clean up duplicate or incomplete product data.
  • Identify Shopify app replacements for your most critical plugins.
  • Audit your customer and order data for gaps.
  • Have a clear plan for handling customer functionality.

Migration works best as a planned upgrade, not a rescue operation.

Talk to migration experts for store readiness

WooCommerce vs Shopify Plus: Total Cost of Ownership Compared

Most people compare WooCommerce and Shopify Plus by subscription price alone. That is the wrong comparison. When you look at the total cost of Shopify website development with ownership, the picture looks very different.

WooCommerce Hidden Costs: Hosting, Maintenance, Plugins & Dev Hours

WooCommerce is free to install, but running it at scale is not. Here is what a typical mid-to-large WooCommerce store actually pays:

  • Managed Hosting: $200-$1,500 per month, depending on traffic.
  • Plugin License and Renewals: $2,000-$8,000 per year.
  • Developer Hours: For updates, security patches, and plugin conflicts, 10-20 hours per month.
  • Performance Optimization: Works on the ongoing quarterly cost.
  • Security Incidents: Major core updates that break compatibility, unpredictable spikes.

These costs add up fast, and they are often invisible until someone audits them properly.

Shopify Plus Pricing: What You Actually Pay and What You Get

Shopify Plus starts at $2,500 per month. Here is what that fee includes:

  • Hosting, SSL, and unlimited bandwidth.
  • 99.99% uptime SLA.
  • Shopify Flow Automation
  • Custom checkout via Checkout Extensibility
  • Up to 9 expansion stores
  • A dedicated merchant success manager

For most mid-market brands, this bundle actually replaces $3000-$6000 worth of WooCommerce infrastructure costs every month.

ROI After Migration: Revenue Uplift vs Migration Investment

Shopify Plus stores consistently report conversion rate improvements of 15-30% after migration. This is driven by:

  • Faster page load speeds.
  • A smoother, more reliable checkout experience.
  • Better mobile performance out of the box.

On a store doing $5 million annually, even a 20% conversion uplift adds $1 million in revenue. Against a one-time migration investment of $1,500-$50,000, the payback period is typically under 60 days.

Cost Comparison Table: WooCommerce vs. Shopify Plus Over 3 Years

Cost CategoryWooCommerce (3 Years)Shopify Plus (3 Years)
Hosting$7,200-$54,000Included
Plugin Licenses$6,000-$24,000$3,000-$9,000 (apps)
Developer Maintenance$18,000-$72,000$3,200-$14,400
Security & Compliance$3,000-$12,000Included
Platform Fee$0$90,000
Total Estimated$34,200-$162,000$96,6000-$113,400

At scale, Shopify Plus is often the more cost-effective platform once you factor in developer overhead and ongoing maintenance.

See profit impact after switching to Shopify

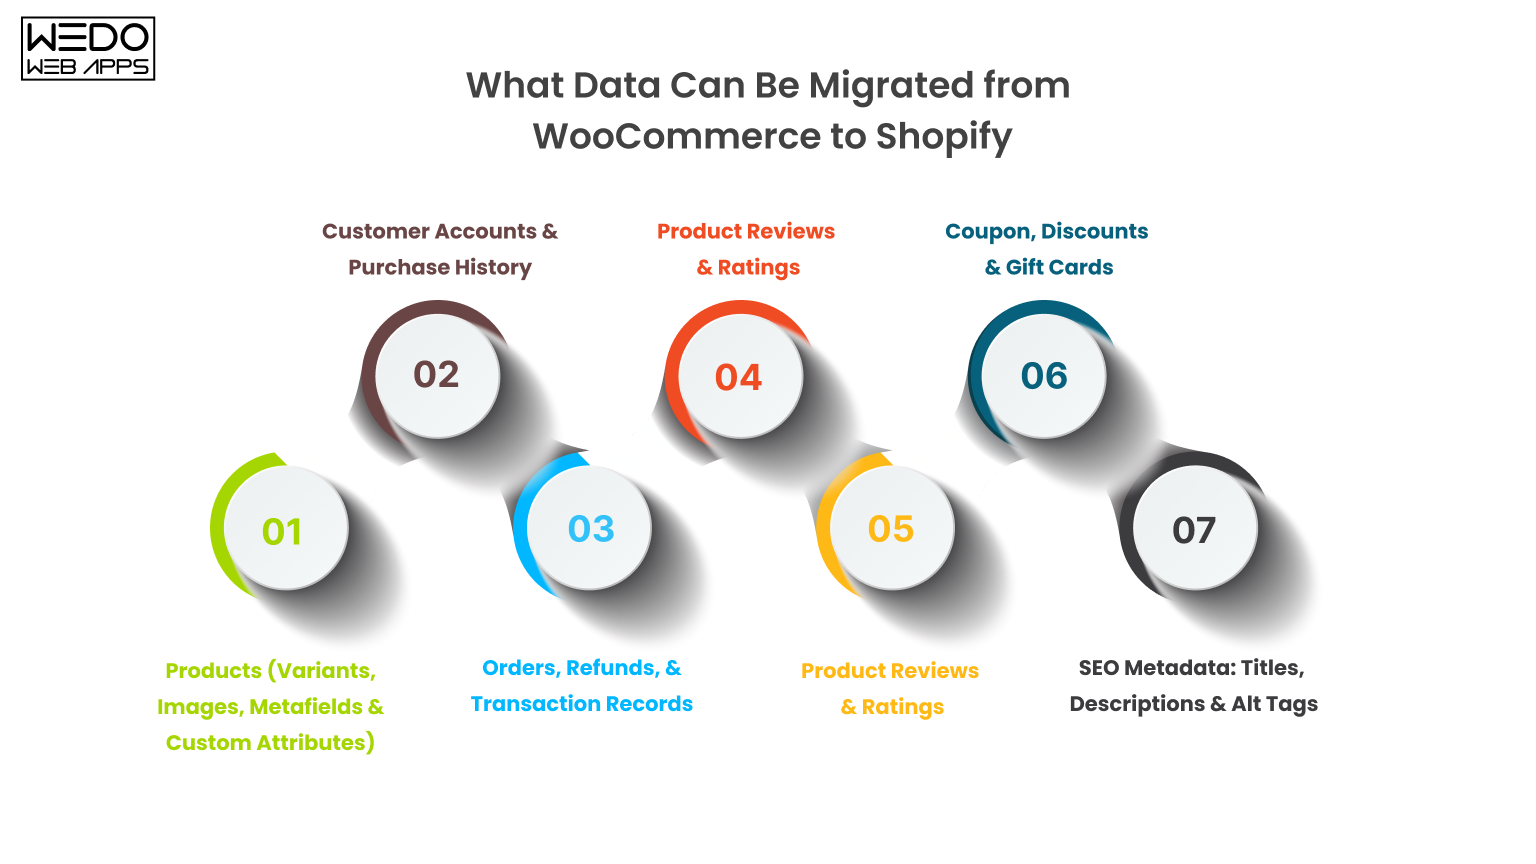
What Data Can Be Migrated from WooCommerce to Shopify?

Products, orders, customers, and SEO data safely

Before you start any export work, you need a clear picture of exactly what is moving, what needs special handling, and what cannot be transferred automatically.

Products (Variants, Images, Metafields & Custom Attributes)

Your full product catalog migrates cleanly, including:

  • Product titles, descriptions, and prices.
  • SKUs and stock levels.
  • Product images and galleries.
  • Variant combinations (size, color, material)
  • Product tags and categories.

Custom metafields and product attributes need extra mapping steps, especially if you used WooCommerce customer fields or ACF integrations.

Customer Accounts & Purchase History

Most customer data transfers without issues:

  • Names, email addresses
  • Billing and shipping addresses
  • Account creation dates and tags

One important exception: Customer password cannot be migrated. Shopify uses a different password hashing system. Your customer will need to reset their password after the WooCommerce to Shopify migration, and you should communicate this clearly before launch.

Orders, Refunds, & Transaction Records

Historical orders can be migrated to keep your reporting and customer service records intact. These include:

  • Order line items and totals
  • Shipping details
  • Refund records

Note: Shopify imports these as archived orders. They will not be editable, and payment statuses will reflect the migrated state rather than live payment gateway data.

Product Reviews & Ratings

Product reviews can be migrated using tools like LitExtension, or through the import functions of Shopify review apps like Judge.me or Yotpo. This step is easy to overlook, but your reviews represent years of social proof and are worth the effort to preserve.

Blog Posts, Pages & Media Files

The following content can all be migrated:

  • Blog posts
  • Static pages (About, Contact, FAQ)
  • Associated images and media

All media files should be re-uploaded to Shopify’s CDN during migration. Do not rely on images still hosted on your WordPress server; that server will eventually be shut down.

Coupon, Discounts & Gift Cards

  • WooCommerce coupon code can be recreated as a Shopify discount code.
  • Gift card balances cannot be automatically transferred; the affected customer needs to be reissued new Shopify gift cards.

SEO Metadata: Titles, Descriptions & Alt Tags

SEO metadata, including meta titles, meta descriptions, and image alt tags, should be exported from WooCommerce (via Yoast or RankMath) and mapped into Shopify’s SEO fields during import. This is one of the most commonly skipped steps in any WooCommerce to Shopify migration, and one of the most damaging if skipped.

What Cannot Be Directly Migrated (And How to Handle Each Gap)

Some things simply do not transfer:

  • WooCommerce plugin configurations must be rebuilt in Shopify.
  • Custom database tables created by the plugin are left behind.
  • Subscription billing cycles must be manually recreated in your Shopify subscriptions app.
  • Complex custom post types may need a Shopify developer to be restructured for Shopify’s data model.

Identify these gaps during your pre-migration audit, not after go-live.

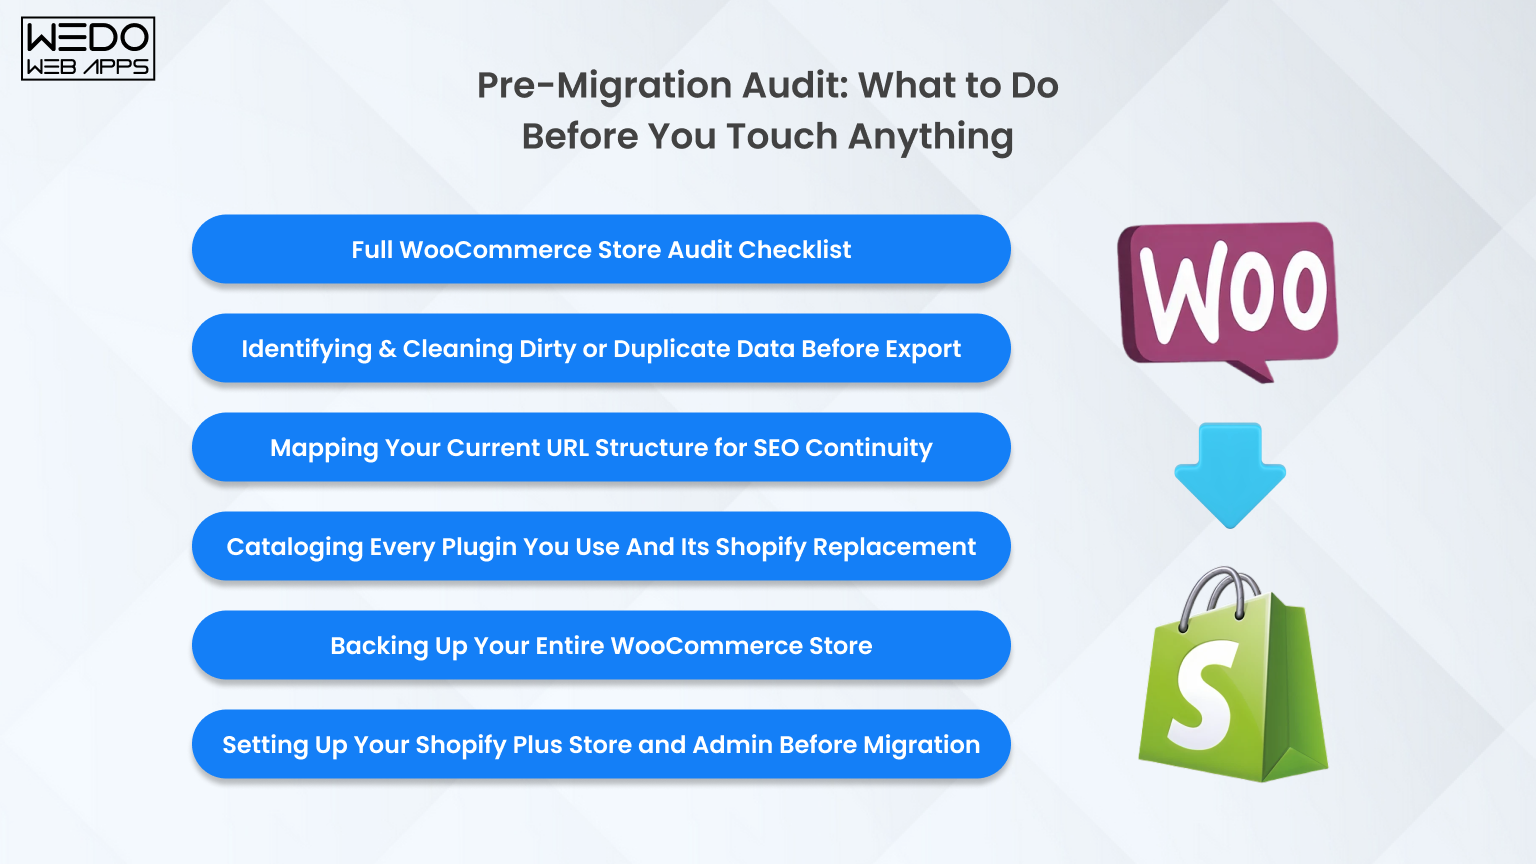
Pre-Migration Audit: What to Do Before You Touch Anything

Check everything before starting your migration

The quality of your migration depends almost entirely on the quality of your preparation. Rushing this phase is the most common reason migrations go wrong.

Full WooCommerce Store Audit Checklist

Start by documenting everything in your current store:

  • Total number of products, customers, and orders.
  • Number of blog posts and static pages.
  • All active plugins and what each one does.
  • Active payment gateways and shipping zones.
  • Any custom code in your theme or functions.php file.

This document becomes your migration reference guide from start to finish.

Identifying & Cleaning Dirty or Duplicate Data Before Export

Before you export anything, clean your data:

  • Remove duplicate SKUs and products.
  • Fix missing or broken product images.
  • Complete any incomplete product descriptions.
  • Merge or remove duplicate customer email addresses.
  • Fill in any missing customer address fields.

Migrating dirty data does not fix it; it just moves the problem to a new platform.

Mapping Your Current URL Structure for SEO Continuity

Export every indexed URL from Google Search Console. Then crawl your WooCommerce site using a tool like Screaming Frog to capture every internal URL. Create a simple spreadsheet with two columns:

  • Old URL (WooCommerce)
  • NEW URL (Shopify)

This WooCommerce to Shopify SEO service allows for a URL redirect map, which is the most important document you will create during the entire migration process.

Cataloging Every Plugin You Use And Its Shopify Replacement

For every active WooCommerce plugin, document:

  • What the plugin does
  • How business-critical it is
  • Whether Shopify has a native equivalent
  • Which Shopify app replaces it
  • Estimated time to set up the replacement

This exercise almost always reveals 3-5 plugins that have no direct Shopify development equivalent and will need custom solutions or workflow changes.

Expert audit ensures smooth Shopify migration

Backing Up Your Entire WooCommerce Store (Step-by-Step)

Before any migration work starts, take a full backup of your WooCommerce database and file system. Use a plugin like UpdraftPlus or take a server-level snapshot. Store the backup in at least two locations, one local, one cloud. This is your safest net. You will probably never need it, but you will be very glad it exists if something goes wrong.

Setting Up Your Shopify Plus Store and Admin Before Migration

Do not wait until after migration to set up your Shopify store. Before data migration begins:

  • Create your Shopify Plus account
  • Configure store settings like currency, timezone, tax, and shipping zones.
  • Install and configure your chosen theme.
  • Set up your key apps so imported data flows into them correctly from day one.

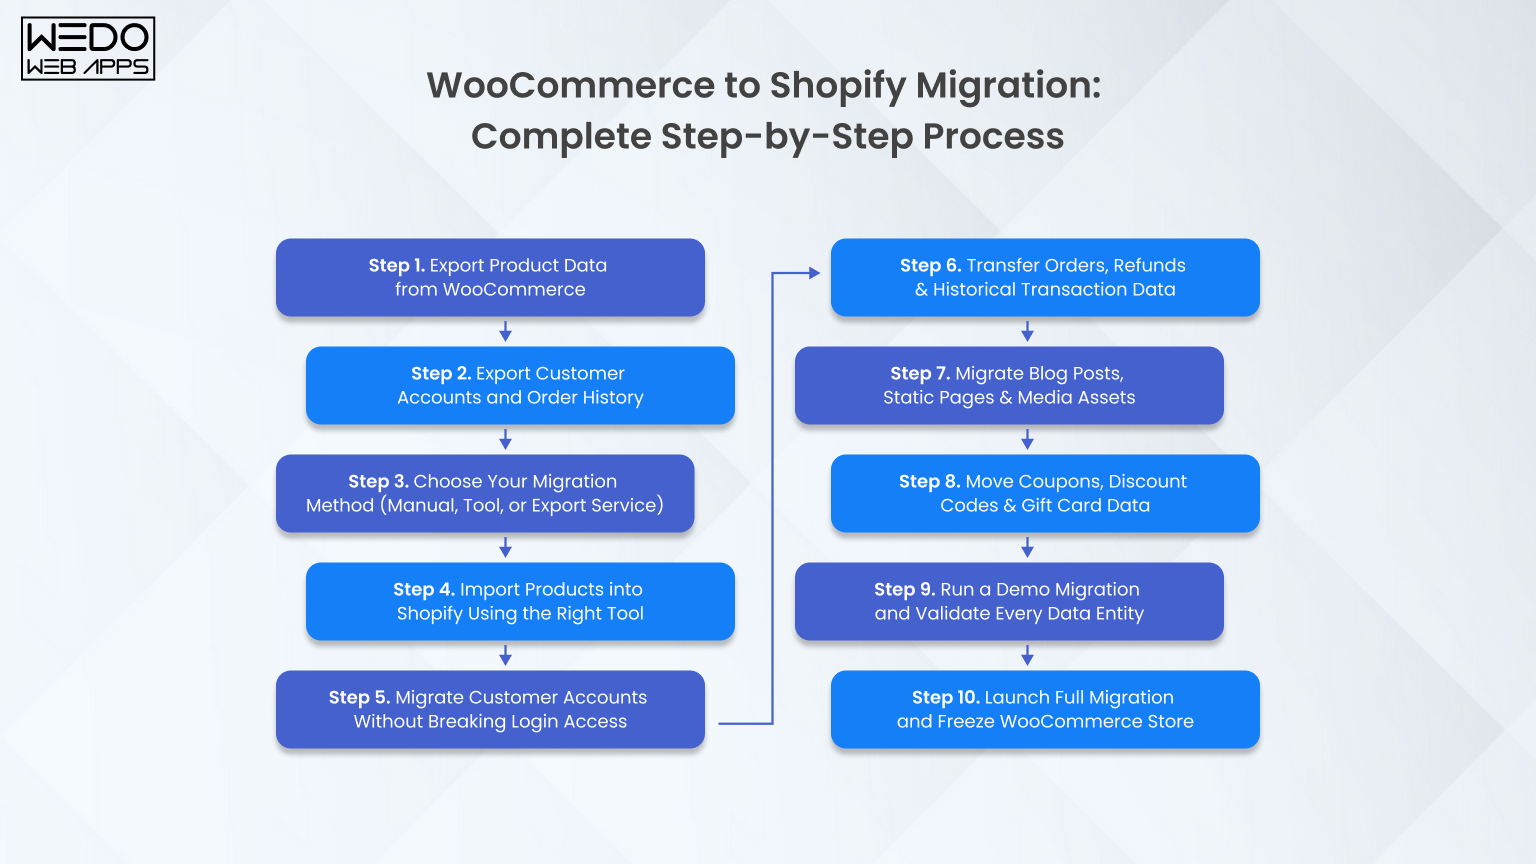
WooCommerce to Shopify Migration: Complete Step-by-Step Process (Including Shopify Plus)

Complete process from start to successful launch

Step 1. Export Product Data from WooCommerce

Use WooCommerce’s built-in product export tool (Product -> Export) to generate a CSV of your full catalog. For stores with complex variable products, metafields, or custom attributes, use a dedicated export plugin like Matrixify’s WooCommerce exporter. It generates a Shopify-compatible format directly and saves significant manual mapping work.

Step 2. Export Customer Accounts and Order History

  • Go to WooCommerce -> Customer and export your customer list as CSV.
  • Go to WooCommerce -> Orders -> Export to download your order history.
  • For a large store with 10,000+ orders, export in batches by date range to keep file sizes manageable.

Step 3. Choose Your Migration Method (Manual, Tool, or Export Service)

There are three ways to move from WooCommerce to Shopify:

  • Manual migration via CSV – best for stores with fewer than 500 simple products.
  • Automated migration tools (Cart2Cart, LitExtension, Matrixify) – best for mid-size stores with moderate complexity.
  • Professional Shopify Plus migration partner – best for large stores, complex customizations, B2B requirements, or zero tolerance for downtime.

Step 4. Import Products into Shopify Using the Right Tool

For simple catalogs, Shopify’s built-in product importer works well. For complex imports, Matrixify (formerly Excelify) gives you the most control. It supports bulk imports of products, collections, metafields, and redirects all from a single spreadsheet. Map your products, collections, metafields, and redirects all from a single spreadsheet. Map your WooCommerce column headers to Shopify’s required fields before you start the import.

Step 5. Migrate Customer Accounts Without Breaking Login Access

Import your customer CSV into Shopify via the customer importer or through Matrixify. After import, send a bulk password reset email to all migrated customers. Be transparent about what is happening. A simple email explaining the platform upgrade and asking customers to set a new password maintains trust and avoids confusion.

Step 6. Transfer Orders, Refunds & Historical Transaction Data

Use Matrixify or a dedicated migration tool to import historical orders. When mapping order statuses:

  • WooCommerce “Processing” -> Shopify “Paid.”
  • WooCommerce “Completed” -> Shopify “Fulfilled.”
  • WooCommerce “Refunded” -> Shopify “Refunded.”

After import, manually verify totals on a sample of 50-100 orders to confirm data accuracy.

Step 7. Migrate Blog Posts, Static Pages & Media Assets

  • Export blog posts as XML from WordPress.
  • Recreate them in Shopify’s blog editor (or use a migration tool).
  • Re-upload all media files to Shopify’s file manager.
  • Update all internal links within blog content to point to their new Shopify URLs.

Do not link images back to your WordPress media library that server will be decommissioned eventually.

Step 8. Move Coupons, Discount Codes & Gift Card Data

Recreate WooCommerce coupon codes as Shopify discount codes. If any WooCommerce coupons had complex conditional logic, such as user role restriction or product combination rules. Test each one in Shopify carefully to confirm it behaves the same way. For gift card balances, generate new Shopify gift cards and notify affected customers directly.

Step 9. Run a Demo Migration and Validate Every Data Entity

Before running the full migration, test with a small subset of data, typically 10 products, 10 customers, and 10 orders. Check:

  • All fields map correctly
  • Product images display properly
  • Variant data is complete and accurate
  • Customer addresses are correct
  • Order totals match
  • SEO metadata fields are populated

Fix any mapping errors before scaling to your full dataset.

Step 10. Launch Full Migration and Freeze WooCommerce Store

Once your demo is validated, run the full migration. Immediately after it completes, put your WooCommerce store into maintenance mode. This prevents new orders from being placed on the old platform while you complete DNS cutover and final testing. Your WooCommerce store should never accept new orders after this point.

Get full migration support with zero data loss

WooCommerce to Shopify Product Data Migration Tool: Which One Should You Use?

Choosing the right WooCommerce to Shopify product data migration tool makes a significant difference in how much manual work is involved and how clean your data lands in Shopify.

Manual CSV Migration: When it Works and When It Breaks

Manual CSV migration works for:

  • Store with fewer than 500 simple products.
  • No customer metafields or complex attributes.
  • A team comfortable working with spreadsheets.

It breaks when you have variable products with complex attribute combinations, custom fields, or more than a few thousand rows. CSV mapping errors at scale can take days to fix.

Automated Migration Tools: How They Work and What They Support

Automated tools connect to your WooCommerce database via API or FTP, extract your data, transform it into Shopify’s format, and push it to your new store, all without manual CSV work.

Most support:

  • Products and variants
  • Customer and order history
  • Blog posts and pages
  • SEO metadata and URL redirects

The quality of the data mapping varies between tools, so always run a demo migration first.

Cart2Cart, Matrixify & LitExtension: Side-by-Side Comparison

FeatureCart2CartMatrixifyLitExtension
ProductYesYesYes
OrdersYesYesYes
CustomersYesYesYes
MetafieldsNoYesLimited
SEO URLsYesYesYes
RedirectsYesYesYes
ReviewsYesNoYes
PricingPre migrationSubscriptionPre migration
Best ForSpeedComplex dataLarge catalogs

Custom Migration for Complex or Large WooCommerce Stores

For stores that are developed with dedicated WooCommerce developers, allow for setups, complex B2B pricing rules, multi-warehouse inventory, ERP integrations, or custom post types. Off-the-shelf tools will not handle the full migration cleanly. A custom migration built by a certified Shopify Plus migration partner is the right investment at this level of complexity.

How to Validate Your Product Data After Import

After import, run a spot-check across five areas:

  • Count check: Total products in Shopify matched WooCommerce
  • Image check: No broken or missing product images
  • Variant check: All size, color, and material combinations are present
  • Pricing check: Compare 20 products manually against WooCommerce
  • Inventory check: Spot-check 20 SKUs against WooCommerce stock levels

WooCommerce to Shopify SEO URL Redirect Mapping: Protecting Every Ranking You’ve Built

SEO is the highest-risk element of any platform migration. A missed redirect is a lost ranking. At scale, missing redirects means lost revenue.

Why Platform Migrations Kill SEO (And How to Prevent It)

When you move from WooCommerce to Shopify, your URLs change. Google has indexed your old URLs. If those old URLs return a 404 error instead of redirecting to their new equivalents, Google drops them from its index. Depending on how many pages are affected, you can lose 20-60% of your organic traffic within weeks of going live. This is entirely preventable, but only if you treat SEO as a core migration deliverable from day one.

Building Your WooCommerce to Shopify SEO URL Redirect Map

Follow these steps to build your WooCommerce to Shopify SEO URL redirect map:

  1. Export all indexed URLs from Google Search Console.
  2. Crawl your WooCommerce site with Screaming Frog to capture every internal URL.
  3. Create a spreadsheet with two columns: Old URL and New URL.
  4. Map every product page, collection page, blog post, and static page.
  5. Pay special attention to category pages; WooCommerce uses/product-category/name/ while Shopify uses /collections/name.

How to Set Up 301 Redirects in Shopify (Bulk & Individual)

  • Individual redirects: Shopify Admin -> Navigation -> URL Redirects -> Add URL Redirect.
  • Bulk redirect: Upload a CSV file with two columns, “Redirect from” and “Redirect to,” via Shopify’s bulk redirect importer or through Matrixify.

Upload your full redirect file before DNS cutover so every redirect is live the moment your new store goes public.

Migrating SEO Metadata: Page Titles, Descriptions & Structured Data

Export your Yoast or RankMath SEO data from WooCommerce as CSV. Then map:

  • Meta title -> Shopify’s SEO title field
  • Meta descriptions -> Shopify’s meta description field
  • Image alt tags -> Shopify’s image alt text field

For large catalogs, use Matrixify to bulk-import SEO metadata. Do not rely on Shopify to auto-generate meta descriptions from product copy, as they are rarely optimized for search.

Handling Shopify’s URL Structure Limitations (/products/,/collections/)

Shopify uses a fixed URL structure that you cannot change:

  • Products -> /product/handle
  • Collections -> /collections/handle
  • Blog posts -> /blogs/blog-name/post-handle

If your WooCommerce store used flat URLs (e.g.,/product/name), every single one of those URLs needs a redirect entry. Factor this into your redirect map from the very beginning.

Canonical Tags, Herflang & Sitemaps Submission Post-Migration

  • Shopify automatically generated canonical tags for all pages, which prevents duplicate content issues.
  • If you run multiple language or regional stores, configure herflang tags through your translation app (Weglot or Langify)
  • After migration, submit your Shopify sitemap (yourdomain.com/sitemap.xml) to Google Search Console and Bing Webmaster Tools immediately.

Post-Migration SEO Audit: What to Check in the First 30 Days

Within 30-days of going live:

  • Run a full crawl with Screaming Frog to identify any remaining 404 errors.
  • Check Google Search Console for coverage errors and redirect chains longer than 2 hops.
  • Monitor your top 20 keywords rankings weekly using your rank tracking tool.
  • Compare organic traffic week-over-week versus the same period last year.
  • Any significant traffic drop required immediate investigation.

Preserve URLs, rankings, and traffic safely

Shopify Plus App Replacements for WooCommerce Plugins

One of the most underestimated challenges of moving from WooCommerce to Shopify Plus is replacing your plugin stack. Your WooCommerce store’s functionality is built on plugins. Shopify is built on apps. They are not a one-to-one match.
How to Audit Your WooCommerce Plugin Stack Before Migrating

For every active plugin, document:

  • What it does in plain terms
  • Whether it touches your database or modifies checkout
  • How critical it is to daily operations
  • Whether a Shopify equivalent exists
  • How long will it take to set up the replacement

Sort your plugins into three categories: directly replaceable, partially replaceable, and no direct equivalent. The third category drives your custom development budget.

Essential WooCommerce Plugin to Shopify App Replacement Map

SEO Plugins – Yoast to Shopify SEO Apps

Yoast’s core features, like meta titles, meta descriptions, XML sitemaps, and breadcrumbs, are largely handled natively by Shopify. For advanced SEO needs like structured data and bulk metadata editing, Plug In SEO or SEO Manager are the leading replacements.

Page Builders – Elementor to Shopify Theme Sections or PageFly

Elementor’s drag-and-drop editing is replaced by Shopify’s native Online Store Editor with sections and blocks. For pages that need more layout flexibility, PageFly or Shogun offer Elementor-style control within Shopify.

Subscription Plugins – To Recharge or Shopify Subscriptions

WooCommerce Subscription is replaced by either Recharge (the market leader for complex subscription models) or Shopify’s native subscription feature (for straightforward recurring billing). Active billing cycles must be manually recreated in your new subscriptions platform plan this carefully.

Membership Plugins – To Bold Memberships or Locksmith

WooCommerce Memberships are replaced by Bold Memberships or Locksmith on Shopify. Both support gated content, member-only pricing, and tiered access, but the configuration logic is different enough that a full rebuild is required.

Wholesale & B2B Plugins – To Shopify Plus Native B2B

WooCommerce wholesale plugins are replaced by Shopify Plus’s native B2B functionality, which supports company accounts, custom price lists, net payment terms, and purchase order workflows, all without a third-party app. This is one of the biggest advantages of migrating to Shopify Plus specifically.

Advanced Reporting Plugins – To Shopify Analytics or Glew

WooCommerce reporting plugins are replaced by Shopify’s built-in analytics for standard eCommerce metrics, combined with Glew.io or Daasity for advanced cohort analysis, LTV reporting, and cross-channel attribution.

WooCommerce Plugins With No Direct Shopify Equivalent: What to Do

Some WooCommerce plugins solve problems that Shopify handles differently or does not address natively. These typically include:

  • Complex product configurators
  • Highly custom pricing engines
  • Deep ERP integrations with legacy systems

These gaps require either a custom Shopify app or a bespoke Shopify Function. Budget for this work before migration begins, not after you discover the gap.

Get app replacement strategy tailored to your store

Payment Gateway Setup After Moving from WooCommerce to Shopify Plus

Shopify Payments – Setup, Eligibility & What It Replaces

Shopify Payments is Shopify’s built-in payment processor, powered by Stripe. The main advantages:

  • Eliminates transaction fees that apply when using third-party gateways.
  • Integrates directly with your Shopify dashboard.
  • Supports accelerated checkouts: Shop Pay, Apple Pay, and Google Pay.
  • Available in 23+ countries.

If you are eligible, activating Shopify Payments should be your first step in the payment setup process.

Migrating from WooCommerce Payment Gateways (Stripe, PayPal, & Others)

  • Stripe users: Your existing Stripe account connects directly to Shopify Payments.
  • PayPal users: PayPal integrates as a separate payment method within Shopify’s checkout settings.
  • All gateways: Statement descriptions, capture settings, and 3D Secure preferences must be reconfigured in Shopify.

Setting Up Multiple Currencies and Markets on Shopify Plus

Shopify Plus Markets lets you sell in multiple currencies and regions from a single store, with:

  • Localized pricing per market
  • Checkout currency conversion
  • Regional domain or subfolder support

Configure your marketplace before launch day so international customers experience correct local pricing from the very first visit. This is one of the most powerful advantages Shopify Plus has over a typical WooCommerce multi-currency setup.

B2B Payment Terms and Net Payment Options on Shopify Plus

Shopify Plus native B2B supports net payment terms – Net 15, Net 30, Net 60 on a per-company basis. This means:

  • No third-party B2B payment plugin needed.
  • Payment terms integrate directly into the checkout for approved wholesale accounts.
  • Company profiles and payment terms are managed from your Shopify Plus admin.

Set up company profiles and assign payment terms before migrating your wholesale customer base.

Testing Every Checkout Flow Before Going Live

Before DNS cutover, test every payment method you offer:

  • Credit card
  • PayPal
  • Shop Pay
  • Any BNPL options like Klarna or Afterpay
  • Gift card redemptions
  • Subscription billing triggers
  • Failed payment recovery flows

Do not go live until every single checkout path is confirmed to work.

Post-Migration QA Testing: Validate Everything Before You Go Live

QA testing is not optional. It is your last line of defence before real customers experience your new store. Build a checklist, assign ownership to specific team members, and do not skip anything.

Product Page QA – Images, Variants, Pricing & Inventory

For a sample of 50-100 products (including your top sellers), verify:

  • All images display correctly and at the right quality.
  • All product variants are present and selectable.
  • Prices are accurate, including sale prices.
  • Inventory levels match WooCommerce.
  • Product descriptions are complete and properly formatted.
  • SEO metadata fields are populated.

Customer Account QA – Login, Password Reset & Order History Access

  • Create a test customer account and verify the login flow works.
  • Trigger a password reset and confirm the email arrives correctly.
  • Log in to a migrated customer account and verify that historical orders are visible.
  • Check that billing and shipping addresses have migrated correctly.

Order & Checkout Flow Testing (Including Edge Cases)

Place test orders covering:

  • Standard checkout with a credit card
  • Check out with a discount code applied
  • Check out with a gift card applied
  • Check out using Shop Pay
  • Guest checkout (no account required)

Confirm that order confirmation emails are sent correctly and that each order appears in the Shopify admin with the right status.

Redirect Testing – Every Old URL Must Land Somewhere

Using a bulk URL checker or Screaming Frog, test every URL in your redirect map. Every old URL should:

  • Return a 301 status (permanent redirect).
  • Resolve to the correct new Shopify URL.

Any URL returning a 404 needs an immediate redirect added. Complete this step before DNS cutover.

Speed & Performance Testing on Shopify Plus

Run your homepage, a collection page, and your top product page through Google PageSpeed Insights and GTmetrix before launch. Target:

  • LCP (Largest Contentful Paint): under 2.5 seconds
  • FID (First Input Delay): under 100ms
  • CLS (Cumulative Layout Shift): under 0.1

If scores are poor, investigate large image files, render-blocking scripts, and app JavaScript conflicts before going live.

Mobile Responsiveness & Cross-Browser QA

Test every key page on:

  • iOS Safari
  • Android Chrome
  • Desktop Chrome, Firefox, and Safari

Pay close attention to product image galleries, the cart drawer, and the checkout flow on mobile; these are where most issues appear. Use BrowserStack for systematic cross-browser testing if your team does not have all devices available.

Analytics, Tracking Pixels & Tag Manager Verification

Before launch, confirm:

  • Google Analytics 4 is firing correctly on all pages, including the order confirmation page (purchase event).
  • Meta Pixel is sending PageView, AddToCart, InitiateCheckout, and Purchase events.
  • Google Tag Manager container is deployed, and all tags are firing correctly.

Use GA4 DebugView and Meta Pixel Helper to verify these in real time.

Expert team validates every detail before launch

Launch Day Checklist – Going Live on Shopify Plus

Pre-Launch Final Verification (48 Hours Before)

Forty-eight hours before DNS cutover, confirm all of the following:

  • All redirects are uploaded and tested.
  • All payment gateways are live and verified with test transactions.
  • All transactional emails are configured and are being sent correctly.
  • All analytics and tracking pixels are verified.
  • Inventory levels are synced and accurate.
  • Customer launch communication is ready to send.

DNS Cutover – How to Switch Domains Without Downtime

In Shopify, add your custom domain under Online Store -> Domains. Follow Shopify’s instructions to update your A record and CNAME with your domain registrar. DNS propagation typically takes 24-48 hours, but is often faster. During propagation:

  • Keep WooCommerce in maintenance mode to prevent split orders.
  • Monitor both platforms to see when Shopify fully takes over.

Notifying Customers About the New Store Experience

Send a launch email to your full customer list covering:

  • The platform upgrade and what has changed.
  • The need to reset their password (with a direct reset link).
  • Any improvements they will notice faster checkout, better mobile experience, and new features.

This email reduces support tickets and builds goodwill around the transition.

Monitoring the First 24 Hours Post-Launch

Assign someone to actively monitor the following for the full first 24 hours:

  • Live orders coming through the Shopify admin.
  • Check the checkout conversion rate in Shopify Analytics.
  • Customer support channels for login or checkout issues.
  • Google Analytics real-time for unexpected traffic drops or bounce rate spikes.

Have your development team on standby for the first 48 hours after launch.

Submitting Your New Sitemap to Google & Bing

Immediately after DNS cutover:

  • Log in to Google Search Console and submit your sitemap at yourdomain.com/sitemap.xml
  • Do the same in Bing Webmaster Tools.
  • Use the URL Inspection tool to request indexing of your homepage, top collection pages, and top product pages.

Google will typically begin recrawling your site within hours of sitemap submission.

The 90-Day Post-Launch Performance Roadmap

Going live is not the finish line. Follow this post-launch roadmap:

  • Weeks 1-2: Monitor and fix any 404 errors flagged in Search Console.
  • Weeks 3-4: Review conversion rate by device and traffic source; identify checkout drop-off points.
  • Month 2: Run a full SEO audit comparing keyword rankings against your pre-migration baseline.
  • Month 3: Review app performance and costs against your old WooCommerce plugin costs; optimize your tech stack.

WooCommerce to Shopify Plus Migration Checklist

Use this as your master reference throughout the entire WooCommerce to Shopify Plus migration. Each section maps to the corresponding guide section above.

Pre-Migration Checklist

  • Complete WooCommerce store audit (products, customers, orders, plugins, pages).
  • Back up WooCommerce database and file system (two locations).
  • Export all indexed URLs from Google Search Console.
  • Build a full WooCommerce to Shopify SEO URL redirect map.
  • Clean all product and customer data before export.
  • Catalog all active plugins and identify Shopify Plus app replacements.
  • Set up a Shopify Plus account and configure basic store settings.
  • Install and configure the Shopify theme before migration begins.

Data Migration Checklist

  • Export products via CSV or WooCommerce to Shopify product data migration tool.
  • Export customers and full order history.
  • Run demo migration and validate all data entities.
  • Import products: verify images, variants, and pricing.
  • Import customers: verify addresses and account data.
  • Import orders: verify totals, statuses, and line items.
  • Migrate blog posts and static pages.
  • Re-upload all media to Shopify CDN.
  • Recreate coupons and discount codes.
  • Handle gift card balances for affected customers.

SEO Migration Checklist

  • Upload the complete 301 redirect map to Shopify.
  • Test all redirects, no 404 responses remaining.
  • Import all SEO metadata (titles, descriptions, alt tags).
  • Verify canonical tags on all pages.
  • Configure hreflang tags if applicable.
  • Submit the new sitemap to Google Search Console and Bing.

App & Plugin Replacement Checklist

  • SEO app installed and configured.
  • Page builder or theme editor configured.
  • Subscription app installed; billing cycle recreated.
  • Membership app installed and configured (if applicable).
  • Shopify Plus native B2B configured for wholesale accounts.
  • Reporting tools connected and verified.
  • All custom plugin gaps identified and resolved.

QA Testing Checklist

  • Product pages verified (images, variants, pricing, inventory).
  • Customer login and password reset flow tested.
  • Order history visible in migrated customer accounts.
  • All checkout flows tested (card, PayPal, Shop Pay, discount code, gift card).
  • All redirects are returning 301 with correct destinations.
  • PageSpeed scores, reviews, and Core Web Vitals met.
  • Mobile and cross-browser testing complete.
  • Analytics and tracking pixels verified.

Launch Day Checklist

  • All pre-launch verifications are complete (48 hours before).
  • WooCommerce store set to maintenance mode.
  • DNS cutover initiated.
  • Customer launch email sent (with password reset link).
  • Live monitoring is assigned for the first 24 hours.
  • Sitemap submitted to Google and Bing.
  • Development team on standby for the first 48 hours.

Download the complete WooCommerce to Shopify Plus Migration Checklist as a free printable PDF.

Why Work With a Certified Shopify Plus Migration Partner?

A certified Shopify Plus migration partner brings hands-on experience from dozens or hundreds of previous migrations. They know exactly which data mapping edge cases cause problems, have pre-built tooling for complex data, app configuration, QA testing, and launch.

Zero Downtime Migration: How it is Actually Achieved

Zero downtime migration means your WooCommerce store keeps operating normally right up until the DNS cutover moment. Here is how it works:

  • All migration work happens on your new Shopify store in parallel.
  • Immediately before cutover, a final delta sync captures any new orders or customers created after the initial migration.
  • DNS is switched, WooCommerce is frozen.
  • The window where neither store is fully live is measured in minutes, not hours.

Zero Data Loss Guarantee: What That Means in Practice

A zero data loss guarantee means every product, customer record, and order in your WooCommerce store is present and accurate in Shopify after migration. Achieving this requires:

  • A validation process that compares total record counts across every entity type.
  • Field-level spot-checks to confirm data accuracy, not just presence.
  • Any discrepancy is investigated and resolved before the migration is signed off.

Shopify Plus Partner vs. Freelancer: How to Choose the Right One

A Shopify Plus Partner agency has been vetted by Shopify for technical ability, client outcomes, and business stability. Key differences versus a freelancer:

  • Proven migration methodology and formal QA process.
  • Backup team resource if something goes wrong mid-project.
  • Experience migrating stores across industries and store sizes.
  • Greater accountability and contractual protection.

For a migration involving significant revenue, years of customer data, and hard-won SEO rankings, the risk profile of who you hire matters as much as the price.

Conclusion: Plan It Right, Migrate Once, & Scale Faster

The decision to WooCommerce to Shopify Plus is more than a platform change. It is about building a store that performs better and scales without constant technical effort.

If you plan to migrate WooCommerce to Shopify, focus on preparation, clean data, and proper testing. A well-managed WooCommerce to Shopify migration protects your SEO, customer data, and revenue from day one.

Brands that succeed when moving from WooCommerce to Shopify follow a structured process and avoid rushing the launch with the help of the right eCommerce developers. When you move from WooCommerce to Shopify with the right approach, you get faster performance, a smoother checkout, and a system ready for growth.

Keep the process simple, validate every step, and launch with confidence.

Migrate with zero downtime and full SEO safety

Multi-Vendor Marketplace Platform: Feature, Cost, & Development Guide

Introduction

What if your platform did not just sell products, but allowed hundreds of sellers to build their own businesses within it?

This is exactly what a multi-vendor marketplace platform enables, where multiple sellers operate independently while everything is managed under one system. Instead of running a single online shop solution, businesses are now moving towards building a scalable multi-vendor eCommerce website that supports multiple vendors, products, and transactions in one place.

A modern multivendor eCommerce platform is not just about maintaining a list of products. It requires a structured workflow for vendor management, commission handling, and payment processing to ensure smooth operations across all users.

For businesses planning to build a marketplace app, one of the first considerations is understanding the marketplace app development cost. The total cost of building a marketplace website depends on features, technology stack, and whether the solution is basic or part of full-scale multi-vendor eCommerce marketplace development.

This guide explains how to approach, how to create a multi-vendor marketplace website, what features matter most, and how different decisions impact the final development cost and scalability of your platform.

Validate your idea before investing in development

What is a Multi-Vendor Marketplace Platform?

A multi-vendor marketplace platform is a system where multiple sellers can register, list their products, and manage their own stores within a single platform. Instead of a single seller controlling everything, the platform brings together different vendors while the owner manages the overall system, transactions, and rules.

This model powers platforms like Amazon and Etsy, where growth comes from multiple sellers working under one structured ecosystem.

Meaning of Multi-Vendor eCommerce Marketplace

A multi-vendor eCommerce marketplace allows different sellers to operate independently while sharing the same storefront environment. Customers can browse products from multiple vendors, compare options, and complete purchases through a single checkout system.

The platform owner earns revenue through commissions, listing fees, or subscription models, while maintaining control over operations.

How a Multi-Vendor eCommerce Website Works

A multi-vendor eCommerce website follows a simple but structured flow:

  • Vendors register and set up their stores.
  • Products are listed and managed individually by sellers.
  • Customers browse and place orders from multiple vendors.
  • Payment is processed and split between vendors and platform owners.
  • Vendor fulfills orders and manages delivery.

This system becomes efficient when you build a marketplace app with proper automation for orders, payments, and commissions.

Types of Multi-Vendor Marketplace Models

Different business goals lead to different marketplace structures. The most common models include:

ModelsDescriptionExample
B2C Marketplace ModelBusinesses sell products directly to customers through multiple vendors.Retail-focused platforms with wide product categories.
B2B Marketplace ModelBusinesses sell bulk products or services to other businesses.Wholesale or industrial supply platforms.
C2C Marketplace ModelIndividuals sell products or services to other individuals.Resale and peer-to-peer selling platforms.
Service-Based Marketplace ModelVendors offer services instead of physical products.Freelance, booking, or on-demand service platforms.

Each model influences how you approach multi-vendor eCommerce marketplace development, especially in terms of features, workflows, and user experience design.

Why Businesses Are Moving Toward Marketplace Models

Businesses are shifting toward a multivendor eCommerce platform because it allows them to:

  • Scale without holding inventory.
  • Earn from multiple vendors through commissions.
  • Expand product offerings quickly.
  • Build a network-driven business model.

This makes it a preferred approach for startups and enterprises planning to build a marketplace app.

Key Benefits of a Multi-Vendor Marketplace Platform

A strong multi-vendor marketplace platform offers:

  • Centralized control with decentralized selling.
  • Automated commission tracking.
  • Flexible vendor management.
  • Higher scalability compared to single-store systems.
  • Multiple revenue streams for platform owners.

Understanding the marketplace structure and benefits allow to make the actual decision.

Essential Features of a Multi-Vendor Marketplace Platform

The success of a multi-vendor marketplace platform depends on how well its features are structured for three key users: customers, vendors, and admins. Each group interacts with the platforms differently, so the features must be designed to keep operations smooth while supporting growth.

Instead of adding everything at once, focus on features that directly impact usability, vendor management, and revenue flow when you build a marketplace app.

Customer Side Features

These features define how buyers interact with your multi-vendor eCommerce website. A smooth customer experience directly impacts conversions and retention.

Key customer features include:

  • Advanced product search and filters: Helps users quickly find products across multiple vendors.
  • Cart and unified checkout system: Allows purchasing from different sellers in a single order.
  • Order tracking and history: Gives transparency after purchase.
  • Reviews and ratings system: Builds trust between buyers and vendors.
  • Wishlist and saved items: Encourages repeat visits and future purchases.

Vendor Dashboard Features

Vendors are the backbone of any multivendor eCommerce platform. A strong dashboard helps them manage their business without relying on the admin.

Important vendor features:

  • Product management system: Add, edit, and organize product listings easily,
  • Inventory and stock control: Prevent overselling and track availability.
  • Order management dashboards: Accept, process, and update orders.
  • Earnings and payout tracking: Clear visibility of revenue and commissions.
  • Store customization options: Allow vendors to manage branding and presentation.

Admin Panel Features

The admin controls the entire multi-vendor eCommerce development system. This panel ensures smooth operations and platform governance.

Core admin features include:

  • Vendor onboarding and approval system: Control who can sell on the platform.
  • Commission management system: Set and adjust platform fees.
  • Order and transaction monitoring: Track all activities across the platform.
  • Dispute and refund management: Handle conflicts between buyers and vendors.
  • Analytics and reporting dashboards: Monitor performance, sales, and growth.

Advanced Marketplace Features

Once the core system is stable, advanced features can improve scalability and user experience.

Key advanced features:

  • Multi-language and multi-currency support: Expand reach to global markets.
  • AI-based product recommendations: Improve product discovery and conversions.
  • Integrated notification system: Real-time updated via email, SMS, or in-app alerts.
  • Mobile app compatibility: Extend platform access across devices.

Every feature of eCommerce you add increases the overall cost of building a marketplace website. A basic feature set helps launch faster, while advanced features increase both complexity and the marketplace app development cost.

That is why most businesses start with an MVP and gradually expand based on user demand and platform growth.

Talk to experts about features tech stack and cost

Marketplace Features Comparison Table

Choosing the right approach for your multi-vendor marketplace platform is not just about cost. It is about how well the platform supports essential features like vendor management, commission handling, and scalability over time.

Different solutions, such as Magento, WooCommerce, and custom-built systems, offer varying levels of flexibility. This comparison will help you understand what you actually get when you build a marketplace app using each option.

Feature Comparisons Across Marketplace Platforms

FeaturesMagento MarketplaceWooCommerce MultivendorCustom Marketplace
Vendor DashboardAdvanced and scalablePlugin-based functionalityFully customizable
Product ManagementStrong and flexibleModern with pluginsTailored to business needs
Commission EngineBuilt-in configuration optionsDepends on pluginsFully custom logic
Payment Split SystemRequires third-party integrationPlugin-supportedCustom-built integrations
Order ManagementRobust and enterprise-readyBasic to moderateFully optimized workflow
Review & RatingsBuilt-in supportPlugin-basedFully customized
Analytics & ReportingAdvanced insightsLimited without extensionsCustom dashboards
ScalabilityHighMediumVery High
CustomizationModerate to highLimited by pluginsUnlimited flexibility
Development CostHighLow to mediumHigh

What This Comparison Means for Your Business

  • Magento is suitable for businesses that need a stable and scalable multivendor eCommerce platform with strong built-in capabilities.
  • WooCommerce works well for smaller projects or MVPs with limited budgets.
  • Custom development is ideal when you want full control over features and long-term scalability in your multi-vendor eCommerce marketplace development.

How to Choose the Right Platform

Your decision should depend on:

  • The complexity of your marketplace.
  • Your budget and expected marketplace app development cost.
  • The level of customization required.
  • Long-term scalability plans.

If your goal is to launch quickly, a plugin-based system may work. But if you are planning a scalable multi-vendor eCommerce website, investing in a more flexible solution can provide better results over time.
Vendor Onboarding Workflow for Marketplace Platforms

A strong vendor onboarding process decides how quickly your multi-vendor marketplace platform can grow. If onboarding is slow or complicated, vendors drop off before they even start selling. If it is too loose, the platform risks low-quality sellers and poor customer experience.

The goal is simple. Make it easy for the right vendor to join, while keeping enough control to maintain platform quality.

Step-by-Step Vendor Onboarding Process

A structured onboarding flow ensures consistency across your multi-vendor eCommerce website.

Typical onboarding steps include:

  • Vendor Registration: Sellers create accounts with basic business details.
  • Profile and Store Setup: Vendors add store information, branding, and contact details.
  • Verification and Approval: Identity checks and document validation before activation.
  • Product Listing Setup: Identify checks and document validation before activation.
  • Go Live and Start Selling: Approved vendors can begin receiving orders.

This process should be simple enough to encourage signups, but controlled enough to protect platform standards.

Automated Vendor Onboarding for Scale

As your multivendor eCommerce platform grows, manual onboarding becomes a bottleneck. Automation helps reduce delays and improve efficiency.

Automation can include:

  • Auto-approval rules for selected vendor categories.
  • Predefined product listing templates.
  • Real-time document verification.
  • Guided onboarding dashboards.

When you build a marketplace app, adding automation early can save time and reduce operational effort as vendor numbers increase.

Common Vendor Onboarding Challenges

Even well-designed systems face issues during onboarding. Some common challenges include:

  • Incomplete vendor profiles: Missing details delay approval and listing.
  • Fake or low-quality sellers: Weak verification can impact trust.
  • Approval delays: Manual processes slow down vendor activation.
  • Product quality inconsistency: Poor listings affect the overall platform experience.

Addressing these early issues improves the quality of your multi-vendor eCommerce marketplace development and builds long-term trust.

How Onboarding Impacts Marketplace Growth

A smooth onboarding workflow directly affects:

  • Number of active vendors on the platforms.
  • Product variety and availability.
  • Customer trust and experience.
  • Overall platform scalability.

A well-optimized onboarding system helps you scale faster without increasing operational complexity or the cost of building a marketplace website unnecessarily.

Build a trusted system vendors want to join

Marketplace Commission Engine Development

The commission engine is the revenue backbone of any multi-vendor marketplace platform. It defines how much the platform earns from every transaction and how payouts are distributed to vendors.

Without a well-structured commission system, even a feature-rich multi-vendor eCommerce website can struggle to generate consistent revenue. That is why this component needs to be planned early when you build a marketplace app.

What is a Commission Engine in Marketplace Platforms

A commission engine is the logic that automatically calculates the platform’s share from each order placed on the marketplace.

Every time a customer makes a purchase:

  • The total value is calculated.
  • The platform deducts its commission.
  • The remaining amount is assigned to the vendor.

This process runs in the background and is a core part of any multivendor eCommerce platform.

Types of Commission Models

Different marketplaces use different revenue models based on their business goals.

Common commission structures include:

Commission ModelDescription
Percentage-Based CommissionA fixed percentage is deducted from each sale.
Fixed Fee per OrderA flat fee is charged regardless of order value.
Subscription-Based ModelVendors pay a monthly or yearly fee to sell.
Hybrid ModelCombination of commission + subscription or listing fees.

Choosing the right model depends on how you plan to scale your multi-vendor eCommerce marketplace development.

How Commission Calculation Works

A simple commission flow looks like this:

  • Customer places an order.
  • Total order value is recorded.
  • Platform commission is calculated.
  • Remaining amount is allocated to the vendor.

This entire process is automated when you build a marketplace app with a proper commission engine.

Advanced Commission Rules for Better Control

As your marketplace grows, basic commission models may not be enough. Advanced rules allow more flexibility and control.

Examples include:

  • Category-based commission rates.
  • Vendor-specific commission tiers.
  • Seasonal or promotional commission adjustments.
  • Performance-based incentives for top vendors.

These strategies help optimize revenue without increasing the overall cost of building a marketplace website significantly.

Why Commission Engine Impacts Marketplace Profitability

A well-designed commission system directly affects:

  • Platform revenue generation.
  • Vendor satisfaction and retention.
  • Pricing competitiveness.
  • Long-term scalability of the platform.

If the commission is too high, the vendor may leave. If it is too low, the platform may struggle to sustain operations.

A properly planned commission engine ensures your multi-vendor marketplace platform remains profitable while still attracting and retaining quality vendors.

Marketplace Payment Split Integration (Stripe Connect Explained)

Handling payments correctly is one of the most critical parts of any multi-vendor marketplace platform. Since multiple vendors are involved, the system must ensure that transactions are split accurately and payouts are handled without delays.

A well-maintained payment system not only improves trust but also keeps operations smooth across your multi-vendor eCommerce website.

What is Payment Split in Multi-Vendor eCommerce Platforms?

Payment split is a mechanism where a single customer payment is automatically divided between the platform and the vendor.

In a typical flow:

  • Customer pays the full order amount.
  • The platform deducts its commission.
  • The remaining balance is assigned to the vendor.
  • Payout is processed based on defined timelines.

This process is essential when you build an on-demand marketplace solution that handles multiple vendors and transactions.

How Stripe Connect Works for Marketplace Platforms

Stripe Connect is designed to manage platforms in marketplace systems where multiple parties are involved.

Here is how it works within a multivendor eCommerce platform:

  • Vendor onboarding: Sellers create or connect their payment accounts directly through the platform.
  • Payment collection: The platform collects the full payment from the customer at checkout.
  • Automatic split calculation: Commission is deducted based on predefined rules.
  • Fund distribution: The remaining amount is routed to the vendor’s account.
  • Payout management: Vendors receive payments based on scheduled or instant payout settings.

This entire process runs in the background, reducing manual effort and ensuring accuracy across your multi-vendor eCommerce marketplace development.

Alternative Payment Gateway Option

While Stripe is widely used, other payment solutions can also support split transactions:

  • PayPal for global transactions.
  • Razorpay for regional payment handling.
  • Adyen for enterprise-level marketplaces.

This choice depends on your business needs and the expected marketplace app development cost.

Why Payment Integration Impacts Development Cost

Payment systems involve more than just integration. They require secure transaction handling, compliance, and automation.

This directly affects the cost of building a marketplace website due to:

  • Payment gateway setup and configuration.
  • eCommerce website security and compliance requirements.
  • Automated payout logic.
  • Transaction monitoring systems.

A well-structured payment split system ensures your multi-vendor marketplace platform handles transactions effectively while maintaining trust between buyers, vendors, and platform owners.

Build a marketplace tailored to your business needs

How to Build a Marketplace App Like Amazon or Etsy

Building a successful multi-vendor marketplace platform is not about adding every feature at once. It is about following a structured approach where each step supports scalability, usability, and long-term growth.

If you plan to build a marketplace app, the process should focus on clarity, execution, and gradual expansion instead of complexity from day one.

Step 1. Define Your Marketplace Model

Start by identifying what type of marketplace you want to build.

Ask for:

  • What products or services will be offered?
  • Who are your target users?
  • How will vendors interact with the platform?

This step sets the direction for your entire multi-vendor eCommerce marketplace development.

Step 2. Plan Core Feature and Workflow

Before development begins, define the essential features your multi-vendor eCommerce website will need.

Focus on:

  • Vendor registration and management.
  • Product listing system.
  • Order and checkout flow.
  • Commission and payment structure.

Starting with a clear feature set helps control the marketplace app development cost.

Step 3. Choose the Right Technology Approach

Your technology decision will impact performance, scalability, and development time.

Options include:

  • Pre-built platforms for faster launch.
  • Plugin-based systems for moderate customization.
  • Fully custom solutions for long-term scalability.

This choice directly affects the cost of building a marketplace website.

Step 4. Design User Experience for All Roles

A marketplace has three main users: customers, vendors, and admins.

Your design should ensure:

  • Easy navigation for customers.
  • Simple dashboard for vendors.
  • Clear control panel for admins.

A well-designed multivendor eCommerce platform reduces friction and improves engagement.

Step 5. Develop Core Marketplace Features

Begin with an MVP approach.

Focus on:

  • Product management
  • Vendor dashboard
  • Order processing
  • Payment and commission logic

This allows you to launch faster and refine based on real user behavior.

Step 6. Integrate Payment and Commission Systems

A marketplace cannot function without proper transaction handling.

Ensure:

  • Payment split functionality is implemented.
  • Commission engines are configured.
  • Vendor payouts are automated.

This is a key part of building a reliable multi-vendor marketplace platform.

Step 7. Testing, Launch, and Scaling

Before going live:

  • Test all workflows across users.
  • Fix performance and usability issues.
  • Ensure payment and order flows work correctly.

After launch, scale gradually by adding features and vendors based on demand.

Skipping steps or rushing development can increase errors, delays, and overall marketplace app development costs.

A structured process ensures:

  • Faster time to market
  • Better user experience
  • Controlled development cost
  • Scalable growth

Following these steps gives you a clear path to how to create a multi-vendor marketplace website that is stable, scalable, and ready for long-term success.

Start with essential features and scale step by step

Platform Options for Multi-Vendor Marketplace Development

Choosing the right platform is one of the most important decisions in multi-vendor eCommerce marketplace development. It directly affects performance, flexibility, scalability, and the overall marketplace app development cost.

There is no single solution that fits every business. The right choice depends on your goals, budget, and how much control you want over your multi-vendor marketplace platform.

Magento Multi-Vendor Marketplace

Magento is often chosen for large-scale and enterprise-level marketplaces.

Best suited for:

  • Businesses are planning long-term growth.
  • Complex product catalogs.
  • High traffic platforms.

What you get:

  • Strong built-in features
  • High scalability
  • Advanced product and vendor management

Things to consider:

  • Higher development and maintenance costs.
  • Requires experienced developers.

Magento works well when your multi-vendor eCommerce website needs strong performance and flexibility at scale.

WooCommerce Multivendor Marketplace

WooCommerce is a popular choice for startups and small to mid-sized marketplaces.

Best suited for:

  • Quick launches
  • Budget-friendly projects
  • MVP marketplace setups

What you get:

  • Easy setup with plugins
  • Lower initial cost
  • Large ecosystem of extensions

Things to consider:

  • Limited scalability compared to enterprise solutions
  • Heavy dependency on plugins

It is a practical option if you want to build a marketplace app quickly without a large upfront investment.

Custom Multi-Vendor Marketplace Development

Custom development offers full control over your platform.

Best suited for:

  • Unique business models
  • High customization needs
  • Long-term scalability

What you get:

Things to consider:

  • Higher initial cost of building a marketplace website
  • Longer development timeline

This approach is ideal when your multivendor eCommerce platform requires specific functionality that pre-built solutions cannot provide.

How to Choose the Right Platform

Your decision should be based on:

  • Budget and expected marketplace app development cost
  • Required level of customization
  • Scalability needs
  • Time to launch

If you are testing an idea, start small. If you are building for scale, invest in a more flexible solution from the beginning.

Quick Comparison Summary

  • Magento: Best for large, scalable marketplace.
  • WooCommerce: Best for small to mid-level marketplaces.
  • Custom Development: Best for full control and unique requirements.

Selecting the right platform sets the foundation for your multi-vendor marketplace platform and determines how easily it can grow as your business expands.

Multi-Vendor Marketplace Development Tech Stack

The technology stack defines how your multi-vendor marketplace platform performs, scales, and handles multiple users at the same time. A well-chosen stack ensures that your multi-vendor eCommerce website runs smoothly as vendors, products, and transactions increase.

When planning to build a marketplace app, your tech decisions should support flexibility, performance, and future growth instead of just short-term convenience.

Frontend Technologies

The frontend is what users interact with, including customers and vendors.

Common frontend choices:

  • React.js – Fast, responsive interface for dynamic marketplaces.
  • Vue.js – Lightweight and easier to manage for growing platforms.

A strong frontend improves navigation, product discovery, and overall user experience in your multivendor eCommerce platform.

Backend Technologies

The backend manages logic, workflows, and data processing.

Popular backend options:

  • Node.js – Handles real-time operations and high traffic efficiently.
  • Laravel (PHP) – Structured and widely used for eCommerce platforms.
  • Python-based frameworks – Suitable for scalable and data-driven systems.

The backend plays a key role in managing vendors, orders, and commissions within your multi-vendor eCommerce marketplace development.

Database and Infrastructure

Your database and hosting setup determine how well your platform handles growth.

Common choices include:

  • MySQL or PostgreSQL for structured data.
  • Cloud hosting solutions for scalability.
  • Content delivery networks for faster load times.

A reliable infrastructure reduces downtime and supports consistent performance.

Mobile App Development Options

Many businesses extend their multi-vendor marketplace platform to mobile users.

Options include:

  • Native apps – Better performance and user experience.
  • Cross-platform apps – Faster development and lower cost.

Mobile apps improve accessibility and user engagement, especially for marketplaces with frequent transitions.

Choosing the right tech stack may reduce the initial cost of building a marketplace website, but it can limit growth later. On the other hand, a scalable architecture requires higher upfront investment but supports long-term expansions.

Marketplace App Development Cost (2026 Breakdown)

Understanding the marketplace app development cost is one of the most important steps before starting your multi-vendor marketplace platform. The cost is not fixed. It depends on the level of complexity, features, and the approach you choose for your multi-vendor eCommerce marketplace development.

Instead of looking at a single number, it is better to break the cost into clear tiers based on what you are planning to build.

Cost by Complexity Level

The cost of building a marketplace website varies depending on how advanced your platform is.

Marketplace TypeEstimated Cost RangeBest ForKey Feature Included
Basic MVP Marketplace$30,000-$60,000Startups validating an ideaVendor registration, product listing, basic checkout, simple admin control
Mid-Level Marketplace$60,000-$120,000Growing businesses scaling operationsAdvanced vendor dashboard, commission handling, payment integration, order tracking, analytics
Enterprise Marketplace$120,000-$200,000+Large-scale marketplace platformsCustom workflows, advanced analytics, scalable infrastructure, and a high-performance system

Feature vs Cost Comparison

Several factors influence the final cost of building a marketplace website:

Feature/CapabilitiesBasic MarketplaceMid-Level MarketplaceEnterprise Marketplace
Vendor DashboardBasicAdvancedFully customized
Product ManagementLimitedModerateFully flexible
Commission EngineSimple rulesConfigurableAdvanced logic
Payment SystemStandard integrationSplit payment supportAutomated payout system
Order ManagementBasic trackingDetailed trackingFull workflow automation
Analytics & ReportsMinimalStandard reportsAdvanced insights
ScalabilityLowMediumHigh
Customization LevelLimitedModerateUnlimited

Development Cost Breakdown Table

To understand where your budget goes, here is a typical breakdown:

Development ComponentCost Impact LevelDescription
UI/UX DesignMediumWireframes, user flow, and interface design
Frontend DevelopmentHighCustomer and vendor interface
Backend DevelopmentHighCore logic, database, and system workflows
Payment & CommissionMedium to HighPayment integration and commission automation
Testing & DeploymentMediumQuality checks and launch preparation

Hidden Costs You Should Plan For

Beyond development, there are ongoing costs in multi-vendor eCommerce marketplace development that many businesses overlook:

  • Platform maintenance and updates
  • Hosting and infrastructure
  • Vendor onboarding and support
  • Marketing and user acquisition

Planning for these ensures your multivendor eCommerce platform remains stable and scalable after launch.

Key Takeaway

  • A simple multi-vendor eCommerce website can launch with a lower budget.
  • A scalable multivendor eCommerce platform requires higher investment but supports growth.
  • The final cost of building a marketplace website depends on how advanced your features and workflows are.

A clear understanding of cost helps you plan your multi-vendor marketplace platform more effectively and avoid unexpected expenses during development and scaling.

Start with essential features and scale step by step

Timeline for Multi-Vendor Marketplace Development

The timeline for building a multi-vendor marketplace platform depends on how complex your features are and how structured your development process is. While many businesses focus only on cost, the timeline is equally important because it impacts launch speed, testing, and overall execution.

If you plan to build a marketplace app, it is better to understand how time is distributed across different stages instead of expecting a fixed deadline.

Development Timeline Breakdown

Development StageEstimated DurationWhat Happens in This Stage
Planning & Requirements Analysis2-3 weeksDefine business model, features, and workflow for your multi-vendor eCommerce website.
UI/UX Design3-5 weeksCreate wireframes, user journeys, and interface designs.
Core Development8-16 weeksBuild frontend, backend, and core features of the multivendor eCommerce platform.
Integration Phase3-6 weeksAdd payment systems, commission logic, and third-party tools.
Testing & QA2-4 weeksFix bugs, test workflows, and ensure system stability.
Deployment & Launch1-2 weeksFinal setup, server deployment, and go-live.

Timeline Based on Marketplace Complexity

Marketplace TypeEstimated TimelineBest For
Basic MVP Marketplace3-6 monthsQuick launch and idea validation
Mid-level Marketplace6-9 monthsGrowing platforms with more features
Enterprise Marketplace9-12+ monthsLarge-scale, fully customized systems

Factor That Impacts Development Time

Several factors can increase or reduce the timeline of your multi-vendor eCommerce marketplace development.

  • Number of features and customization level.
  • Choice of technology and platform.
  • Complexity of payment and commission systems.
  • Size and experience of the development team.
  • Number of AI integrations required.

A more complex multi-vendor marketplace platform will naturally take longer to develop.

How to Reduce Development Time

If speed is a priority, you can:

  • Start with an MVP instead of a full-scale platform.
  • Use pre-built modules where possible.
  • Focus only on essential features at launch.
  • Plan workflows clearly before development begins.

This helps you build a marketplace app faster without unnecessarily increasing the marketplace app development cost.

Key Takeaway

  • Faster timelines are possible with limited features.
  • Scalable platforms require more time but offer long-term value.
  • A structured approach ensures fewer delays and better results.

Planning your timeline properly ensures your multi-vendor eCommerce website is launched on time while maintaining quality and scalability.

Monetization Models for Multi-Vendor Marketplaces

A multi-vendor marketplace platform is not just about connecting buyers and sellers. It is about building a system that generates consistent revenue as the platform grows.

Choosing the right monetization strategy early helps you recover the marketplace app development cost and scale your multi-vendor eCommerce marketplace development in a sustainable way.

Commission-Based Revenue Model

This is the most widely used model in any multi-vendor eCommerce website.

How it works:

  • A percentage is charged on every transaction.
  • The platform earns from each order placed.

Why it works:

  • Revenue grows with platform activity.
  • No upfront cost for vendors.
  • Easy to manage within the system.

This model is ideal if you want a predictable income while you build a marketplace app.

Subscription-Based Model

In this model, vendors pay a recurring fee to sell on your platform.

How it works:

  • Monthly or yearly subscription plans.
  • Different tiers with added benefits.

Why it works:

  • Fixed and predictable revenues.
  • Attract serious sellers.
  • Reduces dependency on transaction volume.

It is commonly used in multivendor eCommerce platform setups focused on long-term vendor relationships.

Listing Fees and Featured Products

This mode charges vendors for visibility and product placement.

How it works:

  • Fees for listing products.
  • Extra charges for featured listings.

Why it works:

  • Additional revenue stream.
  • Encourage vendors to promote products.
  • Improves product visibility.

Hybrid Monetization Model

Most successful marketplaces combine multiple revenue streams.

Common combinations:

  • Commission and subscription.
  • Commission and featured listings.

Why it works:

  • Diversified revenue.
  • Higher earning potential.
  • Flexibility based on vendor behavior.

Monetization Comparison Table

Monetization ModelHow It WorksRevenue StabilityBest For
Commission-BasedEarn from each transitionMedium to highGrowing marketplace
Subscription-BasedRecurring vendor feesHighStable vendor base
Listing FeesCharge per product or listingLow to mediumHigh product volume platforms
Hybrid ModelA combination of multiple modelsHighScalable marketplaces

Choosing the Right Monetization Strategy

Your monetization model should depend on:

  • Type of multi-vendor marketplace platform.
  • Vendor acquisition strategy.
  • Expected transaction volume.
  • Overall cost of building a marketplace website.

A well-planned strategy ensures your platform remains profitable while attracting quality vendors.

Key Takeaway

  • Start simple with commission-based revenue.
  • Add additional models as your platform grows.
  • Align monetization with user experience.

A strong monetization strategy ensures your multi-vendor eCommerce website not only grows in users but also generates consistent revenue over time.

Upgrade performance features and scalability

Challenges in Multi-Vendor Marketplace Development

Building a multi-vendor marketplace platform is not just about adding features and launching quickly. It involves managing multiple vendors, transactions, and user expectations at the same time. Without proper planning, these challenges can impact performance, user trust, and overall growth.

Understanding these challenges early helps you make better decisions during your multi-vendor eCommerce marketplace development process.

Managing Multiple Vendors Efficiently

Handling multiple sellers on a single multi-vendor eCommerce website can become complex as the platform grows.

Common issues include:

  • Inconsistent product quality across vendors.
  • Delays in order processing.
  • Lack of standardization in listings.

How to handle it:

  • Set clear vendor guidelines.
  • Use approval systems for listings.
  • Provide a structured vendor dashboard.

Payment and Payout Management Issues

Payments are one of the most sensitive parts of any multivendor eCommerce platform.

Challenges include:

  • Delayed vendor payouts.
  • Incorrect commission calculations.
  • Handling refunds and cancellations.

How to handle it:

  • Use automated payment split systems.
  • Define clear payout schedules.
  • Maintain transparent transaction records.

Maintaining Product Quality and Trust

Customer trust depends on consistent quality across your platform.

Challenges include:

  • Fake or low-quality products.
  • Misleading product descriptions.
  • Poor vendor service.

How to handle it:

  • Enable reviews and ratings.
  • Monitor vendor performance.
  • Remove non-compliant sellers.

Scaling the Platform Without Performance Issues

As your platform grows, performance can become a major concern.

Challenges include:

  • Slow loading speed.
  • System crashes during high traffic.
  • Difficulty handling large data volumes.

How to handle it:

  • Use scalable infrastructure.
  • Optimize database and backend systems.
  • Plan performance improvements early.

Balancing Cost and Feature Expansion

Many businesses struggle to decide when to add new features.

Challenges include:

  • Increasing marketplace app development cost.
  • Overbuilding features early.
  • Delayed time to market.

How to handle it:

  • Start with an MVP.
  • Add features based on user demand.
  • Track ROI before investing further.

Challenge vs Solution Overview

ChallengeImpact on PlatformSuggested Solution
Vendor management complexityPoor user experienceStructured onboarding and guidelines
Payment handling issuesLoss of trustAutomated payout and commission system
Product quality inconsistencyCustomer dissatisfactionReviews, monitoring, and vendor control
Scalability issuesPerformance dropCloud infrastructure and optimization
Rising development costBudget constraintsMVP approach and phased development

Key Takeaway

  • Challenges are part of every multi-vendor marketplace platform.
  • Early planning reduces long-term issues.
  • Structured systems improve scalability and trust.

Addressing these challenges properly ensures your multi-vendor eCommerce website grows steadily without operational or performance issues.

Future Trends in Multi-Vendor eCommerce Platforms (2026)

The structure of a multi-vendor marketplace platform is evolving as user expectations and technology continue to shift. What worked a few years ago is no longer enough to stay competitive. Businesses that adapt early can build a stronger multi-vendor eCommerce website that attracts both vendors and customers.

Understanding these trends helps you plan your multi-vendor eCommerce marketplace development with a long-term perspective instead of short-term fixes.

AI-Based Personalization

Modern marketplaces are moving toward AI-based personalized user experiences.

What is changing:

  • Product recommendations based on user behavior.
  • Smart search results tailored to preferences.
  • Automated suggestions for vendors.

Why it matters:

  • Improves user engagement.
  • Increases conversion rates.
  • Helps customers find relevant products faster.

Headless Marketplace Architecture

A headless approach separates the frontend from the backend.

What this means:

  • Frontend can be customized independently.
  • Backend handles core marketplace logic.

Benefits:

  • Faster performance.
  • More flexibility in design.
  • Easier updates without affecting the entire system.

This approach is gaining attention in advanced multivendor eCommerce platform setups.

Mobile-First Marketplace Experience

More users now prefer mobile over desktop.

Key focus areas:

  • Mobile-optimized interfaces.
  • Faster loading times.
  • Smooth navigation and checkout.

For businesses planning to build a marketplace app, mobile-first design is no longer optional.

Automation in Vendor and Order Management

Automation is reducing manual effort across marketplace operations.

Examples include:

  • Automated vendor onboarding workflows.
  • Smart inventory updates.
  • Real-time order tracking systems.

This improves efficiency without increasing the cost of building a marketplace website significantly.

Multi-Currency and Global Expansion

Marketplaces are no longer limited to one region.

What is changing:

  • Support for multiple currencies.
  • Global vendor onboarding.
  • Region-specific pricing.

This allows a multi-vendor marketplace platform to expand beyond local markets.

Data-Driven Decision Making

Analytics is becoming central to marketplace growth.

Key insights include:

  • Vendor performance tracking.
  • Customer behavior analysis.
  • Sales and conversion metrics.

These insights help optimize platform performance and control the marketplace app development cost over time.

Key Takeaway

  • Marketplaces are becoming more intelligent and user-focused.
  • Flexibility and scalability are becoming essential.
  • Early adoption of trends gives a competitive advantage.

Keeping these trends in mind ensures your multi-vendor eCommerce website remains relevant, scalable, and ready for future growth.

Conclusion

Building a multi-vendor marketplace platform requires the right mix of features, technology, and cost planning. A well-structured multi-vendor eCommerce website is not just about launching fast, but about creating a system that can scale with vendors and users over time.

If you plan to build a marketplace app, start with essential features, control the marketplace app development cost, and expand based on real demand with dedicated eCommerce developers. A focused approach ensures your multivendor eCommerce platform grows without unnecessary complexity or cost.

Get your marketplace cost estimate within 24 hours

Headless Shopify with Hydrogen: Cost, Timeline, Performance & ROI Explained

Introduction – Is Headless Shopify with Oxygen Worth It?

If you are exploring headless Shopify with Hydrogen, you are likely trying to answer one core question:

“Will this actually improve my store’s performance and growth, or just increase my costs?”

Because while Shopify Hydrogen promises faster storefronts, better UX, and more flexibility, it also comes with:

  • Higher performance costs ($15K-$250K+)
  • More technical complexity
  • Longer implementation timelines

And that is where the confusion begins.

Between Hydrogen vs Liquid theme performance comparisons, Shopify Oxygen hosting, and Storefront API vs Admin API differences, most businesses struggle to understand what truly matters and what does not.

What This Guide Will Help You Decide?

This guide cuts through the noise and focuses on what actually impacts your decision:

  • What Shopify Hydrogen really is (and how it works)
  • Real headless Shopify development cost and timeline
  • Hydrogen vs Liquid performance differences that affect conversions
  • When headless Shopify is worth it, and when it is overkill
  • How to evaluate ROI before investing.

If you are considering a Shopify headless storefront, this will help you make a clear, business-first decision, not a trend-driven one.

Not sure if headless Shopify fits? Get expert advice

What is Headless Shopify?

Compare performance flexibility and ROI differences

At its core, headless Shopify means separating what your customers see from how your store operates behind the scenes.

In a traditional Shopify setup, your frontend (design + user experience) and backend (products, checkout, orders) are tightly connected through a Liquid theme. This makes things simple and fast to launch, but also limits how far you can customize performance, interactions, and scalability.

Headless Shopify changes that.

Instead of relying on a theme, your storefront is built independently using modern frameworks like Shopify Hydrogen (React-based), while Shopify continues to handle the backend, products, inventory, checkout, and payments.

Think of it like this:

  • Shopify (backend): Manages your business logic
  • Hydrogen (frontend): Controls how your store looks and behaves
  • APIs: Connects both layers in real time

This separation gives you far more control over the user experience, but it also introduces more complexity.

How a Shopify Headless Storefront Actually Works

When a user visits your site, they are no longer interacting with a Shopify theme. Instead:

  • The Hydrogen frontend fetches product and store data using the Shopify Storefront API
  • The backend (Shopify) processes product data, cart logic, and checkout (still handled by Shopify)
  • Everything is hosted and delivered via Shopify Oxygen or external infrastructure

This setup allows for faster, more dynamic experiences, especially for stores that need more than what standard themes can offer.

Where Headless Shopify Starts Making Sense

From a business perspective, headless is not about technology; it is about removing limitations.

It becomes relevant when:

  • Your current store feels restrictive in terms of UX or design flexibility
  • You need high-performance storefronts for large traffic volumes
  • You want to integrate multiple systems (apps, CMS, custom tools) seamlessly
  • Your brand experience is a competitive advantage, not just a storefront

At this point, Shopify Hydrogen and a headless approach start to make strategic sense.

Where Most Businesses Get it Wrong

Many businesses jump into headless Shopify, assuming it is a direct upgrade. However, it is not.

Headless introduces:

  • Higher upfront investment
  • Ongoing development dependency
  • More moving parts (APIs, hosting, performance layers)

Which means if your store does not actually need that flexibility, you are paying for complexity without real returns.

What is Shopify Hydrogen? (And Why it Exists)

Now that you understand how headless Shopify separates the frontend and backend, the next logical question is:

Where does Shopify Hydrogen actually fit into this setup?

In simple terms, Shopify Hydrogen is a React-based framework built specifically to create custom Shopify storefronts. It replaces traditional Liquid themes when you go headless.

Instead of working within Shopify’s templating system, Hydrogen allows developers to build their storefront using modern frontend architecture, giving them far more control over performance, design, and user experience.

Why Shopify Built Hydrogen in the First Place

Before Hydrogen, going headless on Shopify meant stitching together custom frontend frameworks with Shopify APIs. It worked, but it was complex, inconsistent, and time-consuming.

Hydrogen was introduced to solve that.

It gives businesses a purpose-built foundation for Shopify headless storefront development, reducing the friction between flexibility and implementation.

What Makes Shopify Hydrogen Different

Hydrogen is not just another frontend framework; it is optimized specifically for commerce use cases.

Here is what that means in practice:

  • It is built on React, making it highly flexible and component-driven
  • It supports server-side rendering (SSR) for faster load times
  • It comes with pre-built eCommerce components (products, carts, collections)
  • It integrates directly with the Shopify Storefront API

This allows developers to create storefronts that are not only visually unique but also performance-optimized from the ground up.

How Shopify Hydrogen Works in a Headless Setup

Understand architecture performance and workflow

In a Shopify headless Hydrogen storefront, Hydrogen acts as the presentation layer.

It:

  • Fetches product and store data using APIs
  • Renders pages dynamically for users
  • Controls interactions like navigation, filtering, and cart updates

Meanwhile, Shopify continues to handle checkout, inventory, orders, and payments.

So, while Hydrogen gives you flexibility, Shopify still ensures stability where it matters most.

Who Shopify Hydrogen is Actually Built for

Hydrogen is not designed for every Shopify store, and that is an important distinction.

It makes the most sense for businesses that:

  • Need highly customized storefront experiences
  • Care deeply about performance optimization
  • Have complex product catalogs or user journeys
  • Are scaling and want long-term flexibility

Who Should Avoid Shopify Hydrogen

If your store:

  • Relies on standard eCommerce flows
  • Does not require advanced customization
  • Has limited technical resources or budget

Then a Liquid theme will often deliver better ROI with far less complexity.

The Key Takeaway: Shopify Hydrogen is powerful, but it is not a default upgrade.

It is a tool designed for businesses that have outgrown traditional themes and need more control over how their storefront performs and scales.

Shopify Hydrogen vs Liquid Theme: Performance, Flexibility, & Real Business Impact

This is where most decisions are actually made, not on technology, but on outcomes.

Because choosing between a Shopify Hydrogen storefront and a Liquid theme is not about which is “better.” It is about which one delivers measurable business value for your current stage.

The Core Difference (In Practical Terms)

A Liquid theme is fast to launch, tightly integrated with Shopify, and works well for standard eCommerce needs.

A Hydrogen storefront, on the other hand, gives you full control over how your frontend behaves, but requires custom development to achieve it.

That trade-off shows up clearly in performance, flexibility, and scalability.

Performance: Where Hydrogen Gets the Attention

In most Shopify Hydrogen vs Liquid theme performance comparisons, Hydrogen tends to outperform, but not automatically.

Hydrogen enables:

  • Server-side rendering (faster initial loads)
  • Better control over assets and scripts
  • Optimized data fetching via Storefront API

This can lead to:

  • Faster page load times
  • Smoother interactions
  • Improved Core Web Vitals

But here is the nuance most blogs skip: Hydrogen only performs better when it is built correctly.

A poorly optimized Hydrogen storefront can easily perform worse than a well-optimized Liquid theme.

Flexibility: The Real Reason Businesses Go Headless

This is where Hydrogen clearly stands out.

With Liquid themes, you are working within Shopify’s structure. Customization is possible, but only to a certain extent.

With Hydrogen:

  • You control the entire frontend experience
  • You can build completely custom UI/UX flows
  • You can integrate external systems more seamlessly

This matters for businesses that:

  • Want non-standard user journeys
  • Need interactive or app-like storefronts
  • Are building a strong brand-driven experience

Development & Maintenance: The Hidden Trade-Offs

What you gain in flexibility, you pay for in complexity.

Liquid themes:

  • Faster to develop
  • Easier to maintain
  • Lower dependency on developers

Hydrogen storefronts:

  • Require experienced React/Shopify developers
  • Need ongoing maintenance and iteration
  • Involve API management and performance tuning

This directly impacts your long-term cost and operational model.

Side-by-Side Comparison

FactorShopify Liquid ThemeShopify Hydrogen (Headless)
Setup TimeFast (days to weeks)Medium to long (weeks to months)
PerformanceGood (Optimized themes)High potential (if built correctly)
CustomizationLimited (theme constraints)Full flexibility
Developer DependencyLow to moderateHigh
MaintenanceSimpleOngoing technical involvement
ScalabilityModerateHigh (with proper architecture)

What This Means for Your Business

If your goal is to:

  • Launch quickly
  • Keep costs predictable
  • Run a standard eCommerce model

A Liquid theme is often the smarter choice.

But if your business depends on:

  • Performance as a competitive edge
  • Custom user experiences
  • Long-term scalability and integrations

Then a Shopify Hydrogen headless storefront becomes a strategic investment, not just a technical upgrade.

The Reality Most Businesses Realize Too Late

The decision is not: “Hydrogen vs Liquid, Which is better?”

It is “Do we actually need what Hydrogen enables, and are we ready to invest in it?”

Headless Shopify Cost Breakdown (Hydrogen, Oxygen, and Real Investment Range)

The Short Line Answer (Before We Break it Down)

A Shopify Hydrogen headless storefront typically costs:

  • $15,000 – $30,000: Basic Storefront (limited customization)
  • $30,000 – $80,000: Mid-level (custom UI, integrations)
  • $80,000 – $250,000: Advanced builds (enterprise-grade, complex UX, scalability)

But this range only makes sense once you understand what you are actually paying for.

1. Shopify Hydrogen Development Cost

This is where most of your investment goes.

Unlike Liquid themes (which use pre-built structures), Hydrogen requires custom frontend development using React; managing everything, from layouts to interactions, is built intentionally.

Your cost depends on:

  • UI/UX Complexity: Basic templates vs fully custom, interactive experiences
  • Number of Pages & Components: Product pages, collections, landing pages, dynamic sections
  • Third-party Integrations: CRM, ERP, search tools, personalization engines
  • Performance Optimization Level: Basic vs conversion-focused optimization
  • Team Expertise: Shopify specialists vs generic React developers

This is why two “headless Shopify projects” can differ by $100K+.

2. Shopify Oxygen Hosting Cost & Setup

A common misconception is that hosting is a major added expense.

In reality, Shopify Oxygen (Shopify’s hosting for Hydrogen storefronts) simplifies a lot of this.

Here is how it works:

  • Oxygen is included with Shopify plans (especially Shopify Plus)
  • It is optimized specifically for Hydrogen storefronts
  • Deployment is tightly integrated with Shopify

So for most businesses:

  • Initial hosting cost = minimal or included
  • Scaling costs depend on traffic and architecture

That said, some businesses still choose external hosting (like Vercel) for more control, but that adds complexity and cost.

3. Ongoing Maintenance & Operational Cost

This is the part many businesses underestimate.

With a Liquid theme, updates are relatively simple.

With Hydrogen:

  • You will need ongoing developer involvement
  • Performance optimization is continuous
  • APIs and integrations need monitoring

Typical ongoing costs:

  • $1,000 – $5,000/month: Small to mid stores
  • $5,000+/month: High-scale or enterprise setups

Hydrogen vs Liquid Theme: Cost Comparison

Here is a clearer side-by-side comparison to put things into perspective:

Cost FactorShopify Liquid ThemeShopify Hydrogen (Headless)
Initial Build Cost$1,000 – $15,000$15,000 – $250,000+
Time to Launch1-4 weeks4-16+ weeks
HostingIncludedOxygen (included or minimal)
MaintenanceLowMedium to High
Customization CostLimitedHigh but flexible
Long-Term Scalability CostModerateOptimized for scale

What Most Cost Discussions Miss:

The real question is not: “How much does Shopify Hydrogen cost?”

It’s: “What level of complexity does my business actually need, and what is the ROI on that investment?”

Because if you do not need advanced customization or performance optimization:

A $60K-$100K Hydrogen build won’t outperform a well-optimized $10K Liquid store in any meaningful way.

But if you do need it:

Not going headless could limit your growth, conversions, and scalability.

A Practical Way to Think About It

  • Liquid = efficiency-focused investment
  • Hydrogen = growth-focused investment

Neither is right nor wrong; the decision depends on where your business is today and where it is going.

Get a tailored cost estimate before you invest

Shopify Hydrogen Pricing Explained (What You Actually Pay For)

One of the most common misconceptions around Shopify Hydrogen pricing is that it is an expensive product you need to license.

It’s not.

In fact, Shopify Hydrogen is completely free to use.

And that is exactly why so many businesses underestimate the real cost.

So, If Hydrogen is Free, Where Does the Cost Come From?

Hydrogen is a framework, not a product.

You are not paying for access; you are paying for everything required to design, build, and maintain a custom Shopify headless storefront using that framework.

That includes:

  • Frontend development (React-based structure)
  • UX/UI design tailored to your brand
  • API integrations (Storefront API, third-party tools)
  • Performance optimization and testing
  • Ongoing maintenance and updates

So while the framework itself is free, the implementation is where the investment lies.

Understanding Total Cost of Ownership (TCO)

To make a smart decision, you need to look beyond just the initial build cost and consider the total cost of ownership over time.

With a Shopify Hydrogen storefront, your costs typically fall into three layers:

  • Initial Development: One-time cost based on complexity ($15K – $250K+)
  • Infrastructure & Hosting: Shopify Oxygen (often included or minimal cost), optional external hosting (if needed)
  • Ongoing Maintenance & Iteration: Developer retainers, performance improvements, feature updates.

How Shopify’s Plans Affect Your Investment

Your Shopify plan still plays a role, even in a headless setup.

  • Standard Shopify Plans: Work with Hydrogen, but have limitations in checkout customization
  • Shopify Plus: Unlocks more flexibility, especially around checkout extensibility, higher API limits, and better scalability for large businesses.

For most serious headless Shopify implementations, businesses eventually move toward Shopify Plus, not because Hydrogen requires it, but because the use case often does.

The Hidden Cost Most Businesses Miss

The biggest pricing mistake is not underestimating development. It is underestimating iteration.

With Hydrogen, your storefront becomes a living product, not a static theme.

That means:

  • Continuous UX improvements
  • A/B testing and experimentation
  • Feature rollouts

This is where Hydrogen creates real value, but also when costs continue.

A Clear Way to Evaluate Shopify Hydrogen Pricing

Instead of asking: “How much does Shopify Hydrogen cost?”

Ask: “What level of control and performance do we need, and what are we willing to invest to achieve it?”

Because Hydrogen does not increase cost randomly, it increases capability.

And whether that capability translates into ROI depends entirely on your business model.

Shopify Storefront API vs Admin API: What is the Difference (And Why it Matters)

Once you move toward a Shopify Headless Storefront, APIs stop being a technical detail; they become the backbone of how your store functions.

And this is where a lot of confusion comes in:

Shopify Storefront API vs Admin API differences, what is the actual difference, and why should you care?

The Simple Way to Understand It

Think of Shopify as two layers:

  • One that customers interact with
  • One that you (the business) control behind the scenes

These two layers are powered by two different APIs.

1. Shopify Storefront API (Customer-Facing Layer)

The Storefront API is what your Hydrogen frontend uses to display and interact with your store.

It handles everything your customers experience, such as:

  • Browsing products and collections
  • Viewing product details
  • Managing carts
  • Accessing content dynamically

In a Shopify Hydrogen storefront, this API is constantly working in the background to fetch and render data in real time. Without the Storefront API, your headless frontend has nothing to display.

2. Shopify Admin API (Backend Operations Layer)

The Admin API is used for managing your store, not for customer interactions.

It handles:

  • Product creation and updates
  • Inventory management
  • Order processing
  • Customer data

This API is typically used by:

  • Internal systems
  • Third-party apps
  • Backend workflows

Your customer never directly interacts with it.

The Key Difference (That Actually Matters)

The distinction is not just technical; it affects how your storefront is built and maintained.

  • Storefront API: Powers user experience (speed, interaction, frontend logic)
  • Admin API: Powers business operations (data control, automation, integrations)

In a headless Shopify setup, your frontend depends heavily on the Storefront API, so how efficiently it is used directly impacts performance.

Where Businesses Get it Wrong

Many assume that moving to headless means “more control over everything.”

But in reality:

  • You still rely on Shopify’s backend systems
  • Checkout is still controlled by Shopify
  • Admin API access does not replace core platform limitations

So while Hydrogen gives you frontend flexibility, Shopify still defines backend boundaries.

Why This Matters for Your Decision

Understanding this difference helps you avoid unrealistic expectations.

If your goal is:

  • Better frontend performance: Storefront API + Hydrogen helps
  • Full backend control: Shopify will still have limits

This clarity becomes especially important when evaluating:

  • Checkout customization possibilities
  • Integration complexity
  • Long-term scalability

The Practical Takeaway

Headless Shopify does not remove Shopify; it changes how you interact with it.

  • The Storefront API becomes your frontend engine
  • The Admin API remains your operational backbone

And your results depend on how well both are implemented together.

Shopify Oxygen Hosting: How it Works, Cost & When It’s Enough

Once you decide to explore a Shopify Hydrogen headless storefront, the next practical question is:

“Where does this entire frontend actually live?”

That is where Shopify Oxygen comes in.

What is Shopify Oxygen (In Simple Terms)?

Shopify Oxygen is Shopify’s native hosting solution for Hydrogen storefronts.

Instead of setting up external infrastructure (like AWS or Vercel), Oxygen allows you to:

  • Deploy your Hydrogen storefront directly within Shopify’s ecosystem
  • Manage hosting without dealing with DevOps complexity
  • Keep frontend and backend tightly integrated

In short, it is designed to make headless Shopify simpler to manage.

How Shopify Oxygen Works in a Headless Setup

In a traditional setup, your theme is hosted within Shopify automatically.

With Hydrogen:

  • Your frontend (Hydrogen app) needs separate hosting
  • Oxygen acts as the runtime environment for that frontend
  • It connects seamlessly with Shopify APIs and backend systems

So when a user visits your store:

  • Oxygen serves the Hydrogen frontend
  • The frontend fetches data via the Storefront API
  • Shopify handles checkout and core commerce logic

Shopify Oxygen Cost: What Should You Expect?

This is one of the more straightforward parts of headless Shopify.

For most businesses:

  • Oxygen hosting is included with Shopify (especially Shopify Plus)
  • There is no major upfront hosting cost
  • Scaling is handled within Shopify’s infrastructure

This makes Oxygen:

  • More predictable than external hosting
  • Easier to manage for growing businesses

When Shopify Oxygen is Enough

For a large number of businesses, Oxygen does exactly what’s needed.

It works well when:

  • You want a simplified deployment process
  • Your architecture is primarily Shopify-centric
  • You don’t need deep infrastructure customization

In these cases, Oxygen reduces both:

  • Setup time
  • Operational overhead

When Businesses Choose External Hosting Instead

Despite Oxygen’s advantages, some businesses still go beyond it.

This usually happens when they need:

  • Advanced control over performance tuning
  • Multi-region deployments or custom infrastructure setups
  • Integration with broader frontend ecosystems

But this comes with trade-offs:

  • Higher cost
  • More DevOps complexity
  • Longer setup and maintenance cycle

The Real Decision is Not About Hosting

Most businesses overthink this part.

The choice between Oxygen and external hosting is rarely the first decision you should make.

The real decision is:

Do you actually need a headless Shopify architecture in the first place?

Because if the answer is no:

  • Hosting doesn’t matter
  • Hydrogen doesn’t matter
  • Cost savings come from staying simple

The Practical Takeaway:

  • Oxygen is not a cost driver; it is a simplifier
  • It makes Shopify Hydrogen more accessible
  • It removes a layer of infrastructure complexity

But it does not change the core equation:

Headless Shopify is still a strategic investment, not just a technical upgrade.

Headless Shopify Checkout Customization: What’s Possible (and What’s Not)

This is where expectations often break.

Many businesses assume that moving to a Shopify headless Hydrogen storefront means full control over everything, including checkout.

It doesn’t.

And understanding this clearly can save you from costly misalignment.

The Reality: Checkout is Still Controlled by Shopify

Even in a headless setup, Shopify owns the checkout layer.

That means:

  • Customers are redirected to Shopify’s checkout
  • Core checkout logic remains unchanged
  • You cannot fully rebuild checkout using Hydrogen

This is by design; Shopify keeps checkout standardized for security, compliance, and performance.

What You Can Customize

You are not completely restricted, but customization depends heavily on your Shopify plan.

With standard Shopify plans, your options are limited to:

  • Basic branding (colors, fonts, logo)
  • Some layout adjustments
  • Payment and shipping configurations

With Shopify Plus, things open up significantly.

You can:

  • Use Checkout Extensibility to modify parts of the experience
  • Add custom logic (discounts, validations, UI extensions)
  • Improve post-purchase and checkout flows

What You Cannot Do (Even with Headless)

This is where many businesses miscalculate.

You cannot:

  • Fully redesign checkout UX from scratch
  • Replace Shopify checkout with a completely custom one
  • Bypass Shopify’s payment flow

So even with a fully custom Shopify Hydrogen React storefront, checkout remains a controlled environment.

Why This Matters for Your Decision

If your primary goal for going headless is: “We want a fully custom checkout experience.”

Then Shopify (headless or not) may not be the right platform.

But if your goal is:

  • Better storefront performance
  • Advanced UX before checkout
  • Higher conversion through improved browsing experience

Then headless Shopify still makes strong sense.

Where Headless Actually Impacts Conversion

Most conversion gains don’t come from checkout.

They come from:

  • Faster product discovery
  • Smoother navigation
  • Better mobile experiences
  • Personalized storefront interactions

That’s exactly where Shopify Hydrogen shines.

The Practical Takeaway

  • Headless Shopify gives you frontend freedom, not checkout control
  • Checkout customization is limited but extendable (especially on Shopify Plus)
  • Your ROI from headless comes before checkout, not during it

A Smarter Way to Think About It

Instead of asking: “Can we customize checkout completely?”

Ask: “Can we improve everything leading up to checkout enough to increase conversions?”

That’s the real leverage point.

Is Headless Shopify Worth it? (Or Is It an Overkill for Your Business)

By this point, you understand how Shopify Hydrogen, APIs, and Oxygen fit together.

Now comes the only question that actually matters: “Should you invest in a Shopify headless storefront or not?”

Because the wrong decision here does not just waste budget, it creates long-term complexity that your business has to carry.

When Headless Shopify Actually Makes Sense

Headless is not about having better tech; it is about removing growth limitations.

It starts making real business sense when your store is hitting constraints that themes cannot solve efficiently.

For example, if you are experiencing:

  • Performance bottlenecks affecting conversion rates
  • Complex user journeys that standard themes cannot handle well
  • A need for highly customized, brand-driven experiences
  • Heavy reliance on integrations (CMS, personalization engines, custom tools)
  • Scaling traffic where milliseconds impact revenue

In these scenarios, a Shopify Hydrogen storefront becomes a strategic investment, not an experiment.

When Headless Shopify is an Overkill

This is where most businesses go wrong.

They assume headless is a natural upgrade path.

It’s not.

For many stores, especially early-stage or mid-sized ones, headless introduces more problems than it solves.

It is likely overkill if:

  • Your store follows a standard eCommerce flow
  • You don’t have strong UX differentiation needs
  • Your current performance issues can be solved with theme optimization
  • Your budget is limited, or the ROI is unclear
  • You don’t have access to experienced Shopify development support.

In these cases, Liquid themes often deliver better results with far less risk.

The Cost vs Value Reality

Here is the uncomfortable truth:

An $80K – $150K Shopify Hydrogen build will not magically outperform a well-optimized $10K Liquid store, unless your business actually needs what headless enables.

That is why blindly going headless often leads to:

  • Overengineering
  • Slower iteration cycles
  • Higher operational costs

A Simple Decision Framework

Instead of thinking in terms of technology, think in terms of constraints.

Ask yourself:

  • Are we limited by our current storefront experience?
  • Are we losing revenue due to performance or UX issues?
  • Do we need flexibility that themes genuinely cannot provide?
  • Can we justify the cost through measurable ROI?

If most answers are yes, headless is worth exploring.

If not, optimizing your current setup is the smarter move.

What High-Growth Brands Do Differently

Businesses can successfully adopt Shopify Headless Hydrogen, but do not start with technology.

They start with:

  • A clear growth bottleneck
  • A defined performance or UX goal
  • A roadmap for ROI

Headless is then used as a means to solve a problem, not as a trend to follow.

The Practical Takeaway

  • Headless Shopify is powerful, but situational
  • It is best suited for businesses that are scaling or pushing UX boundaries
  • For everyone else, it can become an unnecessary layer of complexity

One Line That Should Guide Your Decision

If you don’t know exactly why you need headless Shopify, you probably do not need it yet.

Hybrid Approach: A Smarter Way to Go Headless (Without Full Complexity)

Not every business needs to go fully headless, and increasingly, they don’t.

A hybrid Shopify approach (often called partial headless) gives you the flexibility of Hydrogen where it matters, while retaining the simplicity of Liquid where it doesn’t.

In practical terms, this means:

  • Building high-impact pages (homepage, landing pages, product discovery flows) using Shopify Hydrogen
  • Keeping checkout and standard flows within Shopify’s native environment.

What a Hybrid Shopify Setup Looks Like

A typical hybrid setup might include:

Hydrogen-powered:

  • Homepage (performance + storytelling)
  • Collection and search experiences
  • Campaign landing pages

Liquid-powered:

  • Checkout flow
  • Standard account pages
  • Basic operational pages

This allows you to improve performance and UX where it actually affects conversions, without rebuilding everything from scratch.

Why Businesses Choose Hybrid Instead of Full Headless

The decision usually comes down to balance.

A hybrid approach helps you:

  • Reduce initial development cost
  • Launch faster
  • Test headless capabilities before committing fully
  • Avoid unnecessary complexity

It is especially useful for:

  • Growing brands not ready for a full headless investment
  • Businesses validating performance improvements
  • Teams with limited technical bandwidth

The Strategic Advantage

Instead of asking: “Should we go headless or not?”

You shift to: “Where does headless actually create value for our business?”

That’s a far more practical and profitable way to approach Shopify Hydrogen.

Shopify Hydrogen Development Timeline (What to Expect Realistically)

Another area where expectations often go wrong is the timeline.

Headless Shopify projects are not just “theme builds with extra steps.” They follow a structured development lifecycle.

Typical Development Phases

A Shopify Hydrogen storefront usually moves through these stages:

  1. Discovery & Planning (1-2 weeks): Understanding business goals, UX requirements, integrations, and architecture.
  2. UX/UI Design (2-4 weeks): Designing a custom storefront experience aligned with brand and conversion goals.
  3. Development (3-8+ weeks): Building the frontend using Hydrogen (React), integrating APIs, and setting up logic.
  4. API & Integration Setup (1-3 weeks, overlap with dev): Connecting storefront API, third-party tools, CMS, and backend workflows.
  5. QA & Testing (1-2 weeks): Performance testing, bug fixes, device/browser optimization.
  6. Deployment & Launch (1 week): Final rollout via Shopify Oxygen or external hosting.

Total Timeline by Project Size

  • Small builds: ~4-6 weeks
  • Mid-level builds: ~8-12 weeks
  • Complex/enterprise: ~3-6 months

What Affects Your Timeline the Most

The timeline is not fixed; it expands based on:

  • UX complexity
  • Number of integrations
  • Custom logic requirements
  • Decision-making speed on your side

The Practical Takeaway: Headless Shopify is not slow; it is intentional.

And the more clarity you bring at the beginning, the faster and smoother your build will be.

ROI of Headless Shopify (How to Evaluate if it’s Worth It)

Now we move from cost to return.

Because a Shopify Hydrogen investment only makes sense if it generates a measurable business impact.

Where ROI Actually Comes From

Headless Shopify does not create value by itself; it enables improvements that drive revenue.

The main ROI drivers are:

  • Faster load times > higher conversion rates
  • Better UX > improved engagement and retention
  • Flexibility > faster experimentation and iteration
  • Scalability > handling growth without performance drop-offs

A Simple ROI Thinking Model

Instead of complex calculations, start with this:

  • Current conversion rate
  • Expected uplift from performance/UX improvements
  • Average order value (AOV)
  • Monthly traffic

Even a 0.5%-1% conversion uplift at scale can justify a significant investment.

Where ROI is Strongest

ROI is typically highest for:

Where ROI is Weak

If:

  • Traffic is low
  • UX is not a differentiator
  • Growth is still early-stage

Then, the ROI from headless is often limited.

The Real Insight: Headless Shopify is not a cost-saving decision. It is a revenue optimization and growth decision.

Know your ROI and performance before you invest

Common Mistakes Businesses Make with Headless Shopify

Most headless failures do not come from technology; they come from poor decisions early on.

  1. Going Headless Too Early: Adopting Hydrogen without a clear need leads to unnecessary cost and complexity.
  2. Underestimating Total Cost: Focusing only on development cost while ignoring maintenance and iteration.
  3. Ignoring Performance Strategy: Assuming headless automatically improves speed without proper optimization.
  4. Choosing the Wrong Development Partner: Working with teams that focus on code, not business outcomes.
  5. Treating Headless as a One-Time Project: Instead of an evolving product that requires continuous improvement.

How to Choose the Right Shopify Hydrogen Development Partner

If you decide to go headless, your results will depend heavily on who builds it.

What to Look For

  • Product thinking, not just development
  • Experience with Shopify Hydrogen and Storefront API
  • Strong understanding of performance optimization
  • Ability to align technology with business goals

Red Flags to Avoid

  • Agencies that push headless as a default solution
  • Unrealistically low cost estimates
  • Lack of Shopify-specific experience
  • No discussion of ROI or long-term strategy

What a Good Partner Actually Does

A strong partner does not just build your storefront; they help you:

  • Decide if headless is right
  • Define a clear roadmap
  • Maximize ROI post-launch

Conclusion: The Right Decision isn’t Headless vs Theme, it’s Fit vs Misfit

By now, one thing should be clear:

Shopify Hydrogen and headless architecture are powerful, but not universally necessary.

The real decision is not about choosing the most advanced technology.

It is about choosing the right level of complexity for your business goals.

  • If you need speed, flexibility, and scalability > headless can unlock growth
  • If you need efficiency, simplicity, and faster execution > Liquid themes often win.

The best storefront is not the most advanced one; it is the one that delivers the highest return on investment.

Build a scalable store that drives growth and ROI

How to Write a Software Development RFP That Gets Serious Attentions

Introduction

Most companies do not lose a good vendor because of budget. They lost them because the RFP wasn’t clear enough to take seriously.

Writing a request for proposal for software development sounds straightforward. You list what you need, set a deadline, and wait for a proposal to come in. But if you have done this before, you know it rarely works that way.

The software product development service is the one with a strong track record and is picky about which RFPs they respond to. A vague document, rushed, or missing basic details like a budget range? They will skip it. The ones who respond to anything are usually not the ones you want.

This guide walks you through how to write an RFP that earns real responses from vendors who actually want to work with you.

What Is an RFP in Software Development?

A request for proposal for software development is a document you send to vendors when you want them to pitch for your project. It tells them what you are building, what you need, your timeline, and how you will decide who wins the work.

Think of it as a structured RFP software development template that gives vendors everything they need. A good one gives vendors everything they need to come back with a relevant and realistic proposal. A poor one leaves them guessing, and experienced vendors don’t guess. They will just move on.

RFP vs RFI vs RFQ: Which One Do You Need?

People mix these up all the time. Here is a simple breakdown:

Most Common

RFP

You know the problem. You want vendors to propose how they’d solve it and at what cost.

Early Research

RFI

You are still figuring things out. You want to understand what’s possible before committing.

Price Comparison

RFQ

Scope is fully defined. You just need price quotes. Rare for custom software.

For most software projects, an RFP is the right tool. If you are still figuring out what you need, start with an RFI or a scoping conversation first.

Do You Actually Need a Formal RFP?

Not always. An RFP takes time to write and time for vendors to respond. If your project scope is small and your requirements are still forming, then a direct conversation with one or two agencies is often faster and just as effective.

Here is a quick way to decide:

Use an RFP whenSkip the RFP when
Budget is above $65kBudget is under $35K
You are comparing 3 or more vendorsYou already have a trusted vendor in mind
Multiple stakeholders need sign-offRequirements are still being defined
There are compliance or audit requirementsSpeed is the main priority
The project involves complex integrationsYou just need a quick scoping call

Talk to us about project scoping

What Vendors Actually Want to See in Your RFP?

Most guides about how to write a software development RFP are written from the buyer’s side. But it should actually cover what vendors actually look for when they are deciding whether to respond or not.

Before you read a single requirement, here are the three things that you must need to check:

  • Is there a budget range? Even a rough one?
  • Is there a real deadline and a named decision-maker?
  • Does the document show the client knows what they want?

If any of those are missing, many good agencies will either skip it or send a vague response just to keep their options open. Neither outcome is useful for you.

What Makes a Vendor Take Your RFP Seriously?

Here is the table so that you can have more clarity:

What to includeWhy it matters to vendors
A budget rangeTells vendors if the project is financially viable before they invest time in a proposal.
The business problem you’re solvingHelps them propose the right solution, not just tick a feature list.
Your existing tech stackFlags integration challenges or constraints upfront.
What’s out of scopePrevents misunderstandings that escalate during delivery.
How and when you’ll decideShows a real decision process and that responding is worth their effort.
A named decision-makerSignals internal alignment and clear ownership.

Things That Make Good Vendors Walk Away

  • No budget range at all, it gives the signal of internal misalignment, not a negotiation strategy.
  • Asking for the free architecture design as part of the proposal.
  • A 40-page spec with no business context behind the requirements.
  • 10 stakeholders listed as “decision-maker” with no one named as the owner.
  • Timelines that are clearly too tight to be realistic.
Worth Remembering

Your document tells vendors what working with you will be like. A clear, honest, well-structured RFP signals that you are an organized client. That alone can put you ahead of other projects competing for the same team’s time.

Before You Write: 4 Things to Sort Out Internally First

The number one reason RFPs fail is not just the document; it is the teams that start writing before they are actually ready. Sort these out first, and everything else becomes much easier.

Get everyone aligned internally

Your CTO, Head of Product, and whoever controls the budget all need to agree on what this project is before vendors hear about it. If they don’t, your RFP will be inconsistent, and the vendor will notice.

Focus on the problem, not just the solution

Instead of writing, “we need a customer portal with these 12 features,” write “customers are dropping off at onboarding because there’s no self-serve option.” Vendors can suggest better solutions when they understand the real problem.

Get a budget range approved before you write anything

You do not need an exact number. A range like $50k-$150K is enough. Without it, you will spend weeks reviewing proposals you can’t actually move forward on.

Assign one person to own the process

Someone needs to manage vendor questions, coordinate internal feedback, and drive the decision forward. Without a named owner, RFPs sometimes stall for months.

The 10 Sections Every Software Development RFP Must Include

A good request for proposal for software development does not have to be long. But it does need to cover these 10 areas: use this in your RFP template software development team follow before going to market.

Skipping the one, you will either get widely different proposals that are impossible to compare or end up with disputes after the contract is signed.

The 10 sections are:

1. Company and Project Overview

Who you are, what you do, and why this project is happening now. Keep it short; vendors want context, not company history.

2. Scope of Work and Functional Requirements

What the product needs to do along with software consulting and project scoping. Separate must-haves from nice-to-haves. Describe what you want to achieve, not just what you want built.

3. Technical Requirements and Preferred Stack

Existing systems, preferred tech, APIs, and security requirements. Be upfront about legacy system surprises; mid-project costs money.

4. UI/UX Expectations and Design Standards

Brand guidelines, design system, accessibility needs, and examples you like. Most RFPs skip this. Then spend months arguing about design after the contract is signed.

5. Budget Range and Engagement Model

A realistic range and whether you prefer a fixed price, time, and materials of a dedicated team. This is the most important section. Most buyers leave it blank. “Don’t.”

6. Timeline and Key Milestones

When you want to start, key delivery dates, and any hard deadlines. Flag which dates are fixed and which are flexible.

7. Vendor Qualification Criteria

What vendors need to qualify: experience level, team size, industry background, and location. This filters out unsuitable responses before they reach you.

8. Proposal Format and Submission Deadline

How vendors should structure their response, what to include, and the hard deadline. The clearer this is, the easier your evaluation will be.

9. Evaluation Criteria and How You’ll Decide

What you have scoring on, such as technical approach, experience, price, and team. Being transparent here usually improves proposal quality significantly.

10. Post-Launch Support and Maintenance

What happens after go-live? Bugs, documentation, handover, and SLAs and handover terms belong in your RFS software development template, not in a contract negotiation 6 months later. Leaving this out is the most common cause of the post-launch dispute.

Most Skipped Section

UI/UX and Post-Launch Support are missing from most of the RFPs you see. Both are common causes of expensive disagreements later. Adding them takes 30 minutes and saves weeks of back-and-forth work.

Need help with the technical side? See how we approach software product development

Should You Share Your Budget Upfront?

Yes. Almost every time.

We know the hesitation, it feels like you are giving your negotiation positions before talks even start. But in practice, hiding your budget causes more problems than it solves.

What Actually Happens When There’s No Budget in the RFP

  • Some vendors over-engineer to impress and come back way over budget.
  • Others are underscoped to look cheap and leave out half of what you need.
  • You spend weeks reviewing proposals that were never realistic.
  • You end up starting the whole process again once reality sets in.

How to Share Your Budget Without Losing Your Edge

Use a range, not a fixed number. Something like “we have a budget in the range $100k–$160k for the initial build” is honest, useful, and still leaves room for discussion. Pair it with your preferred engagement model, and vendors can structure their proposal properly.

Engagement ModelsBest Suited ForMain Trade-Off
Fixed PriceWell-defined scope with clear deliverablesLess flexibility if the scope changes
Time & MaterialsEvolving requirements or agile projectsRequires active oversight on your side
Dedicated TeamLong-term builds or ongoing product developmentHigher upfront cost, but deep alignment

On Timelines

Don’t fake urgency you do not have. “Targeting go-live before Q4, but start date is flexible” is far more useful to the vendor than “ASAP,” which just reads as “we have not aligned internally yet.”

Mistakes That Cost You Good Vendor Responses

These are not edge cases. These are patterns that appear in most of the RFPs that come back with poor responses, no response, or proposals that do not hold up once the project actually starts.

  • Writing a solution instead of a problem

When you prescribe every feature and every screen upfront, vendors cannot suggest a better approach. The best team wants to understand your goals first, then figure out the smartest way to get there. Give them that room.

  • Sending the RFP before internal alignment is done

If the management disagrees on what you are building, that confusion will be reflected in the documents. Vendors will either price in the uncertainty as risk or quietly move on to a client who’s clearer on what they want.

  • Setting a timeline that is not realistic

An aggressive deadline does not signal urgency to experienced vendors. It signals that something has already gone wrong internally, or that the client has not fully thought through what the build actually requires. Both situations lead to inflated quotes.

  • Not explaining how you will make the final decision

Vendors invest real-time in proposals. If they do not know who makes the call, how proposals are scored, or when they will hear back, the best agencies will question whether the effort is worth it. Transparency here builds trust and improves response quality.

  • Leaving post-launch as “something we’ll discuss later”

Support, documentation, handover, and SLAs belong in the RFP software development template and not in a contract negotiation six months down the line. Leaving this section empty does not delay the conversation. It just makes it harder when it eventually comes up.

Each of these mistakes is avoidable with a solid RFP software development template in place before you start writing.

How to Evaluate a Proposal and Pick the Right Vendor

Once the proposals are in, the risk shifts. Now the danger is picking the wrong vendor for the wrong reason, because usually the most polished document wins over the most capable team.

Score Proposal Before You Read Them

Decide your evaluation criteria and their weightings before opening a single response. If you read them first and then build a headline, you will carelessly design it around your favourite.

A simple scoring table helps you avoid that bias entirely.

CriteriaSuggested WeightWhat to Look For
Technical Approach30%Did they understand the real problem or just repeat your requirements?
Relevant Experience25%Similar projects with verifiable references, not just client logos.
Commercial Fit20%Is the pricing clearly explained and realistic for the scope?
Team Composition15%Named individuals with relevant experience, not generic roles.
Communication Quality10%How they handled questions during the RFP process itself.

Questions Worth Asking Every Shortlisted Vendor

  • Walk us through how you would handle a significant scope change three months in; this reveals more than any proposal.
  • Who specifically will work on this day-to-day, not just who presents it to us today?
  • Can you share a reference from a project that ran into problems, and how you resolved it?
  • What does your handover process look like at the end of the project?

Considering a dedicated team model? See how WEDOWEBAPPS structures a dedicated development team

Before You Send Your RFP: A Quick Checklist

Use this check list for your RFP template software development. If you cannot check every box, fix it first; the ones you skip are usually the ones that come back to cause problems.

Internal Alignment

  • One named person owns the RFP process and the final decision.
  • The budget range is approved internally and included in the document.
  • All key stakeholders have reviewed and agreed on the scope.
  • You know whether you need a fixed price, time and materials, or a dedicated team.

The Document Itself

  • The company background and project context are clear and concise.
  • You have described the business problem, not just the feature list.
  • Must-haves and nice-to-haves are clearly separated.
  • Existing tech stack and integrations are documented.
  • UI/UX expectations and any brand guidelines are included.
  • Budget range is stated, even though it is approximate.
  • Timeline included which dates are fixed and which are flexible.
  • Post-launch support expectations are clearly defined.

Vendor Process

  • The submission deadline is clearly stated.
  • Proposal format is specified so responses are easy to compare.
  • Evaluation criteria and weightings are included.
  • You have a named point of contact for vendor questions.

If you are missing more than 3 of these, the RFP is not ready to go out yet. A week spent fixing the document now will save weeks of back-and-forth once proposals start coming in.

Get a Free RFP Review Before It Goes Out

Most ERP mistakes are invisible to the people who wrote them. You are too close to the project to spot what is missing or unclear, but an experienced vendor will notice within minutes.

Before you send your RFP to market, we will review it for free.

Our team at WEDOWEBAPPS will look at your document and tell you:

  • Whether your scope is clear enough to get consistent, comparable proposals.
  • If your budget range is realistic for what you are describing.
  • What is missing that vendors will either assume or price as risk?
  • Whether your timeline is achievable based on similar projects we have delivered.

There is no pitch, no obligation, and no sales unless you want one. Just an honest review from a team that reads RFPs regularly and knows what makes them work.

Send us your RFP for a free review

WEDOWEBAPPS works with startups and product teams on software product development across web, mobile, and backend systems. If you have read this far, you are serious about getting the vendor selection right, and that is the kind of client we work with.

Mobile App Maintenance Retainer Pricing: What You Get at Each Level

Why Every Live App Needs a Maintenance Plan

Launching your app is only the beginning. From the moment your app goes live, the environment it operates in starts to change, and without a solid mobile app maintenance plan, those changes will eventually break your product.

Here is what happens to unmaintained apps over time:

  • Apple and Google release major OS updates annually, and apps that are not updated for compatibility get flagged, crash, or are removed from stores entirely.
  • Third-party libraries, payment SDKs, and APIs deprecate their older versions, quietly breaking features your users depend on.
  • Security vulnerabilities accumulate in outdated dependencies, exposing your users’ data to risk.
  • Performance degrades as device hardware evolves and your app’s codebase falls behind best practices.
  • Without monitoring, you hear about critical bugs from angry users, not from your own team.

A proactive mobile app maintenance plan means all of the above is handled before it becomes a crisis. For apps that handle payments, personal data, or business-critical workflows, a maintenance plan is not optional, it is the cost of staying live.

Get My Free Retainer Recommendation

What a Mobile App Maintenance Retainer Covers

A retainer is not a vague ‘support contract’; it is a structured monthly service with defined deliverables. Our quality assurance and testing services are included in the Standard and Premium retainer tier, not billed separately per release. Here is what falls under a well-structured retainer:

  • Bug identification and resolution (minor and major, depending on tier)
  • OS and device compatibility testing after each platform update
  • Third-party library and SDK updates to prevent silent breakages
  • App Store and Play Store compliance reviews
  • Performance monitoring and optimization, load times, crash rates, memory usage
  • Monthly activity and health reports so you always know what was done and what is planned

iOS App Maintenance and Support

For iOS app maintenance and support, Apple’s annual OS releases mean your retainer should always include compatibility testing, not just bug fixes. Every September, Apple ships a major iOS update that can break UI elements, payment flows, push notifications, and third-party integrations. Our iOS retainers include pre-release compatibility checks so your app is ready on launch day, not two weeks later.

Android App Maintenance and Updates

Android app maintenance and updates require more frequent testing cycles due to device fragmentation; factor this into your retainer tier selection. Unlike iOS, Android runs across thousands of hardware configurations, screen sizes, and manufacturer skins. Our Android retainers include tiered device testing matrices, ensuring your app performs consistently whether your user is on a flagship Samsung or a budget Xiaomi.

Our 3 Retainer Tiers: What is Included at Each Level

We offer three structured retainer tiers designed to match apps at different stages of complexity, traffic, and business criticality. Every tier includes a dedicated point of contact, a monthly report, and clear SLA commitments.

FeatureBasicStandardPremium
Starting Price$300/mo$450/mo$650/mo
Bug FixesMinor onlyMinor + majorAll severity levels
OS CompatibilityAnnual checkEach OS releasePre-release testing
QA TestingBasicFull QA includedFull QA + regression
Performance MonitoringMonthlyBi-weeklyReal-time
Response Time (Critical)72 hrs24 hrs4 hrs
Dedicated Dev Hours4 hrs/mo10 hrs/mo20 hrs/mo
Monthly ReportYesYesYes + strategy call
Best forSimple appsMid-complexity appsBusiness-critical apps

Basic Retainer – What is Included

The Basic Retainer at $300/month is designed for simple apps with low traffic, stable codebases, and no complex third-party integrations. It covers minor bug fixes, a monthly OS compatibility check, basic performance monitoring, and a monthly summary report. Best suited for internal tools, MVP-stage apps, or informational apps that do not handle payments or sensitive data.

Standard Retainer – What is Included

The Standard Retainer at $450/month is our most popular tier, built for mid-complexity apps with active user bases. It includes everything in Basic, plus full QA testing on each release, compatibility testing on every major OS update, bi-weekly performance reviews, and 10 dedicated developer hours per month. This is the right level for eCommerce apps, booking platforms, or any app with regular feature updates.

Premium Retainer – What is Included

The Premium Retainer at $650/month is built for business-critical and high-traffic apps where downtime has a direct revenue impact. It includes everything in Standard, plus real-time performance monitoring, a 4-hour critical bug response SLA, 20 dedicated developer hours per month, pre-release iOS beta testing, and a monthly strategy call to plan upcoming improvements. Ideal for fintech apps, healthcare platforms, and enterprise-grade mobile products.

Retainer vs Ad-Hoc Support: Which is More Cost-Effective?

Ad-hoc support feels cheaper on paper; you only pay when something breaks. But in practice, most businesses that rely on ad-hoc support end up with a mobile app maintenance cost that is significantly higher per year than retainer clients, because emergency fixes are priced at premium rates and often take longer due to the lack of existing context about your codebase.

FactorRetainerAd-Hoc
Monthly Cost$300-$700 (fixed)$800-$2,500+ (variable)
Response TimeGuaranteed SLABest effort
Budget PredictabilityHighLow
Priority AccessYesNo
Proactive MonitoringIncludedNot included

Consider a real-world scenario: an app that needs two emergency fixes per year, each taking 8 hours at a $150/hr emergency rate. That is $2,400, nearly the cost of a full year on our Basic retainer, with none of the proactive monitoring, OS updates, or QA testing included. The average app maintenance cost on a retainer is significantly lower when you factor in priority access, proactive monitoring, and fewer production incidents overall.

Start My Standard Retainer Today

What Our Clients Say About Their Retainer Experience

Do not take our word for it. Here is what business owners on our retainer plans have told us:

“Before WEDOWEBAPPS, we were paying $1,800 in emergency fixes every few months. With the Standard retainer, everything is handled proactively, and we have not had an incident in 14 months.”

– Product Owner, eCommerce App (Standard Retainer)


“The Premium retainer was the best decision we made post-launch. Our app handles live transactions, and we needed a 4-hour SLA. WEDOWEBAPPS delivered, every time.”

– CTO, Fintech Startup (Premium Retainer)

What is Covered in Your Retainer vs. What’s Billed Separately

Transparency matters when you are committing to a monthly fee. Here is a clear breakdown of what sits inside your retainer and what falls outside it, so there are no surprises on your invoice.

Included in Your RetainerBilled Separately (Ad-Hoc)
Bug fixes (within scope)New feature development
OS compatibility updatesComplete UI redesigns
QA testing (Standard+)Third-party API integrations (new)
Performance monitoringApp rebuilds or platform migrations
Monthly reportingMarketing or ASO campaigns
App Store compliance checksServer infrastructure changes

Everything billed separately is quoted upfront before any work begins. You will never receive an invoice for out-of-scope work without prior approval.

How We Handle Emergency Fixes Outside the Retainer

Even the best-maintained apps occasionally face incidents that fall outside the defined retainer scope, such as a sudden server integration failure, a payment gateway change from a third-party, or a critical new-feature deployment that goes wrong. When that happens, here is exactly what to expect from WEDOWEBAPPS.

  • You raise an emergency ticket directly with your dedicated point of contact, no ticket queues, no waiting.
  • We assess the issue within 1 hour (Premium) or 4 hours (Standard and Basic) and confirm the scope and estimated effort.
  • You receive a fixed quote for the emergency work before we begin, no open-ended billing.
  • Emergency ad-hoc rates start at $100/hr, with priority scheduling that puts your issue above non-retainer client requests.
  • Once resolved, we document the root cause in your monthly report and, where relevant, adjust your retainer scope to prevent recurrence.

Being on a retainer means emergency fixes are handled by a team that already knows your codebase, which makes resolution faster and quotes more accurate than any new agency you would have to onboard in a crisis.

Book My Free Retainer Clarity Call

How to Choose the Right Retainer for Your App

Not every app needs the same level of maintenance. Use this framework to identify the right tier for your situation:

  • Choose Basic if your app is a simple informational or internal tool, has under 1,000 active users, does not handle payments or personal data, and has a stable codebase with infrequent releases.
  • Choose Standard if your app has an active and growing user base, processes transactions or stores user data, runs on both iOS and Android, and you release updates every one to two months.
  • Choose Premium if your app is revenue-generating, has users who rely on it daily for business operations, requires a guaranteed response SLA, or operates in a regulated industry such as fintech or healthcare.
  • Request a custom quote if your app has unusual complexity, multiple third-party integrations, large-scale backend dependencies, or enterprise security requirements that do not map neatly to a standard tier.

What to Expect After You Reach Out to WEDOWEBAPPS?

Here is exactly what happens once you submit your enquiry:

  • Step 1 – Discovery: We review your app details and ask any clarifying questions within 24 hours.
  • Step 2 – App Audit: We assess your current codebase, platform, and maintenance history at no cost.
  • Step 3 – Tier Recommendation: We recommend the retainer tier that fits your app, and explain why.
  • Step 4 – Custom Quote: You receive a clear, fixed-price quote with all inclusions listed. No hidden fees.
  • Step 5 – Onboarding: Once confirmed, we onboard within 5 business days and your retainer begins.

Conclusion

A mobile app maintenance retainer is the most cost-effective, predictable, and reliable way to keep a live app performing at the level your users expect. Rather than reacting to breakages with expensive emergency fixes, a well-structured mobile app maintenance plan puts a qualified team in your corner every month, monitoring, updating, testing, and reporting before problems reach your users.

WEDOWEBAPPS structures mobile app maintenance retainer pricing across three tiers, Basic at $300/month, Standard at $450/month, and Premium at $650/month, each with defined inclusions, committed SLAs, and a dedicated point of contact. Understanding your mobile app maintenance cost upfront means no surprises, no inflated emergency invoices, and no guesswork. Whether you are maintaining a simple internal tool or a high-traffic fintech app, there is a tier built for your situation.

The best time to start a retainer is before something goes wrong. The second-best time is right now.

Get My Custom Retainer Quote Now

React Native App Development Timeline: Realistic Phase-by-Phase Breakdown

Introduction

A founder once came to us three weeks before his planned launch date. His previous agency had told him “eight weeks, maybe ten.” He was at week fourteen, the app wasn’t testable yet, and his investor demo was in twenty-one days.

The problem was not the developers. The problem was that no one had given him an honest, phase-by-phase picture of what building an app actually involves, before the contract was signed.

We see this more than we would like to. Clients who were handed a single number (“12 weeks!”) with no breakdown, no risk flags, no mention of App Store review times, or the cost of a scope change in week nine.

This guide fixes that. Below is a complete, realistic timeline for React Native app development, broken into every phase, with honest duration ranges, what each phase actually produces, and the specific things that blow up schedules. Whether you are planning a simple utility app or a multi-sided platform, you will leave this page knowing what to expect, what to watch for, and how to protect your launch date.

What Affects a React Native Application Development Timeline the Most?

Before we get into the phases, it helps to understand the variables that compress or stretch every single one of them.

1. Scope Clarity (the biggest one)

A team that starts with a well-defined scope, clear user flows, agreed features, and defined integrations, will move two to three times faster than a team still demanding requirements in four weeks.

Vague briefs are the single largest cause of timeline overruns. Every time a requirement changes after development starts, you are not just adding a feature, you are often re-architecting something that was already built.

2. Team Size and Structure

A solo developer and a four-person team do not just move at different speeds, they also catch different problems. A solo developer might miss a security gap that a dedicated QA engineer would find immediately.

Our React Native app development services assign a dedicated project manager from day one, a decision that alone cuts communication overhead by 30% or more on projects with multiple stakeholders.

3. Third-Party Dependencies

APIs that do not behave as documented. Payment gateway sandboxes that are down. Map services with unexpected rate limits. Third-party integrations introduce unpredictability that is hard to plan around. Budget two to three buffer days per major external dependency.

4. Client Feedback Speed

This one is underestimated. When a developer pushes a build for review, every day that passes without feedback is a day the developer cannot continue without risking wasted work.

Projects where clients review and respond within 24 hours finish 20-40% faster than those with multi-day feedback loops.

5. Platform Targets

React Native builds for both iOS and Android from a shared codebase, but “shared” does not mean “identical.” Platform-specific UI polish, permission handling, and edge case testing still add time.

Building for both simultaneously adds roughly 15-20% to development and QA phases compared to single-platform development.

The Full React Native Application Development Timeline at a Glance

Here is how a typical mid-complexity project (MVP-range) maps across a 20-week timeline. Each bar represents the phase’s typical duration window.

Full React Native Application Development Timeline

Notice that QA and API integration overlap with core development, they are not separate sequential phases. This is how professional teams actually work. Treating them as “next step” is what causes projects to run three months over schedule.

Not sure which timeline bracket your app

Phase 1. Discovery and Scoping (1-2 Weeks)

Turning your idea into a buildable blueprint

Discovery is the phase most clients want to skip, and the one that saves the most money when done properly. This is where your idea gets translated into a concrete scope, features, user flows, technical requirements, and a realistic timeline for developing an app.

A good discovery phase surfaces the decisions you will otherwise be forced to make mid-development, at five times the cost and twice the delay. It answers: What does the MVP actually need? What can be built in version two? What integrations are required on day one?

Key Deliverables

  • Feature list (prioritized)
  • User flow diagrams
  • Technical architecture overview
  • Project timeline + milestones
  • Risk log

What Causes Delays

  • Unclear business requirements
  • Too many stakeholders with conflicting input
  • Scope that keeps expanding in meetings
  • No decision-maker with final say
Pro Tip

Before the first discovery meeting, write down your three non-negotiable features, the ones the app literally cannot launch without. Everything else goes on a “nice to have” list. This single exercise cuts discovery time in half and prevents scope creep from the start.

Phase 2: UI/UX Design (2-3 Weeks)

From Wireframes to Pixel-Perfect Screens

Design is not just about how the app looks, it is about how it works. A well-designed screen tells the developer exactly what to build and removes ambiguity from every interaction. Apps developed with complete, approved designs move 30-50% faster through the development phase than those where design and development happen at the same time.

UI/UX for React Native includes both visual design (screens, components, typography, colors) and interaction design (transitions, loading states, error states, empty states). Empty states and error screens are the most commonly skipped and the most commonly complained about in app reviews.

Key Deliverables

  • Wireframes for all core screens
  • High-fidelity UI for both iOS and Android
  • Component library/design system
  • Interactive prototype (optional)
  • Asset export for developers

What Causes Delays

  • Branding not finalized before design starts
  • Multiple revision rounds on the same screen
  • Late requests to redesign the navigation structure
  • Waiting for competitor reference apps

Phase 3: Core Development (4-12 Weeks)

Building What Users Will Actually Touch

This is where the app gets built. Screens get coded, navigation gets wired up, business logic gets written, and the app begins to feel real. The four-to-twelve-week range is wide because complexity varies enormously, a simple five-screen utility app and a social media platform with real-time features are both “React Native apps” but have almost nothing in common in terms of development effort.

This phase runs concurrently with API integration and QA testing. A professional team doesn’t finish all development, then write APIs, then test, those activities overlap. As one screen is built and tested, the next is in development. This parallel approach is what keeps projects on schedule.

Key Deliverables

  • All screens built and navigable
  • Authentication (login, signup, sessions)
  • Core business logic
  • Push notification setup
  • Device permission flows
  • Offline handling

What Causes Delays

  • Approved designs changing mid-sprint
  • New features added without timeline adjustment
  • Platform-specific bugs, especially iOS edge cases
  • Poor third-party library compatibility

Many clients add features during development without adjusting the deadline. Every undocumented addition is a hidden cost. Every new feature added in week six is a feature the team designs, builds, integrates, and tests under pressure. Use a change order process, even an informal one, to keep scope and timeline in sync.

The size of your development team directly affects this phase more than any other. When you hire dedicated React Native developers rather than sharing resources with other projects, core development phases routinely run 30-40% shorter, because there is no context-switching, no competing priorities, and no waiting for availability slots.

Phase 4. API Integration and Backend (2-4 Weeks, Runs Concurrently)

Connecting Your App to the World

React Native apps rarely operate in isolation. They connect to backends, payment processors, maps, analytics, push notification services, third-party logins, and more. API integration is the work of making all those connections reliable, secure, and fast.

This phase follows our standard mobile app development process, integrations are planned in discovery, designed in parallel with the UI, and integrated during development rather than bolted on afterwards. The same structure applies whether you are building a simple content app or a transaction-heavy platform.

Key Deliverables

  • REST or GraphQL API connections
  • Authentication tokens and session management
  • Payment gateway integration
  • Push notifications (FCM/APNs)
  • Analytics and crash reporting
  • Map or location services

What Causes Delays

  • API documentation that doesn’t match behavior
  • Payment provider verification taking 3-7 days
  • Third-party sandbox environments going down
  • Backend not ready when frontend needs it

Phase 5: QA and Testing (Runs Throughout Development)

Catching Issues Before Users Do

QA is not a phase you do at the end. That model, build everything, then test everything, is how projects discover critical architectural issues one week before launch. Our quality assurance and testing services run in parallel with development: as a screen is completed, it enters the QA queue. Bugs get caught early, fixed while the code is fresh, and never accumulate into a backlog.

The final 1-2 weeks before submission is a dedicated end-to-end testing round, testing the complete app as a user would actually use it, across multiple devices and OS versions.

Key Deliverables

  • Functional testing (all features work)
  • UI testing (across screen sizes)
  • Performance testing (load times, memory)
  • Regression testing after bug fixes
  • Device matrix testing (iOS + Android)
  • Security and permission testing

What Causes Delays

  • QA starting too late (post-development)
  • Too few test devices available
  • Critical bugs found in final-round testing
  • No staging environment (testing on production)

Phase 6. Team Size and How it Shapes Your Timeline

Your Team Structure is a Timeline Variable

Most timeline guides skip this entirely, which is a mistake. Team composition is one of the most controllable timeline variables, and one of the most misunderstood.

A typical efficient React Native team looks like this:

  • 1 Project Manager: Owns the timeline, client communication, and sprint planning
  • 1-2 React Native Developers: Core app development
  • 1 Backend Developer: API and server-side logic
  • 1 UI/UX Designer: Screens, components, and design system
  • 1 QA Engineer: Concurrent testing throughout development

Running a project with a smaller team does not just take longer, it introduces serial dependencies. When one person is designing, developing, and testing, those activities cannot run in parallel. A five-screen app with one person takes longer than a twenty-screen app with the right team.

Dedicated Team Benefits

  • Parallel workstreams (design + dev + QA)
  • No context-switching or shared priorities
  • Faster review and decision cycles
  • Single accountability point per function

Under-Staffing Risks

  • Serial bottlenecks between phases
  • QA rushed at the end
  • Design decisions made by developers
  • PM work falling on the client

Phase 7. App Store Submission and Launch (1-2 Weeks, Plus the Part Everyone Forgets)

The Finish Line is Further Than it Looks

Every team that has launched an app has a “we were ready and then…” story. App Store submission is the most schedule-disrupting surprise in the entire process, and it is almost entirely outside your control.

THE SURPRISE THAT DELAYS MOST LAUNCHES

Apple’s App Store review typically takes 24-48 hours, but can extend to 5-7 days for first-time app submissions or when reviewers flag issues. Google Play is usually faster (a few hours to 3 days), but can also request additional information. If your app gets rejected, for a missing privacy policy, an incomplete demo account, or a guideline violation, add another 3-5 days for the fix and resubmission cycle. Budget at least two weeks of buffer for this phase alone.

Pre-Submission Checklist

  • App Store/Play Store accounts active
  • Privacy policy published and linked
  • App icons and screenshots prepared
  • App descriptions and keywords written
  • Demo account credentials for reviewers
  • Age ratings completed
  • In-app purchase configs reviewed

Common Rejection Reasons

  • Missing or broken privacy policy link
  • No demo account for reviewers to log in
  • Crashes during Apple’s review
  • Misleading app description or screenshots
  • In-app purchases not using Apple’s system
  • Location/camera permission text too vague

Get a Phase-by-Phase Timeline Estimate

Simple App vs MVP vs Complex Platform: Timeline Comparison

Here is how timelines map to project types. These are real-world ranges, not best-case estimates.

Simple App vs MVP vs Complex Platform

Your Project is an MVP or Full Build

Full Phase Timeline Table

PhaseTypical DurationKey DeliverablesMost Common Delay
Discovery and Scoping1-2 weeksFeature list, user flows, architecture plan, milestone timelineUnclear requirements
UI/UX Design2-3 weeksWireframes, high-fidelity designs, component library, asset exportsBranding not ready
Core Development4-12 weeksAll screens coded, navigation, auth, business logic, device integrationsScope changes mid-sprint
API & Backend Integration2-4 weeks (concurrent)APIs connected, payments, push notifications, analyticsThird-party API issues
QA & TestingOngoing + 1-2 week final roundFunctional, UI, performance, regression, device matrix testingLate QA start
App Store Submission1-2 weeks prep + review waitStore listings, screenshots, privacy policy, submission, approvalApple rejection

How to Speed Up Your React Native Project

Most timeline overruns are not caused by slow developers. They are caused by slow decisions, late deliverables, and creeping scope. Here are the actions that consistently compress timelines without cutting quality.

1. Finalize Your Brand Before Design Starts

If your designer is waiting for logo, font decisions, or color approvals, your project is paused, even if the clock is still running. Have your brand assets locked before the design phase begins. It saves at least a week of back-and-forth.

2. Assign One Decision-Maker

Projects with multiple approvers (two co-founders, a board, several internal stakeholders) routinely take 40-60% longer than those with a single named decision-maker. The team is not slower, they are just waiting for a consensus that never forms quickly. Name one person who can approve designs and unblock decisions within 24 hours.

3. Freeze Scope at the Start of Each Sprint

New ideas are good. New ideas mid-sprint are expensive. Implement a simple rule: feature requests go on a backlog and get evaluated for the next sprint, they don’t enter the current one. This single process change is the highest-leverage thing a first-time app client can do to protect their timeline.

4. Set Up Your App Store Accounts Early

Apple Developer enrollment takes 1-2 days, and sometimes up to a week for business verification. Google Play Console setup is faster, but still requires a one-time fee and verification. Do this in week one, not week eighteen.

5. Use a Dedicated Team

Shared-resource models, where developers split time between multiple projects, introduce scheduling dependencies that add weeks to timelines. A team working exclusively on your project can run all phases in parallel and respond to issues the same day.

Which Bottlenecks Applies to Your Project

Conclusion

React Native app development takes as long as the decisions it is built on top of. A clear scope, fast feedback, a dedicated team, and a realistic understanding of App Store timelines will do more for your project schedule than any technical shortcut.

The teams that consistently launch on time are not the ones with the most developers, they are the ones who make decisions quickly, protect their scope, and treat QA as a continuous process rather than a last-minute checkbox.

If you are planning an app and want a timeline built around your actual feature set, not a generic estimate, we are happy to walk through it with you.

what timeline is realistic for your app idea

Web Development With a Dedicated Project Manager Included, and What to Look for When They Do

Introduction

You hire a web development company. The kickoff call went well. Everyone seemed aligned. Timelines were agreed. The project began.

Then, three weeks in, you are chasing developers for updates. Nobody has a clear answer on where things stand. The deadline slips quietly, then loudly. And when you finally get a response, it comes from a different person each time.

This is not a rare story. It is the default experience for hundreds of businesses every year. And the frustrating part is that the code was probably fine. The design was solid. What failed was everything around it: the communication, the accountability, and the process.

That gap is exactly what a dedicated web development project manager or a dedicated development team with project management is supposed to prevent. Yet most agencies treat web dev project management as a secondary function, split informally across developers and account managers who are already stretched thin.

This blog breaks down what strong web development project management actually looks like, why it should come standard with every engagement, and exactly what to ask before you sign with any agency.

Why Most Web Development Projects Fail Before a Line of Code Is Written

Studies consistently show that nearly 70% of technology projects fail to meet their original goals. The leading cause is not technical failure. It is poor communication and unclear ownership.

Think about how web dev project management typically works at an average agency:

  • A salesperson closes the deal and hands it to a developer.
  • The developer starts building without a formal brief.
  • The client sends feedback via email.
  • Something gets lost in translation.
  • Rework follows, timelines slip, trust erodes.

Nobody lied. Nobody was incompetent. There was simply no single person responsible for keeping the project aligned from the client’s original business goals all the way through the final deliverables.

A dedicated web development project manager closes that gap before it opens. Here is what they do from the moment a project kicks off:

  • Translates business requirements into clear technical briefs.
  • Owns the project timeline and enforces milestone accountability.
  • Surface blockers early before they become delays.
  • Ensures the right decisions get made by the right people at the right time.

Without that role clearly defined and actively filled, even technically strong project manager website development engagements drift slowly at first, then all at once.

What Does a Project Manager Actually Do in Web Development?

The title sounds administrative. The reality is that a web development project manager is active from day one, often before development even begins, and stays involved right through launch and handoff.

Here is what a strong web development project management looks like across the full project lifecycle:

1. Discovery and Planning

This is where most agencies fail their clients before a single line of code is written. A strong web development project manager:

  • Handle lead requirements gathering sessions with the software consulting and project planning.
  • Ask the business questions that developers will not think to ask.
  • Builds the project briefs that become the single source of truth.
  • Defines scope, milestones, and communication cadence.
  • Documents how change requests will be handled in writing, before work begins.

2. During the Build

Once development starts, the PM becomes the operational backbone of the project:

  • Runs daily or weekly standups with the development team.
  • Monitor task completion against milestones in tools like Jira.
  • Serves as the single point of contact for all client communication.
  • Owns blocker resolution when a developer gets stuck, the PM acts.
  • Keeps the client informed without requiring them to chase anyone.

3. QA and Pre-Launch

Before anything goes live, the PM:

  • Coordinates all testing cycles and QA rounds.
  • Manages client feedback loops in a structured and documented way.
  • Ensures nothing goes live without an explicitly tracked client sign-off.
  • Prepares the launch checklist and owns the go-live process.

4. Post-Launch

A good project manager website development engagement does not end at launch.

  • Documents everything that was delivered.
  • Ensures that the client knows how to operate what was built.
  • Closes the engagement cleanly with credentials handed over, decision documented, and no loose ends.

This is web development project management done properly. It is not a project tracking a spreadsheet. It is active, daily ownership of both the client relationship and the delivery process at the same time.

PM-Led vs Developer-Only Engagements: What is the Real Difference?

If you have worked with a web development company with a project manager included versus one that relies on developers to manage their own client communication, you already know the difference.

Here is a direct comparison:

Developer-Only Engagement

  • Communication is reactive; you email when you have a question and wait.
  • Developers context-switch between building and responding to clients.
  • Neither the code nor the communication gets full attention.
  • Timelines exist on paper but are rarely enforced.
  • Scope creep happens quietly, until suddenly the project is over budget and past deadline.
  • Nobody quite knows how it got there because nobody was tracking it.

PM-Led Engagement

  • Communication is proactive; your PM sends updates before you ask for them.
  • Milestones are tracked, visible, and enforced.
  • Scope changes go through a defined process, documented and agreed upon, before work continues.
  • You always know exactly where the project stands.
  • Developers focus entirely on building, the PM handles everything else.

Side-by-Side Comparison

FactorsPM-Led EngagementDeveloper-Only Engagement
Single Point of ContactYes, named PMNo, whoever is available
Proactive UpdatesWeekly, structuredReactive, on request
Milestone TrackingYes, via Jira/AsanaInformal or absent
Scope Change ProcessDocumented, signed offHandled verbally
Timeline AccountabilityPM-ownedDeveloper-managed
On-Time Delivery RateSignificantly higherSignificantly lower

The difference is not just about comfort. It is about outcomes. Projects with a dedicated web development project manager are significantly more likely to be delivered on time, within scope, and without the relationship damage that poor communication causes.

For any business investing a meaningful budget in a web project, working with a web development company with a project manager included is not a luxury. It is basic due diligence.

How Communication and Updates Should Be Structured in a Web Project

Good web development project management is not just about having a PM assigned on paper. It is about how communication is structured throughout the entire engagement.

Here is what a well-run project looks like from a communication standpoint:

Weekly Status Reports

Every week, the client receives a written summary that covers:

  • What has been completed since the last update?
  • What is currently in progress?
  • What is scheduled for the coming week?
  • Any open decisions or blockers requiring client input.
  • Current status against the overall project timeline.

This keeps everyone aligned without requiring constant meetings or daily calls.

Milestone-Based Check-ins

Rather than ad hoc calls, structured check-ins are tied to project milestones:

  • End of discovery and requirements sing-off.
  • Design approval.
  • Development complete.
  • QA complete and bug-free sign-off.
  • Launch readiness confirmation.

Each milestone has a clear deliverable and a documented sign-off step. Nothing moves forward without both sides explicitly agreeing.

Centralised Communication Tools

Strong web dev project management keeps all communication in one place:

  • Jira: For task tracking, milestone visibility, and sprint planning.
  • Slack: For real-time messaging and quick decisions.
  • Weekly PDF or email reports: For client-facing summaries and executive updates.

Nothing critical gets buried in email threads or scattered across WhatsApp groups, call notes, and separate inboxes.

Escalation Protocols

If a decision needs to be made quickly, due to a technical constraint, a design change, or an unexpected dependency, there is a clear escalation path. The web development project manager owns that path and ensures nothing stalls waiting for a reply.

When evaluating any agency, ask to see an example weekly report. If they do not have one ready, that tells you more about their web development project management than any portfolio ever will.

What Happens When Project Scope Changes? (And It Always Does)

Scope changes are not a sign that a project is failing. It is a natural part of building anything real. What matters is how it is handled, and this is exactly where the presence or absence of a strong web development project manager becomes very visible.

Without a PM: How Scope Changes Go Wrong

  • A developer agrees to add a feature during a casual call.
  • Nobody documents the change or its impact.
  • Nobody recalculates the timeline or budget.
  • Weeks later, the project is delayed, costs have grown, and both sides are confused about what was good.
  • The relationship suffers not because of bad code, but because of bad process.

With a PM: How Scope Changes Should Work

Every scope change goes through a defined process:

  1. Client submits a change request in writing, not verbally.
  2. The web development project manager evaluates the requests.
  3. Impact on timeline, budget, and resources is assessed and documented.
  4. A formal change order is produced with the updated scope and cost.
  5. The client gives a written sign-off before any additional work begins.
  6. The changes are logged in the project tracker and reflected in the next weekly update.

This process protects the client from surprise costs and protects the agency from delivering work that was never properly agreed upon.

The most important thing to know: the change management process should be defined at the very start of the project during discovery, before a single line of code is being written. Any agency that cannot explain its scope change process upfront is one that improvises it when things get difficult.

What to Ask a Web Development Company About Their Project Management

Before you sign with any agency, ask these questions directly. The answers will quickly reveal whether their web dev project management is a real, practiced process or just a bullet point on a sales deck.

1. Who will be my single point of contact throughout the project?

What to listen for:

  • A named individual with clear PM responsibility.
  • Someone whose primary role is project management, not a developer who also handles emails.

Red flag: “The team will be your contact” or “Whoever is available.”

2. How do you handle scope changes?

What to listen for:

  • A structured process with written documentation.
  • Impact assessment before work begins.
  • Written client sign-off as a requirement.

Red flag: “We are flexible, we handle it as we go.”

3. What does a typical weekly update look like?

What to listen for:

  • An example report they can share immediately.
  • Structured format covering progress, blockers, and upcoming milestones.

Red flag: No template exists. They have never been asked this before.

4. What tools do you use for project tracking and communication?

What to listen for:

  • Jira, Asana, or equivalent for task and milestone tracking.
  • Slack or Teams for real-time communication.
  • A structured reporting process for client updates.

Red flag: “We mainly use email” for a project of any real complexity.

5. How many projects is your PM managing at once?

What to listen for:

  • A number that allows genuine focus on your project.
  • Clarity on how bandwidth is managed across accounts.

Red flag: One PM managing 15+ active projects simultaneously is not a dedicated resource.

6. What happens if the project fails behind schedule?

What to listen for:

  • Proactive client notification as soon as a risk is identified.
  • A revised milestone plan with a clear recovery path.
  • Transparent communication about the cause.

Red flag: “We always deliver on time” without any explanation of how that accountability works.

The Bottom Line

Web development project management is not a support function. It is the difference between a project that delivers what was promised and one that drifts, overruns, and damages trust on both sides.

Here is what to remember when evaluating any web development company:

  • Always ask who your named web development project manager will be.
  • Always ask to see an example of weekly update reports.
  • Always ask how scope changes are handled in writing before you sign.
  • Always confirm what tools are used for tracking and communication.
  • Never assume PM is included, confirm it explicitly before the project starts.

At WEDOWEBAPPS, every project includes a dedicated web development project manager as standard. Not a shared coordinator. Not a developer wearing two hats. A named PM who owns your timeline, your communication, and your outcomes from kickoff to launch.

Our web development services are built around this model because we have seen what happens to projects that skip it.

work with team that actually communicates

Ecommerce Website Rebuild Cost: What to Budget in 2026 | WeDoWebApps

Introduction

A WooCommerce store owner came to us last year with a simple ask: “We need a rebuild. How much?” They had already gotten two quotes, one for $8,000 and the other for $22,000, and had no idea why the gap was so wide. After a 30-minute scoping call, the reason was clear: neither vendor had asked about their 9,000 SKUs, their ERP integration, or their custom B2B pricing rules. One had underscoped the job entirely, the other had padded for unknowns they had not bothered to investigate.

That gap between quotes is almost always a gap in scope, and it is exactly what this guide is designed to close. Whether you are on Shopify, WooCommerce, or Magento, you will find real cost ranges, honest timelines, and a clear breakdown of what actually drives the price up. Our eCommerce development services cover full rebuilds, platform migrations, and incremental modernization for live stores.

Get a Free Cost Estimate

Rebuild vs Redesign vs New Build: What Are You Actually Doing?

These three terms get mixed up constantly, and mixing them up leads to wildly wrong cost expectations. Here is what each one actually means:

  • Redesign: You are changing how the site looks and feels. Same platform, same data, same technology. Think of it as repainting and refurnishing a house without touching the plumbing. This is the cheapest option.
  • Rebuild: You are reconstructing the store, either on the same platform or a new one, while keeping your existing data (products, orders, customers). This is the most common project type for established businesses.
  • New Build: You are starting from scratch with no legacy data, no old platform to migrate from, and no technical debt to manage. Lower risk, but only relevant if you are launching a genuinely new store.

Most business owners reading this guide are doing a rebuild. You have a store that is live and generating revenue. You cannot just switch it off. Every decision carries real commercial risk.

RedesignRebuildNew Build
What changes?Frontend onlyPlatform + frontend + dataEverything from scratch
Data migration?NoYes (complex)No
Typical cost?$2,000 – $12,000$4,000 – $75,000+$6,000 – $60,000+
Typical timeline?2-8 weeks6-32 weeks8-24 weeks
Risk LevelLowMedium-HighMedium

Cost Breakdown by Platform: Magento, Shopify, WooCommerce

Your platform choice is the single biggest driver of rebuild cost. Here is what to expect across the three most common platforms.

Shopify Rebuild Costs

Shopify is the simplest platform to rebuild on. It is hosted, which removes server setup costs, and the app ecosystem means less custom development is needed.

TierTypical CostWhat’s Included
Low$4,000 – $7,000Premium theme customization, basic data migration, standard apps
Mid$7,000 – $16,000Custom theme, full data migration, app integrations, SEO redirect mapping
High$16,000 – $32,000Headless Shopify, complex integrations (ERP, PIM), bespoke checkout logic

As a Shopify rebuild and migration services provider, our work includes theme development, app integration, and full data transfer from your old platform.

WooCommerce Rebuild Costs

WooCommerce costs vary more than Shopify because everything sits on WordPress infrastructure that you own and manage. Plugin complexity and custom functionality are the two biggest cost variables.

TierTypical CostWhat’s Included
Low$5,000 – $9,000New theme, hosting migration, core plugin updates, basic custom work
Mid$9,000 – $20,000Custom functionality, payment gateway rebuilds, performance optimization
High$20,000 – $38,000Bespoke plugins, multi-site setup, complex B2B pricing rules, ERP sync

For WooCommerce development and rebuilds, costs vary significantly based on plugin complexity and the amount of custom functionality your store depends on.

Magento Rebuild Costs

Magento (Adobe Commerce) is the most powerful platform in this list, and the most expensive to rebuild on. It is built for high-volume, complex stores with sophisticated requirements. If you are on Magento 1 (end-of-life since June 2020), migrating to Magento 2 or a different platform entirely is urgent.

TierTypical CostWhat’s Included
Low$13,000 – $25,000Magento 1 to 2 upgrade, standard theme, core module updates
Mid$25,000 – $50,000Custom theme, extension redevelopment, full data migration, third-party integrations
High$50,000 – $75,000+Enterprise-scale, multi-store, ERP, PIM, 3PL integrations, headless architecture

As Magento development and rebuild specialists, we manage everything from architecture planning to data migration and QA.

Seeing a range that fits your budget

What Drives Rebuild Costs Up

Two stores on the same platform with the same number of pages can have wildly different rebuild costs. Here is what actually moves the number:

  • Number of SKUs and variants: Every product needs to be mapped, cleaned, and imported. 500 SKUs is a half-day job. 50,000 SKUs is a project in itself.
  • Custom integrations: If your store connects to an ERP, a PIM, a loyalty program, or a third-party fulfillment system, each integration needs to be rebuilt or remapped to the new platform.
  • Multi-currency or multi-language: These add development time, testing complexity, and ongoing maintenance overhead.
  • Bespoke checkout or subscription logic: Custom checkout flows, B2B account pricing, and subscription billing all require significant custom development.
  • Age of the current platform: Older systems often have messy, inconsistent data that needs cleaning before it can be migrated. The older the platform, the harder the extraction.
  • SEO URL mapping: Every URL that changes needs a redirect. A poorly planned redirect strategy can destroy years of organic rankings overnight.
  • Performance and accessibility requirements: Meeting WCAG 2.1 AA accessibility standards or hitting specific Core Web Vitals targets adds testing time and sometimes significant rework.

Important: Don’t price-match quotes without scope-matching them first.

A $6,000 quote and a $16,000 quote for a ‘Shopify rebuild’ are almost certainly not scoping the same work. Always ask what is included in data migration, QA, and post-launch support before comparing prices.

Data Migration: The Hidden Cost Everyone Forgets

Almost every client is surprised by how much data migration costs. It is part of a rebuild that is not variable in a finished site, but is often the part that determines whether the project succeeds or fails.

Data migration means taking everything stored in your current platform, products, images, customer accounts, order history, product reviews, blog posts, redirects, and moving it cleanly to the new system. That sounds simple, but it rarely is.

Data TypeWhat Makes it ComplexTypical Effort
Products & variantsCustom fields, inconsistent formatting, missing images5 – 40+ hours
Customer accountsPassword hashing, GDPR/CCPA compliance, duplicate records4 – 16 hours
Order historyStatus mapping, tax line differences, fulfillment data4 – 20 hours
Product reviewsPlatform-specific formats, no standard export3 – 12 hours
Blog / CMS contentFormatting differences, embedded media, URL changes4 – 16 hours
URL redirects301 mapping from old to new URLs, SEO preservation3 – 15 hours

The standard process for a safe migration is: test migration on a staging environment -> UAT (user acceptance testing) with your team -> sign off -> live cutover. Skipping any stage risks data loss or corrupt records in production.

Pre-Rebuild Audit Checklist

Before you talk to any developer, do this audit of your current store. It will save you time, money, and surprises:

  1. Inventory your data sources. List every place data lives: your platform database, third-party apps, spreadsheets, ERP exports.
  2. Document every integration. Write down every system your store connects to: payment gateways, shipping providers, loyalty programs, and accounting software.
  3. Count your SKUs. Get an exact number of active products, variants, and archived products that need to be migrated.
  4. Export your current GA4 baseline. Record current conversion rates, average order value, and organic traffic by URL before you rebuild.
  5. Capture your URL structure. Export a complete list of all current URLs. This becomes your redirect map.
  6. Check DNS and SSL setup. Know where your domain is registered, who manages DNS, and when SSL certificates expire.
  7. Identify your peak trading windows. Black Friday, seasonal peaks, product launches, schedule your rebuild go-live around them, not through them.

Timeline: How Long Does an eCommerce Rebuild Take

The timeline is where a lot of projects go wrong. Developers underquote, clients expect miracles, and live stores get pushed to go-live before they are ready.

Here are realistic timelines based on platform and complexity:

PlatformSimple RebuildComplex Rebuild
Shopify4-8 weeks10-16 weeks
WooCommerce6-10 weeks12-20 weeks
Magento 2 Upgrade16-20 weeks24-32 weeks
Platform Migration (eg, Magento to Shopify)10-16 weeks18-28 weeks

A typical rebuild breaks down into 5 stages:

  • Discovery & Scoping: 1-2 weeks. Auditing the current site, documenting requirements, and producing a technical specification.
  • Design: 2-4 weeks. UX wireframing, visual design, and client approval rounds.
  • Build: Varies by platform and scope (see table above). Development, data migration, and integration work.
  • QA & UAT: 1-2 weeks. Internal testing, client review, bug fixes, and performance checks.
  • Launch: 1 week. DNS cutover, monitoring, and post-launch fixes.

Revenue risk of a delayed rebuild

A rebuild that drags on costs more than the development fee. Every week your underperforming store stays live, you are leaving conversions on the table. Factor this into your cost-benefit analysis when deciding whether to rebuild.

Real-World Rebuild Examples and What They Cost

Here are three anonymized examples from real rebuild projects. They show how scope translates cost and timeline.

Example A: Fashion Retailer, Magento 1 to Shopify Plus

  • Store size: 4,000 SKUs, 3 third-party integrations (loyalty, ERP, 3PL)
  • Scope: Full data migration, custom Shopify Plus theme, integration rebuilds, 301 redirect mapping
  • Cost: $23,000
  • Timeline: 14 weeks
  • Key challenge: Magento 1 data was inconsistent, product attribute cleanup alone took 3 weeks

Example B: B2B Trade Supplier, WooCommerce In-Platform Rebuild

  • Store size: 1,200 SKUs, custom B2B pricing rules, PDF quote generator
  • Scope: New theme, redeveloped custom plugins, performance optimization, customer account migration
  • Cost: $12,000
  • Timeline: 10 weeks
  • Key challenge: The existing PDF quote tool had no documentation, required full redevelopment from scratch

Example C: Health & Wellness DTC Brand, Shopify Re-Theme and Data Clean-Up

  • Store size: 800 SKUs, subscription app migration from Recharge to a new provider
  • Scope: Custom Shopify theme, product data clean-up, subscription migration, SEO audit
  • Cost: $6,500
  • Timeline: 6 weeks
  • Key challenge: Subscription customer data requires manual mapping between providers

Does one of these projects sound like yours

Should You Rebuild or Migrate to a New Platform?

This is the question most business owners don’t ask early enough, but it’s the most important one. Sometimes, a rebuild on your current platform makes sense. Other times, the platform itself is the problem.

Rebuild on the same platform if:

  • Your platform still meets your business needs and has a clear long-term roadmap
  • You have significant custom development already built on it that would be expensive to recreate
  • Your team knows the platform, and switching would require retraining

Consider migrating to a new platform if:

  • You are on Magento 1 (end-of-life – serious security risk)
  • Your current platform is limiting growth, You cannot add the features your business needs
  • Hosting and maintenance costs are disproportionately high
  • Your dev team spends more time firefighting than building

The cost difference between rebuilding on the same platform and migrating to a new one is often smaller than businesses expect, because data migration is the expensive part, regardless.

How to Scope Your Rebuild Before Talking to Vendors

The more clearly you can define what you need, the more accurate your quotes will be. And the less likely you are to get hit with out-of-scope costs mid-project.

Before you contact any agency or developer, work through these questions:

  • What problem are you actually solving? Performance? Scalability? Design? Platform limitations? Be specific. “The site feels old” is not a scope.
  • What does your current platform look like? Version number, hosting setup, and number of active extensions or plugins.
  • What integrations are non-negotiable? List every external system that must connect to your store from day one.
  • What data must be migrated? Products, customers, orders, reviews, and how far back does order history need to go?
  • What are your peak trading periods? These define when you cannot go live and should inform the project timeline from the start.
  • What does “done” look like? Define measurable success criteria: conversion rate targets, page speed benchmarks, and revenue thresholds.

Get a Custom Rebuild Estimate

Every rebuild is different. The cost of your project depends on your platform, your data, your integrations, and your goals, not a generic price list.

We offer a free scoping call to understand your current setup and give you a realistic cost estimate before you commit to anything. No obligation, no sales pitch, just honest numbers based on what your project actually involves.

Get a Free Rebuild Cost Estimate

Tell us about your current platform, SKU count, and integrations. We will give you a scoped estimate within 48 hours.

Contact us at wedowebapps.com or call to speak directly with a rebuild specialist.

Get a Free Rebuild Cost Estimate