skip to content

Native vs Cross Platform App Development for Healthcare Apps

Introduction

The global healthcare app market is projected to cross hundreds of billions in value by 2026, driven by telemedicine, remote patient monitoring, and digital health platforms. In this space, the decision between native vs cross platform app development for healthcare is not just a technical preference. It directly impacts compliance, patient safety, and long-term scalability.

The native vs cross platform app development debate changes significantly when healthcare regulations like HIPAA and FDA requirements enter the picture. What may work for a standard consumer app can fall short when sensitive patient data, secure authentication, and clinical integrations are involved.

The difference between native and cross platform becomes more critical in healthcare than in any other industry. Every architectural choice must support strict data protection rules, seamless integration with the EHR system, and reliable performance in real-world medical scenarios.

For healthcare startups, hospitals, and health-tech companies, cost still matters. Budgets often shape early decisions, especially during MVP stages. But choosing the right approach is not only about saving money upfront. It is about building a system that can handle compliance, scale with patient demand, and avoid expensive rework later.

This guide breaks down the decision with a clear focus on compliance, performance, and cost so you can choose the right path with confidence.

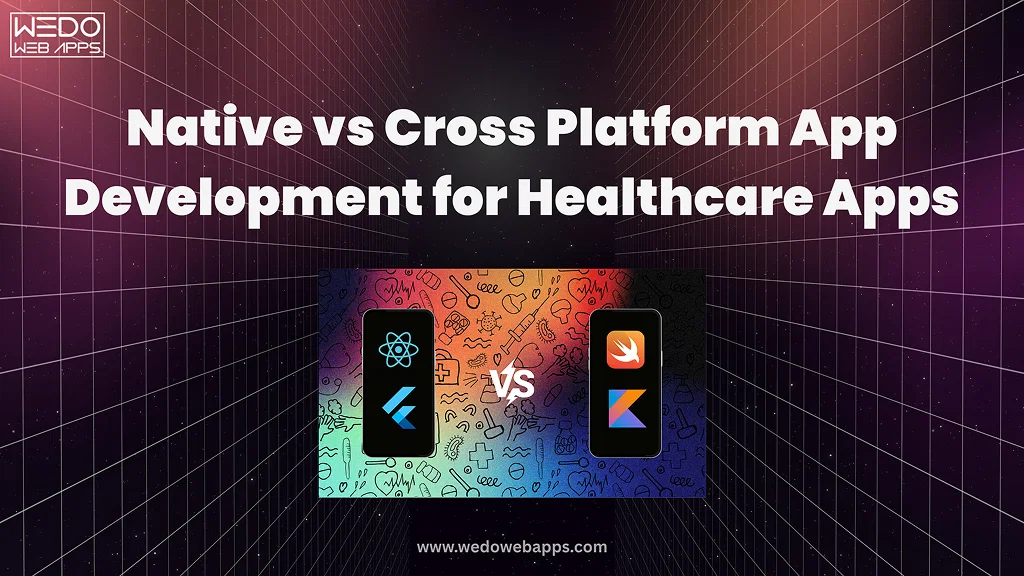
What is native vs cross-platform app development for healthcare?

Native vs cross platform for app development for healthcare refers to how a medical app is built and deployed across devices while meeting strict compliance and security requirements.

A native approach involves building separate apps for iOS and Android. This gives full access to device-level features like secure storage, biometric authentication, and system-level encryption, which are important when handling patient data.

A cross-platform application uses a single codebase to run on both platforms. It reduces development time and cost, while still supporting most healthcare features when implemented with proper security and compliance practices.

Native vs Cross-Platform – Quick Primer for Healthcare Teams

When you evaluate native vs cross platform app development for healthcare, the decision is less about preference and more about risk, control, and long-term viability.

Let’s simplify it.

What is Native in Healthcare Apps?

A native app is built separately for iOS and Android.

  • iOS uses Swift.
  • Android uses Kotlin.
  • Full access to device features.

In healthcare, this means:

  • Stronger control over data encryption and storage.
  • Direct use of biometric authentication, such as Face ID or fingerprint.
  • Better handling of background processes, such as continuous patient monitoring.

Think of native like a custom-built medical device. Everything is designed specifically for the environment it operates in.

What is Cross-Platform in Healthcare Apps?

A cross-platform app uses one codebase for both platforms.

  • Built using Flutter or React Native.
  • Shared logic across iOS and Android.
  • Faster development cycle.

In healthcare, this means:

  • Lower development cost.
  • Faster MVP launch.
  • Easier updates across platforms.

However, some features depend on plugins. These plugins must be carefully tested when handling patient data.

Why This Decision Matters More in Healthcare

In a regular app, performance or design may drive the decision.

In healthcare, the priorities shift:

  • Compliance requirements like HIPAA.
  • Secure handling of patient data.
  • Integration with hospital systems.
  • Reliability in critical situations.

This is why native vs cross platform app development for healthcare is not a simple technical choice. It directly affects how your app performs under real medical conditions.

Quick Comparison for Healthcare Use Cases

FactorNativeCross-PlatformHealthcare Impact
Security ControlHighModerateImportant for PHI protection
Biometric AccessDirectIndirectAffects login security
Device IntegrationFullLimited in some casesNeeded for monitoring
Development CostHigherLowerImpacts budget
Time to LaunchSlowerFasterUseful for MVP

Simple Decision Insight

  • If your app handles medical workflows or real-time data, native is often the safer choice.
  • If your app focuses on data display, scheduling, or basic interaction, cross-platform can work well.

To explore both approaches in more detail, review:

This foundation will make it easier to understand how performance, compliance, and cost influence your final decision.

Performance & Offline Data Handling in Healthcare Apps

When accessing native vs cross platform app development for healthcare, performance is closely tied to reliability. In a medical environment, apps are expected to work consistently under varying conditions, including low connectivity and continuous data flow.

Why Performance Matters in Healthcare

Healthcare applications often support time-sensitive workflows.

  • Real-time patient monitoring requires continuous data capture from devices such as wearables or sensors.
  • Video consultations depend on stable audio and video streams for accurate communication.
  • Emergency use cases require a quick response time without delays or crashes.

Unlike standard apps, performance issues in healthcare can interrupt care delivery or delay critical decisions.

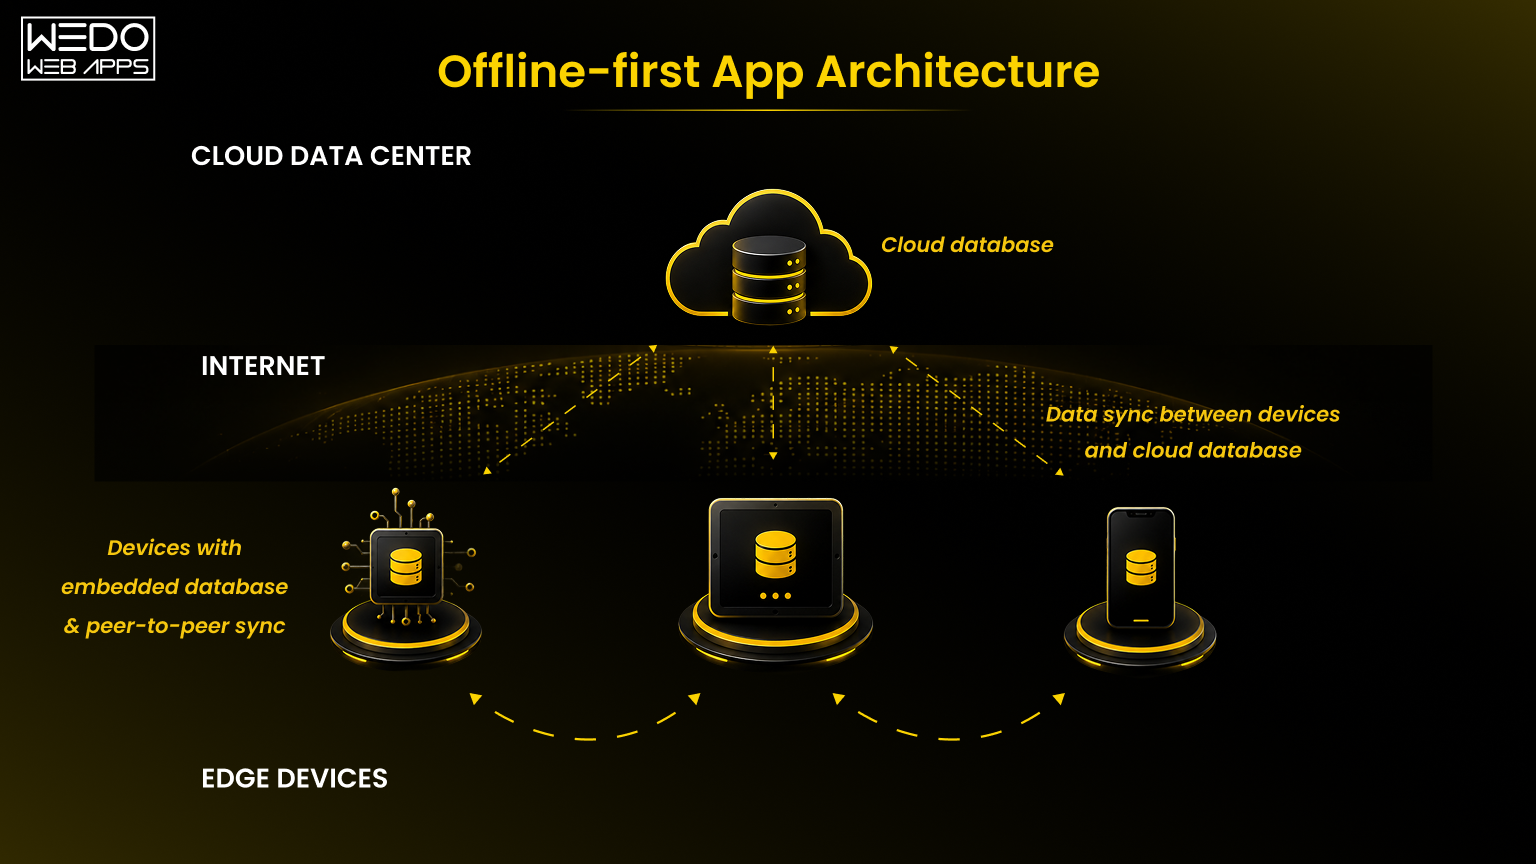
Offline-First Requirement in Medical Apps

Healthcare systems cannot rely entirely on internet connectivity.

  • Rural healthcare environments may experience unstable or limited network access.
  • Field healthcare professionals need access to patient records during home visits.
  • Ambulance and emergency teams operate in an area where connectivity is inconsistent.

An effective healthcare app must store data locally, allow uninterrupted usage, and ensure accurate synchronization once the connection is restored.

Native vs Cross Platform: Performance Comparison

Native Apps

  • Offer efficient background processing for continuous tasks such as vitals tracking.
  • Use platform-level storage systems for reliable offline data handling.
  • Provide lower latency for real-time operations.
  • Maintain stable performance during long-running sessions.

Cross-Platform Apps

  • Deliver adequate performance for most standard healthcare use cases.
  • Rely on framework capabilities and third-party libraries.
  • Support offline storage, but require careful implementation.
  • May face synchronization challenges if data handling is not properly designed.

Practical Examples

A remote monitoring application tracking heart rate must continue collecting data even when the device loses connectivity. Once the network is restored, the app should sync all stored data accurately without duplication or loss. This type of reliability is easier to achieve with native architecture due to direct access to system resources.

Quick Takeaway

  • Choose native when your app depends on continuous monitoring, real-time processing, or strong offline reliability.
  • Cross-platform is suitable for applications focused on data access, scheduling, or standard workflows.

In native vs cross platform app development for healthcare, performance, and offline capabilities are not optional features. They are core requirements that influence long-term usability and trust.

HIPAA Compliance Checklist for Mobile Health Apps

When building a healthcare application, compliance is not optional. The HIPAA-compliant mobile app development checklist helps ensure that patient data is protected at every level. This is where the choice between native vs cross-platform app development for healthcare becomes critical, because security implementation differs across both approaches.

Core HIPAA Requirements You Must Cover

Every healthcare app that handles Protected Health Information must meet these standards:

  • Data encryption at rest and in transit: Use AES-254 for stored data and TLS 1.3 for secure communication.
  • Access control mechanisms: Role-based access ensures users only see what they are authorized to.
  • Biometric authentication: Fingerprint or Face ID adds an extra layer of protection.
  • Audit logging: Track who accessed data, when, and what actions were performed.
  • Business Associate Agreement (BAA): Required when using third-party cloud providers like AWS or Google Cloud.
  • PHI handling rules: Follow the “minimum necessary” standard for data access.
  • Breach notification procedures: Incidents must be reported within defined timelines, such as the 72-hour rule.
  • Remote wipe capability: Ability to erase sensitive data if a device is lost or stolen.

Native vs Cross Platform: Compliance Implementation

Native Apps

  • Direct access to secure hardware features.
  • Use of Secure Enclave (iOS) and Android Keystore.
  • Better control over encryption and strict security policies.

Cross-Platform Apps

  • Security depends on third-party plugins and libraries.
  • Mature frameworks offer encryption support, but require validation.
  • Additional testing needed to ensure compliance across both platforms.

HIPAA Compliance Checklist Comparison

RequirementsNative SupportCross-Platform SupportVerdict
Data EncryptionStrong (built-in APIs)Strong (library-based)Both viable
Access ControlFull controlSupportedBoth viable
Biometric AuthDirect accessPlugin-basedNative stronger
Audit LoggingEasy to implementSupportedBoth viable
BAA CompliancePlatform-independentPlatform-independentEqual
PHI HandlingFull controlRequires disciplineNative advantage
Breach NotificationProcess-drivenProcess-drivenEqual
Remote WipeStrong OS supportSupported via APIsNative stronger

Real Healthcare Context

A telehealth app storing patient consultation records must encrypt both stored data and transmitted messages. It must also log every access attempt and restrict visibility based on user roles, such as doctor, patient, or admin.

Quick Takeaway

  • Both native and cross-platform apps can meet HIPAA requirements.
  • Native provides deeper security control through device-level access.
  • Cross-platform requires careful implementation and thorough testing.

For organizations planning secure healthcare solutions, it is important to follow a structured healthcare software development approach.

Need a HIPAA-compliant healthcare app

HL7 FHIR Integration – Connecting to EHR Systems

Modern healthcare apps rarely work in isolation. They need to exchange data with hospital systems, labs, and electronic health records. This is where HL7 FHIR integration for mobile health apps becomes essential.

What is FHIR and Why It Matters

FHIR stands for Fast Healthcare Interoperability Resources. They need to exchange data with hospital systems, labs, and electronic health records. This is where HL7 FHIR integration for mobile health apps becomes essential.

With FHIR, your app can connect to major EHR systems such as:

  • Epic
  • Cerner
  • Allscripts

This enables real-time access to patient records, lab results, prescriptions, and appointment data.

Common FHIR Resources Used in Apps

Healthcare apps typically work with a set of standard data objects:

  • Patient for demographic and identity data.
  • Observation for vitals and lab results.
  • MedicationRequest for prescriptions.
  • Appointment for scheduling and calendar data.

These resources allow structured and consistent data exchange across systems.

EHR Integration Patterns in Real Projects

FHIR is the foundation, but how you integrate it also matters.

  • Direct API integration connects your app straight to the EHR system.
  • The middleware layer acts as a bridge to manage security, scaling, and data transformation.
  • Batch vs real-time sync depends on how frequently data needs to be updated.
  • SMART on FHIR uses OAuth 2.0 for secure authentication and authorization.

Most production-grade healthcare apps use a middleware layer for better control and security.

Native vs Cross-Platform for FHIR Integration

Native Apps

  • Direct access to platform features like Apple HealthKit.
  • HealthKit supports FHIR-based data structures.
  • Better suited for deep, real-time integrations.

Cross-Platform Apps

  • Work well with FHIR through REST APIs.
  • No direct bridge to native health ecosystems.
  • Suitable for standard data exchange use cases.

Implementation Timeline

  • Basic read-only integration: 4 to 8 weeks
  • Bi-directional data sync: 8 to 16 weeks

The timeline depends on system complexity and security requirements.

Quick Takeaway

  • Choose native if your app requires deep integration with health ecosystems or real-time data sync.
  • Cross-platform works well for apps that primarily fetch and display healthcare data.

In native vs cross platform app development for healthcare, FHIR integration is a key factor that influences architecture decisions, especially for apps connected to hospital systems.

Telemedicine App – Features, Tech Stack & Cost

Telemedicine apps are now a core part of healthcare delivery. They support virtual consultations, reduce hospital visits, and improve access to care. When planning telemedicine app development features and cost 2026, the technical approach directly affects performance, compliance, and long-term scalability.

Key Features Required in a Telemedicine App

A production-ready telemedicine app includes multiple interconnected models.

  • Video Consultation (WebRTC): Enables real-time doctor-patient interaction with low latency.
  • Appointment Scheduling: Allows patients to book, reschedule, and receive reminders.
  • E-prescription Management: Doctors can issue and manage prescriptions digitally.
  • Secure Messaging: Encrypted communication between patients and providers.
  • Payment Integration: Supports consultation fees and transaction tracking.
  • Patient Records Access: View medical history, reports, and treatment plans.

Each of these features must work within a secure environment that protects patient data.

Technology Considerations for Telemedicine

Telemedicine apps rely on a combination of technology:

  • WebRTC for real-time video and audio communication.
  • Cloud infrastructure for storing and syncing patient data.
  • Encryption protocols to secure communication and storage.
  • API integrations for connecting with EHR systems.

The architecture must ensure stability during live sessions and secure handling of sensitive information.

Native vs Cross-Platform in Telemedicine

When comparing native vs cross-platform app development for healthcare, telemedicine apps present a balanced use case.

Native Apps

  • Offer better control over video streaming quality and latency.
  • Handle background audio and session continuity more reliably.
  • Perform well in long-duration consultations or unstable network conditions.

Cross-Platform Apps

  • Provide adequate video performance for most standard consultations.
  • Reduce development time with a shared codebase.
  • Suitable for startups building initial versions or scaling gradually.

When evaluating app development native or cross platform for a medical product, video reliability and real-time performance are key decision factors.

Cost Breakdown and Development Timeline

The cost of a telemedicine app depends on feature complexity, compliance requirements, and architecture choice.

FeatureNative CostCross-Platform CostQuality Difference
Video ConsultationHigherModerateNative slightly better
SchedulingModerateLowerSimilar
MessagingModerateLowerSimilar
PaymentsModerateModerateSimilar
Records ViewerHigherModerateNative slightly better

Estimated totals:

  • Native (iOS + Android): $120K to $250K with a timeline of 6 to 9 months.
  • Cross-platform: $70K to $150K with a timeline of 4 to 6 months.

Cross-platform development can reduce overall cost by around 30 to 40 percent.

Practical Scenario

A telemedicine platform handling daily consultations must ensure stable video calls, secure messaging, and quick access to patient records. If the app experiences lag or call drops, it affects both patient experience and workflow. This is where architectural choice becomes important.

Planning a Telemedicine App

FDA Software as Medical Device (SaMD) – What You Need

For many healthcare apps, compliance goes beyond HIPAA. If your app performs clinical functions, you must also consider FDA requirements for mobile medical device apps. This directly impacts how you approach native vs cross platform app development for healthcare, especially from a validation and documentation perspective.

What Qualifies as SaMD

Software as a medical device refers to applications that:

  • Diagnose medical conditions.
  • Monitor patient health in a clinical context.
  • Provide treatment recommendations.

Examples include apps that analyze ECG data, track chronic conditions, or guide treatment decisions.

What Does Not Qualify

Not all healthcare apps fall under FDA regulation.

  • Appointment scheduling apps
  • Patient portals
  • General wellness or fitness apps
  • Basic telemedicine platforms without diagnostic features

These are usually classified as non-SaMD and follow lighter regulatory requirements.

FDA Classification Levels

The FDA classified medical apps based on risk:

  • Class I (Low Risk): Minimal regulatory control
  • Class II (Moderate Risk): Requires 510(k) clearance
  • Class III (High Risk): Requires strict approval and clinical validation

The higher the class, the more rigorous the compliance process.

510(k) Clearance and QMS

For most SaMD applications, especially Class II:

  • 510(k) clearance is required to demonstrate that the app is safe and effective.
  • A Quality Management System (QMS) must be in place to track development, testing, and updates.

This includes documentation of code, testing procedures, and risk management.

Native vs Cross-Platform for FDA Compliance

Native Apps

  • Easier to document and validate due to platform-specific codebases.
  • Clearer traceability for testing and compliance.
  • Preferred when regulatory approval is a priority.

Cross-Platform Apps

  • Require validation on each platform separately.
  • Shared codebase does not eliminate compliance requirements.
  • Testing complexity increases due to abstraction layers.

Practical Insights

If your app analyzes patient data to provide medical insights, regulators will require detailed validation of how the software behaves on each device. Any inconsistency can delay approval.

Quick Takeaway

  • SaMD apps in Class II or III often benefit from native development due to easier validation.
  • Non-SaMD apps can safely use cross-platform without regulatory concerns.

In native vs cross platform app development for healthcare, FDA requirements add another layer of decision-making. The more clinical your app becomes, the more important architecture clarity and validation will be.

Patient Portal – Features, Authentication & Data Security

Patient portals are one of the most widely used healthcare applications. They allow patients to access medical information, communicate with providers, and manage appointments. When following a patient portal mobile app development guide, the focus is on usability, secure access, and reliable data handling.

Core Features of a Patient Portal

A well-designed patient portal typically includes:

  • User registration and profile management.
  • Appointment booking and reminders.
  • Lab results and medical reports access.
  • Medication list and refill requests.
  • Secure messaging with healthcare providers.
  • Billing, payments, and insurance details.
  • Push notifications for updates and alerts.

These features are primarily data-driven, while influencing the choice in native vs cross platform app development for healthcare.

Authentication and Security Requirements

Since patient portals handle Protected Health Information, strong authentication is required.

  • Multi-factor authentication (MFA): Adds an extra layer beyond passwords.
  • Biometric login: Fingerprint or facial recognition for quick and secure access.
  • Session timeout policies: Automatically log users out after inactivity.
  • Single Sign-On (SSO): Integration with hospital identity systems for seamless login.

These measures help ensure that only authorized users can access sensitive data.

Native vs. Cross-Platform for Patient Portals

Native Apps

  • Direct access to biometric authentication APIs.
  • Better control over secure storage and offline data access.
  • Slightly stronger performance for large data sets.

Cross-Platform Apps

  • Fully capable of handling data-heavy interfaces.
  • Push notifications and messaging work effectively.
  • Faster development and easier maintenance.

Since portals are mainly focused on viewing and managing data, cross-platform frameworks perform well in most cases.

Cost Consideration

  • Cross-platform development: $40K to $80K
  • Native development (iOS + Android): $70K to $130K

Cross-platform offers a cost advantage while still meeting functional and compliance requirements when implemented correctly.

Practical Example

A hospital patient portal allows users to check lab results, message doctors, and pay bills. These actions rely more on secure data access than complex device interactions. This makes a cross-platform a practical choice for many organizations.

Quick Takeway

  • Patient portals are data-driven, not performance-heavy.
  • Cross-platform is often sufficient and cost-effective.
  • Native may be preferred when advanced security or offline access is a priority.

In native vs cross-platform app development for healthcare, patient portals are one of the clearest use cases where cross-platform development can deliver strong results without compromising functionality.

Quick Comparison of Native vs Cross-Platform in Healthcare Apps

Before making a final decision on native vs cross-platform app development for healthcare, it helps to review a side-by-side comparison of the most important factors.

FactorNativeCross-Platform
Compliance ControlHighModerate
CostHighLower
SpeedSlowerFaster
PerformanceStrongGood
Offline AccessStrongModerate

What This Means for Healthcare Teams

  • Compliance control is stronger in native apps due to direct access to system-level security features.
  • Cost and speed favor cross-platform, especially for startups or MVP launches.
  • Performance and offline access are more reliable in native apps, which is important for monitoring and critical workflows.

This summary gives a quick view, but the final decision should still depend on your app’s specific use case, regulatory needs, and long-term scalability.

Not Sure Which Approach Fits Your Healthcare App

Decision Matrix – When to Choose Native vs Cross-Platform

Choosing between native vs cross platform app development for healthcare depends on how your app handles compliance, performance, and integration. At this stage, the goal is to match your product requirements with the right architecture.

Choose Native When

Native development is the right fit if your healthcare app involves:

  • SaMD Class II or Class III applications where regulatory validation is critical.
  • Heavy sensor usages such as wearables or continuous patient monitoring.
  • Deep integrations with device-level features or health ecosystems.
  • High performance requirements, including real-time processing and low latency.
  • Higher budget availability above $150K for long-term scalability.

In these cases, native apps provide better control, stability, and compliance alignment.

Choose Cross-Platform When

Cross-platform development works well for:

  • Patient portal that focuses on accessing and managing health data.
  • Telemedicine apps with standard video and communication features.
  • Wellness or non-clinical applications with lower regulatory complexity.
  • Budget constraints under $100K, where cost efficiency is important.
  • MVP or early-stage products that need a faster time to market.

This approach allows faster development while still supporting most healthcare functionalities.

Decision Table

RequirementNativeCross-Platform
HIPAA ComplianceYesYes
FDA ApprovalBetter suitedPossible with validation
Offline ReliabilityStrongModerate
Cost EfficiencyLowerHigh
SpeedSlowerFaster

Quick Takeaway

  • Choose native for compliance-heavy, performance-critical healthcare applications.
  • Choose cross-platform for faster, cost-effective solutions with standard workflows.

In native vs cross-platform app development for healthcare, the right decision is not about choosing one approach over the other. It is about aligning your architecture with your app’s clinical role, technical needs, and growth plans.

Business Insight Box

Choosing the wrong architecture early can increase compliance costs as your product grows. Many healthcare teams face performance or regulatory limitations once user load and data volume increase. As a result, they are forced to rebuild core parts of the app within 12 to 18 months, which adds both time and cost to the project.

Conclusion

In healthcare, architecture decisions carry more weight than in most industries. When evaluating native vs cross platform app development for healthcare, the focus should not be limited to cost or speed. Compliance, data security, and long-term scalability must guide the decision.

Choosing the native app vs cross platform for a healthcare product depends on how critical performance, regulatory validation, and device-level control are to your app. Native offers deeper control and reliability for complex medical use cases. Cross-platform provides faster development and cost efficiency for data-driven applications like portals and telemedicine.

The key is to align your technical approach with your product’s clinical role and future growth.

Build your healthcare app with confidence

React Native App Performance Optimization Guide: Checklist, Tools, and Proven Fixes for Faster Apps

Introduction

When Does React Native Performance Become a Business Problem?

At what point does a “slightly slow” app turn into lost users, low conversions, and negative reviews?

For most businesses, it does not happen suddenly. It builds quietly.

Your React Native app launches well. Early users engage. Features expand. But as complexity grows, performance starts slipping; startup time increases, scrolling feels less smooth, and occasional lags begin to appear. Nothing feels broken, but nothing feels fast either.

That is the danger zone.

Because users don’t report performance issues, they respond to them. They abandon sessions faster, interact less, and hesitate to return. And internally, teams often misread this as a feature or UX problem, when in reality, it is a performance bottleneck underneath.

Here is what makes it more challenging: React Native performance issues are rarely obvious and almost never caused by a single factor.

They usually come from a combination of:

  • JavaScript thread overload
  • Excessive communication over the native bridge
  • Inefficient rendering patterns
  • Poor list handling strategies
  • Memory leaks that worsen over time
  • Default configurations that were never optimized for scale

Individually, these don’t seem critical. Together, they create an experience that feels unreliable.

This guide is designed to change that.

Instead of scattered tips, you will get a structured React Native app performance optimization approach for 2026, including:

  • A practical, downloadable optimization checklist
  • Clear fixes for startup time, memory issues, and UI lag
  • Guidance on Hermes engine configuration and bundle optimization
  • Strategies to reduce bridge overhead and improve rendering performance
  • A migration path toward the New Architecture (Fabric & TurboModules)

More importantly, this guide helps you answer a critical business question:

Should you keep optimizing your current app, or is it time to rethink how it is built?

If you’re evaluating performance not just as a technical issue but as a growth factor, this will give you a clear path forward, especially when aligned with a structured react native app development approach.

Get a Free Performance Audit

Why React Native Performance Still Becomes a Bottleneck in 2026

React Native performance issues rarely come from the framework itself. They emerge when apps that were built for speed of launch are expected to perform under scale, with more users, more features, and more complex interactions.

In the early stages, everything feels smooth. But as the app grows, small inefficiencies begin to compound. What once worked efficiently starts creating friction, not instantly, but gradually enough that it is often overlooked until user experience is already affected.

Here are the key areas where performance typically starts breaking down:

1. JavaScript Thread Overload

React Native relies on a single JavaScript thread to handle most of the app logic and UI coordination. As your application grows, this thread starts carrying more responsibility than it was originally designed for.

  • Heavy computations block UI updates
  • Multiple asynchronous tasks compete for execution
  • User interactions get delayed

The result is subtle at first, slight lag, delayed taps, but becomes more noticeable as usage increase.

2. Excessive Native Bridge Communication

Every interaction between JavaScript and native code passes through the bridge. While efficient in controlled scenarios, excessive or poorly structured communications add latency.

  • Frequent small data exchanges instead of batched updates
  • Overuse of bridge-heavy libraries
  • Unnecessary calls between layers

These delays stack up and directly impact responsiveness, especially during complex interactions.

3. Rendering Inefficiencies at Scale

Rendering issues are one of the most common and underestimated performance problems. As components grow and the state becomes more complex, unnecessary re-renders begin to accumulate.

  • Components updating more often than needed
  • Lack of memoization strategies
  • Heavy UI elements rendering repeatedly

This leads to dropped frames, inconsistent UI smoothness, and degraded user experience.

4. Inefficient List Rendering

Lists are central to most apps – feeds, product catalogs, dashboards – but they are often poorly optimized.

  • Using ScrollView for large datasets
  • Misconfigured FlatList or SectionList
  • Missing virtualization

This results in janky scrolling, increased memory usage, and poor performance on mid-range devices.

5. Memory Leaks That Surface Over Time

Memory issues don’t usually appear during development. They show up in real usage scenarios where sessions are longer and navigation is deeper.

  • Event listeners not cleaned up
  • Timers continuing in the background
  • Retained references after component unmount

Over time, this leads to higher memory consumption, slowdowns, and even crashes.

6. Default Configurations That Don’t Scale

Many apps are shipped with default setups that work, but are not optimized.

  • Large JavaScript bundles
  • No lazy loading or code splitting
  • Unoptimized images
  • Hermes engine not fully leveraged

These don’t break functionality, but they limit how efficiently your app performs under load.

7. Lack of Performance Measurement

One of the biggest gaps is not technical; it is operational. Performance is often assumed rather than measured.

  • No consistent use of profiling tools
  • Issues identified based on perception, not data
  • Optimization efforts become reactive instead of strategic

Without visibility, even critical bottlenecks remain hidden.

What This Means for Your Business

React Native performance issues are rarely caused by a single mistake. They are the result of multiple small inefficiencies building up as your product scales.

By the time users start noticing:

  • Engagement has already dropped
  • Interactions feel slower
  • Retention begins to decline

The key takeaway: React Native is not limiting your app; unoptimized implementation is.

This becomes even more critical in scaling SaaS platforms, where performance directly impacts user retention and engagement.

React Native vs Flutter Performance Benchmarks

When performance issues start surfacing, many teams jump to a bigger question:

“Should we stick with React Native or switch to Flutter for better performance?”

It is a fair question, but often the wrong starting point.

Because in most real-world cases, the performance gap is not caused by the framework; it is caused by how the app is built, optimized, and maintained.

Let’s break this down from a decision-making perspective, not just a technical comparison.

1. Startup Time

Startup time is one of the most visible performance indicators; users feel it immediately.

  • React Native: Can have a slower startup if bundles are large or not optimized. Improves significantly with Hermes, RAM bundles, and lazy loading.
  • Flutter: Typically faster startup due to compiled native code

Reality: React Native startup time issues are usually fixable. Poor bundle strategy is the real culprit.

2. UI Performance & Animations

Smooth interactions and animations define perceived performance.

  • React Native: Depends on JS thread + bridge. Can lag if optimized. Near-native performance achievable with Reanimated and proper rendering strategies.
  • Flutter: Uses its own rendering engine (Skia). Consistent performance across devices.

Reality: React Native can match Flutter’s performance if animations are offloaded from the JS thread and rendering is optimized.

3. Memory Usage

Memory efficiency becomes critical as apps scale.

  • React Native: Higher risk of memory leaks if not managed properly. Depends heavily on developer practices.
  • Flutter: More controlled memory handling. Generally more predictable.

Reality: Most memory issues in React Native apps are implementation-driven, not framework limitations.

4. CPU Usage Under Load

When apps handle heavy data or complex interactions, CPU usage becomes a bottleneck.

  • React Native: Performance depends on JS workload and bridge usage. Can degrade if logic is not optimized.
  • Flutter: More stable under heavy UI workloads

Reality: React Native performs well when heavy computations are offloaded, and bridge usage is minimized.

5. Development Flexibility vs Performance Control

This is where the real trade-off exists.

  • React Native: Faster development cycles, strong ecosystem, easier integration with existing web teams.
  • Flutter: More control over rendering and performance. Slightly steeper learning curve for teams unfamiliar with Dart.

Reality: Most businesses choose React Native for speed, but must invest in optimization later.

So, Which One Should You Choose in 2026?

Here is the decision most teams actually need to make:

  • If your app is already built in React Native, Optimization is almost always more cost-effective than rebuilding
  • If you are starting fresh with performance-heavy requirements, Framework choice matters, but architecture matters more.

What Most Comparisons Get Wrong

The biggest misconception is this: “Flutter is faster than React Native.”

A more accurate statement would be: “A well-optimized app performs better than a poorly optimized one, regardless of framework.”

In real-world scenarios:

  • A poorly optimized React Native app will underperform
  • A poorly structured Flutter app will also face performance issues

What This Means for Your Business

Before considering a rewrite or framework switch, ask:

  • Have you optimized your JS thread usage?
  • Have you reduced unnecessary bridge calls?
  • Have you configured Hermes properly?
  • Have you addressed rendering inefficiencies and memory leaks?

If the answer is no, switching frameworks won’t solve the root problem.

React native is not inherently slower; it just requires intentional performance optimization as your app scales.

React Native Performance Optimization Checklist

At this stage, most teams do not need more theory; they need clarity on what exactly to fix, in what order, and what actually impacts performance.

That is where a structured checklist becomes critical. Instead of randomly trying optimizations, this checklist helps you:

  • Identify real bottlenecks (not assumed ones)
  • Prioritize high-impact fixes first
  • Avoid wasting time on low-impact tweaks
  • Create a repeatable optimization process as your app scales

What This Checklist Covers

This is not a generic list; it is structured around the exact areas where performance typically breaks down in production apps.

1. JavaScript Thread Optimization

  • Identify blocking operations on the JS thread
  • Reduce unnecessary re-renders
  • Optimize state updates and component structure
  • Move heavy computations off the main thread

2. Native Bridge Reduction

  • Audit JS <-> Native communication frequency
  • Batch updates instead of multiple small calls
  • Replace bridge-heavy libraries where needed
  • Use native modules strategically

3. Hermes Engine Configuration

  • Ensure Hermes is enabled correctly
  • Optimize bytecode execution
  • Reduce JavaScript bundle size
  • Validate performance improvements through profiling

4. App Startup Time Optimization

  • Implement RAM bundles or inline requires
  • Reduce initial bundle size
  • Lazy load non-critical components
  • Optimize initial screen rendering

5. Image Optimization

  • Use compressed formats like WebP
  • Avoid loading full-resolution assets unnecessarily
  • Implement caching strategies
  • Serve optimized assets via CDN

6. List Rendering Optimization

  • Use FlatList or SectionList instead of ScrollView for large data
  • Enable virtualization and windowing
  • Optimize key extraction and item rendering
  • Avoid inline functions in list items

7. High-Performance Animations

  • Move animations off the JS thread using Reanimated
  • Avoid heavy layout recalculations
  • Optimize gesture handling

8. Memory Leak Detection & Fixes

  • Clean up event listeners and subscriptions
  • Clear timers and background tasks
  • Monitor navigation stack behavior
  • Use profiling tools to detect leaks

9. Performance Profiling & Monitoring

  • Use Flipper and React DevTools
  • Analyze JS thread performance
  • Track frame drops and memory usage
  • Identify real bottlenecks before fixing

10. New Architecture (Fabric + TurboModules) Readiness

  • Evaluate migration feasibility
  • Reduce dependency on the bridge
  • Improve rendering performance with Fabric
  • Plan a phased migration strategy

Before You Start Fixing Anything

One important point most teams miss: Not every issue needs to be fixed at once.

The goal is not “perfect performance,” it is removing the biggest bottlenecks first so your app can scale without friction.

Many businesses choose to outsource app development to ensure performance optimization is handled systematically without slowing internal teams.

Request a Performance Review

JS Thread Optimization: Fix the Root Cause of Lag

If your React Native app feels slow, unresponsive, or inconsistent, the JavaScript thread is usually where the problem begins.

This is because React Native relies on a single JS thread to handle:

  • Business logic
  • State updates
  • API responses
  • UI coordination

As your app grows, this thread starts doing more than it should, and when it gets blocked, everything else slows down with it.

What Actually Blocks the JS Thread?

Most performance issues here don’t come from one major mistake. They come from small decisions that add up over time.

  • Heavy computations running during user interactions
  • Large state updates triggering multiple re-renders
  • Synchronous operations delaying UI updates
  • Complex component trees re-evaluating too frequently

The result is what users experience as:

  • Delayed taps
  • Laggy transitions
  • Dropped features

How to Optimize the JS Thread (Practically)

Instead of trying to “optimize everything,” focus on reducing unnecessary workload on the thread.

1. Eliminate Unnecessary Ren-renders

  • Use React.memo for pure components
  • Apply useMemo for expensive calculations
  • Use useCallback to stabilize function references
  • Avoid passing new inline objects/functions on every render

Impact: Reduces repeated computation and stabilizes UI performance.

2. More Heavy Work Off the JS Thread

Not all logic needs to run on the main thread.

  • Defer non-critical tasks using InteractionManager
  • Offload heavy computations to background processes
  • Avoid running large loops during active user interaction

Impact: Keeps UI responsive even under load.

3. Optimize State Management

Poor state handling increases unnecessary updates.

  • Keep the state as minimal and localized as possible
  • Avoid deeply nested state updates
  • Split large components into smaller, focused ones

Impact: Reduces render cycles and improves responsiveness.

4. Avoid Synchronous Blocking Code

Synchronous operations delay everything else.

  • Avoid long-running sync functions
  • Break tasks into smaller asynchronous chunks
  • Use debouncing or throttling where needed

Impact: Prevents UI freezes and improves perceived speed.

5. Monitor JS Thread Performance

You cannot optimize what you don’t measure.

  • Use React DevTools to track re-renders
  • Use Flipper to monitor JS performance
  • Identify frame drops and execution delays

Impact: Helps you focus only on real bottlenecks.

What Most Teams Get Wrong

Many teams try to fix performance by tweaking UI components or switching libraries, without addressing the JS thread.

That is why improvements feel temporary.

Because unless you reduce the core workload on the JavaScript thread, performance issues will keep coming back as your app scales.

What This Means for You

JS thread optimization is not a “nice-to-have”; it is foundational.

  • If your JS thread is overloaded, your UI will lag
  • If your UI lags, user experience suffers
  • If user experience suffers, engagement drops

If you fix the JS thread, you solve a large percentage of React Native performance issues at their root.

This is where many teams choose to hire React Native app developers to systematically identify and resolve performance bottlenecks.

Analyze My App Performance

Reduce Native Bridge Bottlenecks

Once the JavaScript thread is under control, the next major constraint in React Native apps is how often and how efficiently you communicate between JavaScript and native code.

React Native operates across two worlds:

  • JavaScript (logic, state, UI coordination)
  • Native (platform-specific capabilities)

The bridge connects them, but it’s not free.

Every interaction that crosses this bridge introduces overhead. When used occasionally, it is negligible. But in real-world apps, repeated and unoptimized communication starts creating measurable delays.

Why the Bridge Becomes a Bottleneck

The issue is not the existence of the bridge; it is how frequently it is used and how data is passed through it.

Performance starts degrading when:

  • Multiple small calls are made instead of batching data
  • UI updates depend on frequent back-and-forth communication
  • Third-party libraries rely heavily on bridge interactions
  • Large payloads are passed repeatedly

Individually, these don’t seem critical. But together, they create latency that affects animations, gestures, and real-time interactions.

Where This Shows Up in Real Apps

Bridge-related issues often appear in places where responsiveness matters most:

  • Animations that feel slightly delayed
  • Gestures that don’t feel fluid
  • Real-time updates that lag behind user actions
  • Screens that take longer to respond under load

These are subtle, but they directly affect how “fast” your app feels.

How to Reduce Native Bridge Overhead (Practically)

The goal is not to eliminate bridge usage; it is to use it more efficiently and intentionally.

1. Batch Data Instead of Sending Multiple Calls

Instead of triggering multiple bridge calls for small updates:

  • Combine data into a single payload.
  • Reduce frequency of communication.

Impact: Fewer bridge crossings, lower latency.

2. Avoid Bridge-Heavy Patterns in Critical Flows

Some features naturally rely more on native interactions, but not all should.

  • Minimize bridge usage in animations and gestures
  • Avoid unnecessary native calls during user interactions
  • Keep critical UI flows as lightweight as possible

Impact: Smoother, more responsive user experience.

3. Be Selective with Third-Party Libraries

Not all libraries are optimized equally.

  • Audit libraries that frequently interact with native modules
  • Replace inefficient ones where necessary
  • Prefer libraries designed for performance (e.g., Reanimated for animations)

Impact: Reduces hidden performance overhead.

4. Use Native Modules Strategically

Sometimes, moving logic closer to native can help, but only when justified.

  • Offload performance-critical operations to native code
  • Avoid unnecessary back-and-forth once logic is moved

Impact: Reduces repeated bridge communication.

5. Move Toward TurboModules (New Architecture)

Modern React Native architecture reduces dependency on the traditional bridge.

  • TroubleModules enable more efficient native interactions
  • Less serialization overhead
  • Better performance for complex apps

Impact: Long-term scalability and improved performance.

What Most Teams Miss

Many teams focus on optimizing UI components, but ignore how often their app is crossing the bridge.

That is why:

  • Animations still feel slightly off
  • Interactions don’t feel instant
  • Performance improvements plateau

Because the bottleneck isn’t available, it is happening between layers.

What This Means for You

If your app:

  • Feels slow during interactions
  • Struggles with real-time updates
  • Doesn’t feel “native smooth.”

There is a high chance that the bridge is being overused.

Reducing unnecessary bridge communication is one of the fastest ways to make your app feel more responsive, without rewriting it.

Hermes Engine Optimization Tips

If your React Native app takes too long to load or feels heavy during initial interactions, the issue often comes down to how JavaScript is executed, and that is exactly where the Hermes engine makes a difference.

Hermes is not just a toggle you enable. It is a performance layer that, when configured properly, can significantly improve:

  • App startup time
  • Memory usage
  • Overall execution efficiency

But simply enabling Hermes is not enough. Most apps don’t fully benefit from it because the surrounding setup remains unoptimized.

Why Hermes Matters for Performance

By default, JavaScript needs to be parsed and compiled at runtime, which adds overhead, especially during app launch.

Hermes changes this by:

  • Precompiling JavaScript into bytecode
  • Reducing runtime parsing work
  • Lowering memory consumption

This directly improves time-to-interactive, which is one of the most critical performance metrics for user experience.

Where Hermes Delivers the Most Impact

You will notice the biggest improvements in:

  • Faster app startup and screen load
  • Reduced memory footprint on mid-range devices
  • More consistent performance during initial interactions

However, these benefits only show up when your app’s bundle and execution flow are optimized alongside Hermes.

How to Optimize Hermes for Real Performance Gains

1. Ensure Hermes is Properly Enabled (Production Build)

Many teams enable Hermes but don’t validate its impact.

  • Confirm Hermes is active in release builds (Android & iOS)
  • Compare performance metrics before and after enabling
  • Avoid relying only on development mode behavior

Impact: Establishes a baseline for real-world performance gains.

2. Reduce JavaScript Bundle Size

Hermes performs best when the bundle is lean.

  • Remove unused dependencies
  • Enable tree shaking
  • Split large modules where possible
  • Avoid bundling unnecessary assets

Impact: Smaller bytecode = faster startup and lower memory usage.

3. Use Inline Requires & Lazy Loading

Loading everything upfront slows down startup, even with Hermes.

  • Enable inline requires to defer module loading
  • Lazy load non-critical screens and components
  • Prioritize only what’s needed for the first screen

Impact: Improves initial render time and perceived speed.

4. Optimize Third-Party Dependencies

Some libraries inflate bundle size or slow execution.

  • Audit dependencies regularly
  • Replace heavy or unused libraries
  • Prefer lightweight, performance-focused alternatives

Impact: Reduces overhead that negates Hermes benefits.

5. Profile Hermes Performance

Don’t assume improvements, measure them.

  • Use Flipper with Hermes debugging enabled
  • Analyze startup time and memory usage
  • Identify bottlenecks in execution flow

Impact: Helps you validate and fine-tune optimizations.

What Most Teams Get Wrong

They enable Hermes and expect instant results.

But if:

  • Your bundle is still large
  • Your app loads everything upfront
  • Your dependencies are unoptimized

Then Hermes cannot deliver its full value.

What This Means for Your App

Hermes is one of the highest ROI performance optimizations in React Native, but only when paired with the right strategies.

  • It improves startup time
  • Reduces memory usage
  • Makes execution more efficient

But it does not fix poor architecture on its own.

Hermes is a performance accelerator, not a shortcut. To get real gains, you need to optimize what runs on top of it.

React Native App Startup Time Optimization

Startup time is one of the few performance metrics users notice immediately and judge instantly.

If your app takes too long to become interactive, users don’t wait to understand why. They drop off, retry less often, and form a perception that your app is unreliable or heavy.

The challenge is that startup delays are rarely caused by a single issue. Them come from everything your app tries to load and execute at once.

What Slows Down App Startup?

In most React Native apps, startup time increases due to:

  • Large JavaScript bundles being loaded upfront
  • Too many modules initialized on launch
  • Heavy API calls triggered immediately
  • Complex initial screen rendering
  • Assets (images, fonts) loading synchronously

Even if each of these seems manageable individually, together they delay the moment when your app becomes usable.

How to Optimize Startup Time (Practically)

The goal is simple: load only what’s necessary to get the first screen interactive, nothing more.

1. Reduce Initial Bundle Size

The more code your app loads at startup, the slower it becomes.

  • Remove unused dependencies
  • Split large modules into smaller chunks
  • Avoid building non-critical features upfront

Impact: Faster load time and reduced processing overhead.

2. Use Inline Requires & Lazy Loading

Not everything needs to be loaded on app launch.

  • Enable inline requires to defer module loading
  • Lazy load secondary screens and features
  • Delay non-essential logic until after initial render

Impact: Faster time-to-interactive and smoother first experience.

3. Optimize the Initial Screen

Your first screen defines perceived performance.

  • Keep UI lightweight and minimal
  • Avoid complex layouts or heavy components
  • Defer non-critical rendering

Impact: Users feel the app is fast, even if background tasks continue.

4. Defer API Calls and Background Work

Many apps overload the startup with unnecessary network activity.

  • Prioritize only essential API calls
  • Defer secondary data fetching
  • Use background loading strategies

Impact: Reduces startup blocking and improves responsiveness.

5. Optimize Assets (Images, Fonts, Media)

Assets often delay rendering more than expected.

  • Use compressed formats like WebP
  • Avoid loading high-resolution assets at startup
  • Preload only critical assets

Impact: Faster rendering and lower memory usage.

6. Leverage Hermes + RAM Bundles Together

Startup optimization works best when combined with execution improvements.

  • Use Hermes for faster JS execution
  • Implement RAM bundles or segmented loading
  • Ensure only the required code is initialized

Impact: Significant improvement in startup speed and efficiency.

What Most Teams Miss

They try to make everything load faster, instead of making less load initially.

That is the real shift:

  • It is not just optimization
  • It is prioritization

What This Means for Your Business

Startup time directly impacts first impressions, user retention, and conversion rates.

Even a small delay can reduce engagement, especially on mobile networks and mid-range devices.

The fastest apps are not the ones that load everything quickly; they are the ones that load only what’s necessary first.

Image Optimization in React Native Apps

Images are one of the biggest contributors to performance issues, yet they’re often overlooked because they don’t “break” the app. They quietly slow it down.

If your app includes product catalogs, feeds, banners, or user-generated content, image handling directly affects:

  • Load time
  • Scroll performance
  • Memory usage

And unlike code-level optimizations, image inefficiencies scale aggressively as your content grows.

What Goes Wrong with Images

Most React Native apps don’t have an image problem; they have an image handling problem.

Common issues include:

  • Loading high-resolution images unnecessarily
  • No compression or improper formats
  • Rendering full-size images in smaller containers
  • Re-fetching images without caching
  • Blocking UI while images load

These don’t always show up in testing, but in real usage, they create visible lag and increased memory pressure.

Where Image Issues Impact Performance the Most

You’ll notice performance drops, especially in:

  • Product or content-heavy screens
  • Infinite scroll feeds
  • Image-rich dashboards
  • Slower networks or mid-range devices

This is where users start experiencing:

  • Delayed rendering
  • Janky scrolling
  • Increased load times

How to Optimize Images (Practically)

The goal is simple: load the right image, at the right size, at the right time.

1. Use Modern, Compressed Image Formats

Not all formats are equal.

  • Prefer WebP over PNG/JPEG where supported
  • Compress images before serving
  • Balance quality vs size

Impact: Reduces file size significantly without noticeable quality loss.

2. Serve Appropriately Sized Images

Avoid rendering oversized images.

  • Match image resolution to display size
  • Use multiple variants (small, medium, large)
  • Avoid scaling large images down on the device

Impact: Lower memory usage and faster rendering.

3. Implement Image Caching

Repeated downloads slow down performance.

  • Use caching libraries like react-native-fast-image
  • Cache frequently used images
  • Leverage CDN caching headers

Impact: Faster repeat loads and reduced network usage.

4. Use Lazy Loading for Off-Screen Images

Loading everything at once hurts performance.

  • Load images only when they enter the viewport
  • Defer non-visible assets
  • Combine with list virtualization

Impact: Improves initial load time and scrolling smoothness.

5. Optimize Image Rendering in Lists

Lists amplify image inefficiencies.

  • Avoid re-rendering images unnecessarily
  • Use stable keys and memoization
  • Combine with optimized FlatList settings

Impact: Smooth scrolling and better performance on large datasets.

6. Use a CDN for Image Delivery

Serving images efficiently matters as much as optimizing them.

  • Use a CDN to reduce latency
  • Deliver images based on device and network conditions
  • Enable compression at the delivery level

Impact: Faster load times across geographies and devices.

What Most Teams Get Wrong

They treat image optimization as a design or frontend concern, not a performance strategy.

So:

  • Images are added without compression
  • Formats are not standardized
  • Caching is ignored

And performance gradually degrades as content grows.

What This Means for Your App

If your app relies heavily on visuals, image optimization isn’t optional; it’s foundational.

  • It affects speed
  • It affects memory
  • It affects user experience directly

Optimizing images is one of the quickest ways to improve real-world performance, especially in content-heavy apps.

FlatList vs SectionList vs ScrollView: Choosing the Right Rendering Strategy

If your app involves lists, and most apps do, your rendering strategy directly impacts performance.

This is where many React Native apps unknowingly introduce lag. Not because lists are complex, but because the wrong component is used for the wrong use case.

At a small scale, everything works. At a large scale, the difference becomes obvious, especially in scrolling performance and memory usage.

Why List Rendering Becomes a Bottleneck

Rendering a list is not just about displaying data; it is about how much of that data is loaded and rendered at any given time.

Performance issues typically arise when:

  • Too many items are rendered at once
  • Off-screen items are still consuming memory
  • Re-renders are not controlled

This leads to:

  • Janky scrolling
  • Increased memory usage
  • UI freezes on lower-end devices

ScrollView: Simple, But Not Scalable

ScrollView renders everything at once.

It works well for:

  • Small, static content
  • Limited number of elements

But becomes a problem when:

  • This list grows large
  • Content is dynamic or frequently updated

Impact: High memory usage and poor scroll performance.

FlatList: The Default for Large Lists

FlatList is designed for performance through virtualization.

Instead of rendering everything, it:

  • Renders only visible items
  • Recycles off-screen components
  • Manages memory efficiently

Best used for:

  • Long, uniform lists (feeds, product lists)
  • Infinite scrolling

Impact: Smooth scrolling and better performance at scale.

SectionList: Structured Lists with Performance

SectionList builds on FlatList but adds grouping.

Best used for:

  • Categorized data (eg., grouped products, messages by date)
  • Section headers and structured layouts

Impact: Maintains performance while supporting complex data structures.

How to Optimize List Performance (Practically)

Choosing the right component is step one. Configuring it properly is where real gains come from.

1. Enable and Tune Virtualization

  • Use initialNumToRender wisely
  • Adjust windowSize based on use case
  • Avoid rendering too many items upfront

Impact: Controls memory usage and improves scroll smoothness.

2. Optimize Item Rendering

  • Use React.memo for list items
  • Avoid inline functions inside render
  • Use stable keyExtractor

Impact: Reduces unnecessary re-renders.

3. Use getItemLayout for Predictable Lists

If item sizes are fixed:

  • Implement getItemLayout
  • Avoid runtime layout calculations

Impact: Faster scroll performance and reduced computation.

4. Avoid Heavy Components Inside Lists

  • Keep list items lightweight
  • Defer complex UI elements
  • Lazy load images inside items

Impact: Improves rendering speed and responsiveness.

5. Combine with Image & State Optimization

Lists amplify inefficiencies.

  • Optimize images used in list items
  • Prevent unnecessary state updates
  • Avoid re-rendering the entire list on small changes

Impact: Stable performance even with large datasets.

What Most Teams Miss

They switch from ScrollView or FlatList and expect performance to be solved. But poor configuration, heavy list items, and unoptimized rendering can still cause performance issues.

What This Means for Your App

If your app relies on lists:

  • Your rendering strategy directly affects user experience
  • Small inefficiencies scale quickly
  • Optimization here delivers immediate visible improvements

Choosing the right list components is important, but configuring and optimizing it properly is what actually improves performance.

Using Reanimated for High-Performance Animations

Animations are where users feel performance the most.

Your app might load fast and function correctly, but if animations are laggy, delayed, or inconsistent, the entire experience feels slow. This is especially true for gestures, transitions, and interactive UI elements.

The root issue in most React Native app is: “Default animations often depend on the JavaScript thread.”

And as you have already seen, the JS thread is easily overloaded.

Why Default Animations Start Lagging

When animations rely on the JS thread:

  • They compete with business logic and state updates
  • Frame updates get delayed when the thread is busy
  • Gestures feel unresponsive under load

This leads to:

  • Dropped frames
  • Stuttering transitions
  • Delayed feedback on interactions

Even small delays here significantly impact perceived performance.

How Reanimated Solves This

Reanimated works differently.

Instead of relying on the JS thread, it runs animations directly on the UI thread, which means:

  • Animations continue smoothly even if JS is busy
  • Gestures respond instantly
  • Frame consistency improves significantly

This makes a noticeable difference in real-world usage, especially in complex or highly interactive apps.

Where Reanimated Delivers the Most Value

You will see the biggest improvements in:

  • Gesture-based interactions (swipes, drag-and-drop)
  • Navigation transitions
  • Micro-interactions (buttons, toggles, loaders)
  • Scroll-linked animations

These are areas where even slight lag is immediately noticeable to users.

How to Use Reanimated Effectively

Switching to Reanimated alone is not enough, you need to use it strategically.

1. More Critical Animations Off the JS Thread

  • Use Reanimated for gesture-driven interactions
  • Avoid JS-based animations in high frequency UI updates
  • Keep animation logic close to the UI layer

Impact: Smooth, consistent animations even under load.

2. Optimize Animation Logic

  • Avoid overly complex animation calculations
  • Keep transitions lightweight
  • Use shared values efficiently

Impact: Reduces computation overhead on the UI thread.

3. Integrate with Gesture Handler

Reanimated works best when combined with gesture handling libraries.

  • Use react-native-gesture-handler
  • Handle gestures and animations together
  • Avoid unnecessary re-renders during interactions

Impact: Seamless and responsive user interactions.

4. Avoid Mixing Animation Approaches

Using multiple animation systems creates inconsistency.

  • Standardize on Reanimated for performance-critical flows
  • Avoid mixing with legacy animation APIs unnecessarily

Impact: Predictable and stable animation performance.

What Most Teams Get Wrong

They optimize logic and rendering, but leave animations untouched.

So even after improvements:

  • The app still feels slow
  • Interactions don’t feel fluid
  • Users perceive lag where none technically exists

Because perception is driven by motion.

What This Means for Your App

If your app relies on gestures, has frequent transitions, or includes interactive UI elements, then animation performance is not optional; it is central to user experience.

If you want your app to feel truly fast, your animations need to run independently of the JS thread, and that is exactly what Reanimated enables.

React Native Memory Leak Detection and Fix Guide

Some performance issues are immediate – lag, slow startup, janky scrolling. Memory leaks are different. They build quietly and only show up when users spend more time in your app.

That is why they are dangerous.

An app can feel fine during testing, but in real-world usage:

  • Sessions are longer
  • Navigation is deeper
  • More components mount and unmount

And if memory is not managed properly, it keeps increasing until performance drops or the app crashes.

What Causes Memory Leaks in React Native

Most memory leaks don’t come from complex logic. They come from missed cleanups and retained references.

Common issues include:

  • Event listeners that are not removed after component unmount
  • Timers (setTimeout, setInterval) continuing in the background
  • API subscriptions or sockets not being closed
  • Navigation stacks keeping unused screens in memory
  • Large objects or images not being released

Individually, these seem harmless. Over time, they accumulate.

How Memory Leaks Impact Your App

Unlike visible bugs, memory leaks degrade performance gradually:

  • Increased memory usage over time
  • Slower navigation and screen transitions
  • App freezing on lower-end devices
  • Sudden crashes after prolonged usage

This directly affects retention, especially for users who stay longer or return frequently.

How to Detect Memory Leaks (Practically)

You can’t fix what you can’t see. Detection is the first step.

1. Use Flipper for Memory Monitoring

  • Track memory usage over time
  • Identify components that don’t release memory
  • Monitor leaks during navigation

Impact: Helps pinpoint where memory is accumulating.

2. Use Xcode Instruments (iOS) / Android Profiler

  • Analyze heap allocations
  • Detect retained objects
  • Identify abnormal memory growth patterns

Impact: Deep visibility into memory behavior at runtime.

3. Test Real Usage Scenarios

  • Navigate across multiple screens repeatedly
  • Keep the app running for extended sessions
  • Simulate real user flows

Impact: Reveals leaks that don’t appear in short test cycles.

How to Fix Memory Leaks

Once identified, fixes are usually straightforward, but require discipline.

1. Clean Up Event Listeners

  • Remove listeners in cleanup functions (useEffect return)
  • Avoid multiple subscriptions without cleanup

Impact: Prevents unnecessary memory retention.

2. Clear Timers and Background Tasks

  • Always clear setTimeout and setInterval
  • Stop background processes when not needed

Impact: Frees up memory and reduces CPU usage.

3. Manage Subscriptions and API Calls

  • Cancel ongoing requests when components unmount
  • Close WebSocket or real-time connections properly

Impact: Prevents orphan processes consuming memory.

4. Optimize Navigation Behavior

  • Avoid keeping unnecessary screens mounted
  • Use proper navigation stack management

Impact: Reduces memory buildup across screens.

5. Avoid Retaining Large Objects

  • Release references to unused data
  • Optimize image handling and caching

Impact: Keeps memory footprint stable.

What Most Teams Miss

They optimize visible performance issues, but ignore what happens over time.

So:

  • The app performs well initially
  • But degrades during longer sessions
  • And eventually crashes under real usage

Because memory leaks don’t show up immediately, they accumulate silently.

What This Means for Your App

If your app:

  • Slows down after prolonged use
  • Crashes without clear errors
  • Performs inconsistently across sessions

There’s a strong chance memory leaks are involved.

Fixing memory leaks isn’t just about stability; it’s about maintaining consistent performance as users engage more deeply with your app.

Profiling & Debugging Tools You Should Be Using

At this point, you have seen where performance issues come from and how to fix them.

But here is where most teams still go wrong:

They optimize based on assumptions.

They “feel” the app is slow, try a few fixes, see minor improvements and stop there. The problem is, without proper profiling, you are not solving the root issue. You are just reaching to symptoms.

Performance optimization only becomes effective when it is measured, not guessed.

Why Profiling Changes Everything

Without profiling:

  • You don’t know what is actually slow
  • You may fix low-impact issues first
  • Critical bottlenecks remain uptouched.

With profiling:

  • You identify exactly where time and memory are being consumed
  • You prioritize fixes based on impact
  • You avoid unnecessary rework

That is what separated random optimization from systematic performance improvement.

Key Tools You Should Be Using

You do not need dozens of tools, just the right ones used consistently.

1. Flipper (All-in-One Debugging Tool)

Flipper is one of the most practical tools for React Native performance analysis.

  • Monitor JS thread performance
  • Track network requests
  • Analyze memory usage
  • Inspect logs and app behavior

Best For: Getting a consolidated view of app performance in real time.

2. React DevTools (Render Analysis)

  • Identify unnecessary re-renders
  • Analyze component updates
  • Track state and prop changes

Best for: Fixing rendering-related performance issues.

3. Performance Monitor (Built-in RN Tool)

A quick way to check real-time performance inside your app.

  • Monitor FPS (frames per second)
  • Track JS thread activity
  • Identify frame drops

Best for: Spotting immediate performance issues during interaction.

4. Xcode Instruments (iOS) / Android Profiler)

For deeper, system-level analysis:

  • Track CPU usage
  • Analyze memory allocation
  • Detect leaks and spikes

Best for: Diagnosing complex performance and memory issues.

5. Systrace (Advanced Performance Tracking)

Useful for understanding low-level performance behavior.

  • Analyze thread activity
  • Identify bottlenecks in execution flow
  • Track system-level delays

Best for: Advanced debugging in high-performance or complex apps.

How to Use Profiling Effectively

Using tools is one thing, using them correctly is what matters.

Start with a Clear Scenario

  • Test specific user flows (eg., app launch, scrolling, navigation)
  • Avoid random exploration

Identify the Bottleneck First

  • Is it JS thread overhead?
  • Rendering inefficiency?
  • Memory growth?
  • Network delay?

Prioritize High-Impact Fixes

  • Focus on issues affecting user experience directly
  • Ignore micro-optimizations initially

Measure Before and After

  • Validate improvement after every change
  • Avoid stacking multiple fixes without tracking impact

What Most Teams Get Wrong

They treat profiling as optional. So:

  • Performance issues are misdiagnosed
  • Fixes are inconsistent
  • Time is wasted on low-impact improvements

What This Means for Your App

If you are not profiling:

  • You are guessing
  • You are likely fixing the wrong problems first
  • You are leaving performance gains on the table

Profiling turns performance optimization from trial-and-error into a repeatable, data-driven process.

Combining profiling with consistent software testing ensures performance issues are identified early and resolved before impacting users.

React Native New Architecture (Fabric + TurboModules) Migration Guide

If you have already optimized your app and still see performance limits, the next step is not another tweak; it is architecture.

React Native’s New Architecture (Fabric + TurboModules) is designed to solve some of the core limitations of the traditional setup, especially around the bridge and rendering pipeline.

But here is the important part: This is not a mandatory upgrade for every app. It is a strategic decision.

What is Changing in the New Architecture?

The traditional React Native model relies heavily on the bridge for communication between JavaScript and native layers.

The New Architecture reduces that dependency and introduces a more efficient system:

  • Fabric improves how UI is rendered
  • TurboModules optimize how native modules are accessed
  • JSI (JavaScript Interface) enables more direct communication without heavy serialization

Together, these changes aim to make React Native faster, more predictable, and more scalable.

Where You Will See the Biggest Performance Gains

The new architecture does not magically fix everything, but it significantly improves performance in areas like:

  • Faster and more consistent rendering
  • Reduced latency in JS <-> Native Communication
  • Better handling of complex UI updates
  • Improved performance in animation-heavy or interactive apps.

This is especially useful for apps that:

  • Have high user interaction
  • Rely heavily on animations and gestures
  • Experience performance limits even after optimization

When Should You Consider Migrating?

Migration makes sense when:

  • You have already optimized JS thread, rendering, and memory usage
  • Bridge communication is still a bottleneck
  • You app is scaling in complexity
  • You need long-term performance stability

It may not be necessary if:

  • Your current performance is already stable
  • Your app is relatively simple
  • You haven’t yet optimized existing architecture

What Makes Migration Challenging

This is where most teams hesitate, and rightly so.

  • Not all third-party libraries are fully compatible
  • Migration requires testing across the entire app
  • Partial adoption can create inconsistencies
  • Development effort can be significant

That is why this is not just a technical upgrade; it is a planning exercise.

How to Approach Migration Strategically

1. Start with an Audit

  • Identify current performance bottlenecks
  • Confirm if they are architecture-related
  • Avoid migrating without a clear reason

2. Check Library Compatibility

  • Audit all dependencies
  • Replace unsupported libraries if needed
  • Avoid surprises during migration

3. Plan a Phased Rollout

  • Start with non-critical modules
  • Gradually migrate features
  • Monitor performance improvements at each step

4. Combine with Existing Optimizations

Migration works best when paired with:

  • JS thread optimization
  • Reduced bridge usage
  • Efficient rendering patterns

What Most Teams Get Wrong

They see the New Architecture as a quick fix.

So they:

  • Attempt migration too early
  • Skip optimization fundamentals
  • Underestimate implementation complexity

And end up with:

  • Increased development effort
  • Minimal performance gains

What This Means for Your Business

Migrating to Fabric and TurboModules is not about chasing trends; it’s about removing structural limitations when your app outgrows its current setup.

The New Architecture is a powerful upgrade, but only when your app is ready for it and your decision is based on real performance needs.

Talk to a Performance Expert

When to Optimize vs When to Rebuild

At some point, every team working on a growing React Native app faces this question:

“Should we keep optimizing, or is it time to rebuild?”

It is not just a technical decision. It is a business decision involving cost, timelines, risk, and long-term scalability.

The mistake most teams make is choosing too early or too late.

Why This Decision Gets Misjudged

Performance issues create urgency. Lag, crashes, or poor user experience push teams toward drastic decisions like rewriting the app or switching frameworks. But in reality:

  • Many apps are rebuilt when optimization was enough
  • Others are over-optimized when architectural limits already exist

The key is knowing where your app actually stands.

When Optimization is the Right Move

In most cases, optimization should be your first approach, especially if the foundation is still solid.

You should continue optimizing if:

  • Performance issues are linked to JS thread overload, rendering, or memory leaks
  • Startup time is high due to bundle size or asset loading
  • Lists, images, or animations are not optimized
  • Profiling shows clear, fixable bottlenecks

In these scenarios, applying the checklist you have seen can lead to significant improvements without major redevelopment costs.

When Rebuilding (or Major Refactoring) Makes Sense

Optimization has limits, especially when the core architecture becomes a constraint.

You should consider rebuilding or restructuring if:

  • Performance issues persist even after thorough optimization
  • Bridge communication remains a major bottleneck
  • The app architecture is not aligned with scaling needs
  • Technical debt is slowing down development and releases
  • You’re planning major feature expansions that current setup can’t support efficiently

In such cases, continuing to optimize can become more expensive than restructuring.

Cost vs Impact: The Real Trade-Off

This decision isn’t about “what’s better”, it’s about what delivers the best return.

  • Optimization → Lower cost, faster results, minimal disruption
  • Rebuild → Higher cost, longer timelines, but cleaner long-term foundation

The right choice depends on:

  • Current performance state
  • Business priorities
  • Growth plans

A Practical Decision Framework

Before deciding, ask:

  • Have we identified real bottlenecks using profiling tools?
  • Have we optimized JS thread, rendering, and memory usage?
  • Are performance issues still limiting user experience after fixes?
  • Is our current architecture blocking future scalability?

If most answers point to fixable issues → optimize. If they point to structural limitations → consider rebuilding.

What Most Teams Get Wrong

They treat rebuilding as a performance solution.

But:

  • A new app with poor practices will face the same issues again
  • Rebuilding doesn’t eliminate the need for optimization, it resets it

What This Means for Your Business

Choosing correctly here impacts:

  • Development cost
  • Time to market
  • Product stability
  • Future scalability

Optimize when the foundation is strong. Rebuild when the foundation is limiting growth.

Conclusion: Should You Optimize Now or Wait Until It Gets Worse?

If your app is already showing signs of lag, slow startup, or inconsistent performance, waiting will only make the problem harder, and more expensive, to fix.

The right approach isn’t to overhaul everything overnight. It’s to identify bottlenecks, fix what matters most, and build a system that keeps performance stable as you scale.

Because performance isn’t just about speed, it’s about:

  • Retaining users
  • Improving engagement
  • Supporting growth without friction

And in most cases, the difference between a struggling app and a scalable one comes down to how early and how systematically you address performance.

Optimize My App Performance

MVP App Development: Build a Minimum Viable Product Mobile App in 90 Days

Introduction

Most mobile apps fail before they even get a chance to grow. Not because the idea was weak, but because too much was built too early. This is where MVP app development changes the entire approach.

Instead of investing heavily in a full-featured product, businesses now focus on building a minimum viable product mobile app with only the core features users actually need. This allows them to test the idea in real conditions, gather feedback, and make better decisions before scaling.

Think of it like launching with a strong foundation instead of a finished structure. With the right MVP in mobile app development, you can validate your concept, reduce unnecessary costs, and avoid building features that users may not value.

A well-planned mobile app development MVP helps you move faster in a competitive market. It gives you clarity on what works, what needs improvement, and where to invest next.

In this guide, you will learn how to build and launch your MVP within a structured 90-day timeline. From idea validation and feature prioritization to development, testing, and launch, each step is explained in a clear and practical way so you can move forward with confidence.

Discuss Your Idea

What is MVP in Mobile App Development?

Before you start building, you need clarity on one thing. What exactly are you trying to launch first?

That is where MVP app development becomes important. It helps you focus on building only what is needed to test your idea with real users, instead of trying to create a complete app from the start.

Minimum Viable Product Mobile App Explained

A minimum viable product mobile app is the simplest version of your app that solves one main problem for users.

It includes only the core features required to make the app usable. Nothing extra.

Example:

If you are building a food delivery app, your MVP would include:

  • User signup and login
  • List of restaurants
  • Order placements
  • Basic payment options

Features like live tracking, ratings, or discounts can be added later.

The idea behind MVP in mobile app development is simple. Launch early, understand how users interact with your app, and improve step by step.

Why MVP App Development Matters for Mobile Apps

Building a full app without testing the idea can lead to wasted time and budget. A focused mobile app development MVP helps avoid that.

Here is why it matters:

  • Faster Validation: You test your idea with real users early.
  • Reduces Development Cost: You invest only in features that matter first.
  • Better Product Decisions: You improve based on user feedback, not assumptions.
  • Quicker Market Entry: You launch faster and stay competitive.

MVP vs Prototype vs PoC in Mobile App Development

These terms are often confused, but they are used at different stages.

MVP (Minimum Viable Product)

  • A working app with core features
  • Used by real users
  • Helps to test if your idea works in the market

Prototype

  • A design or clickable model
  • Shows how the app will look and flow
  • Not a complete or usable product

PoC (Proof of Concept)

  • A small test to check if the idea is technically possible
  • Usually not shown to users

Simple way to understand:

  • Prototype shows how your app locks
  • PoC checks if your idea can work
  • MVP shows if users actually want it

This clarity helps you choose the right approach and move forward confidently in MVP app development.

Why Start with MVP in Mobile App Development

Why Start with MVP in Mobile App Development

Building a mobile app without testing the idea first is like investing in a product without knowing if there is demand. Many apps fail at this stage because they are built based on assumptions rather than real user needs.

This is why businesses prefer MVP app development. It allows you to launch a focused version of your app, understand how users respond, and make informed improvements before scaling further.

Reduce Development Risk and Avoid Waste

When you build a complete app from the start, every feature is based on a prediction. If those predictions are incorrect, it leads to wasted effort and budget.

With MVP in mobile app development, you limit your scope to only essential features. This approach helps you:

  • Avoid overbuilding
  • Focus on solving one clear problem
  • Identify gaps early in the process

It also gives you flexibility. If something does not work, you can adjust quickly without major losses.

Validate Real User Demand Early

A minimum viable product mobile app helps you answer one critical question. Do users actually need this app?

Instead of relying only on research, you collect real data such as:

  • User engagement levels
  • Feature usage patterns
  • Feedback and reviews

This early validation ensures that your future development is based on actual demand, not assumptions.

Launch Faster with Focused Features

In mobile app development, timing can directly impact success. Delayed launches often lead to missed opportunities.

A structured mobile app development MVP approach allows you to:

  • Release your app in a shorter time frame.
  • Test your idea in the market early.
  • Start building user traction sooner.

By focusing only on key features, you reduce development time and simplify the launch process.

Control Mobile App Development Cost

Developing a full-featured app requires a significant investment. For many businesses, this can be risky without prior validation.

With MVP app development, costs are more controlled because:

  • Development is limited to core functionality.
  • Design and integrations are kept minimal.
  • Resources are used more efficiently.

This approach allows you to allocate your budget wisely. Once your MVP shows positive results, you can invest further with better confidence and direction.

Starting with an MVP is a practical strategy. It helps you test your idea, learn from real users, and build your app step by step with clarity and control.

90-Day MVP App Development Timeline for Mobile Apps

A well-defined timeline brings clarity to execution. Without it, MVP app development often faces delays, scope changes, and budget overruns. A structured 90-day plan helps you move from idea to launch with clear milestones, measurable progress, and better control over resources.

This roadmap breaks the process into focused phases so your minimum viable product mobile app is built efficiently while maintaining quality.

Week 1-2: Discovery and Wireframing

This is the most critical phase because it defines what you will build and why. Decisions made here directly impact cost, timeline, and product direction.

Key activities:

  • Identify the problem your app will solve.
  • Define target users and their expectations.
  • Conduct competitor analysis to understand market gaps.
  • Map user journeys and app flows.
  • Create wireframes for core screens.

Why this matters:

A strong discovery phase reduces confusion later. It ensures your team works with a clear understanding of features, user flow, and priorities.

Outcome:

A validated concept with structured wireframes ready for design.

Week 3-4: UI Design and Clickable Prototype

Once the structure is ready, the focus shifts to user experience and interface design. This phase shapes how users will interact with your app.

Key activities:

  • Design user-friendly and consistent UI screens.
  • Apply branding elements such as colors and typography.
  • Build a clickable prototype to simulate app flow.
  • Conduct usability testing with early users.

Why this matters:

Testing design before development helps identify usability issues early. It reduces rework and improves overall user experience.

Outcome:

A refined prototype that visually represents your mobile app development MVP.

Week 5-10: MVP Development Sprints

This is the execution phase, where your app is developed in stages. Work is divided into smaller sprints to maintain speed and flexibility.

Key activities:

  • Set up backend systems and database structure.
  • Develop a mobile frontend for core features.
  • Integrate APIs such as payment gateways or notifications.
  • Conduct sprint reviews to track progress.
  • Perform ongoing testing during development.

Why this matters:

Sprint-based development allows quick adjustments. If a feature needs improvement, changes can be made without affecting the entire project.

Outcome:

A functional version of your app with essential features ready for final testing.

Week 11-12: QA Testing and App Store Preparation

Before launch, your app must be stable, secure, and ready for real users. This phase ensures quality and compliance.

Key activities:

  • Perform functional, usability, and performance testing.
  • Identify and fix bugs or errors.
  • Optimize app performance and loading speed.
  • Prepare app store assets such as screenshots and descriptions.
  • Review guidelines for both iOS and Android platforms.

Why this matters:

A poorly tested app can lead to negative reviews and rejection from the app store. Proper testing improves reliability and user satisfaction.

Outcome:

A polished and compliant minimum viable product mobile app ready for release.

Week 13: MVP Launch and Initial Feedback

This is where your app enters the market and starts interacting with real users. The focus now shifts from building to learning.

Key activities:

  • Launch the app on the App Store.
  • Monitor user behavior and app performance.
  • Collect feedback through reviews and in-app responses.
  • Track the key metrics such as downloads, retention, and engagement.

Why this matters:

The launch is not the end. It is the beginning of learning. Real user data helps you decide what to improve, add, or remove in the next version.

Outcome:

Actionable insights that guide future updates and scaling decisions in MVP in mobile app development.

Following this 90-day timeline keeps your project structured and focused. It helps you avoid delays, manage resources efficiently, and move forward with clear direction at every stage.

Start Your MVP Today

How to Validate a Minimum Viable Product Mobile App Idea

How to Validate a Minimum Viable Product

Before investing time and budget into development, validation helps you confirm whether your idea has real demand. Many apps fail because they are built without testing user interest or problem relevance.

A structured validation approach ensures your minimum viable product mobile app is based on real user needs, not assumptions. It also strengthens your MVP app development strategy by giving you clear direction before execution.

Identify the Core Problem Your App Solves

Every app should address a specific problem. If the problem is unclear, the product will lack direction.

What to analyze:

  • What challenges are users facing?
  • How frequently does this problem occur?
  • Current solutions users rely on.
  • Limitations of those existing solutions.

Example:

A budgeting app may focus on helping users track daily expenses instead of offering complex financial planning features.

Why this matters:

A well-defined problem ensures your MVP in mobile app development stays focused and delivers clear value.

Define Target Users and Use Cases

Understanding your users helps you build relevant features and avoid unnecessary additions.

Key steps:

  • Identify primary user segments.
  • Study user behavior and preferences.
  • Define real-life scenarios where the app will be used.
  • Create simple user personas.

Example:

A fitness app MVP may target beginners who need short and guided workout routines.

Why this matters:

Clear user definitions improve feature selection and enhance the effectiveness of your mobile app development MVP.

Conduct Market and Competitor Research

Market research provides insights into what already exists and where your app can fit.

What to evaluate:

  • Popular apps in your category.
  • Features they offer.
  • Pricing models.
  • User review highlighting common issues.

Why this matters:

Competitor analysis helps you identify gaps and build a more focused and competitive minimum viable product mobile app.

Test Demand with Landing Pages or Surveys

Before development, testing demand can give early signals of user interest.

Methods to use:

  • Create a landing page explaining your app idea.
  • Add a signup form for early access.
  • Run small ad campaigns to drive traffic.
  • Use surveys to collect feedback.

What to measure:

  • Number of signups
  • User interest level
  • Feedback on concept clarity

Why this matters:

This step helps to confirm whether users are interested enough to try your app once it is launched.

Build a Prototype for Early Feedback

A prototype gives users a visual understanding of your app and allows you to test usability.

What to include:

  • Key screens and navigation flow.
  • Basic interactions.
  • Core feature representations.

How to use it:

  • Share with a small group of users.
  • Observe how they interact.
  • Collect feedback on usability and clarity.

Why this matters:

Testing with a prototype reduces the chances of major changes during MVP app development and improves overall product quality.

Validating your idea is a critical step in the process. It ensures your app is built on real demand, supported by user insights, and ready for development with a clear direction.

Types of MVP in Mobile App Development

Types of MVP in Mobile App Development

An MVP is not always built in the same way. The approach you choose depends on how early your idea is, how much you want to invest, and what you need to validate first.

Understanding these types helps you make better decisions during MVP app development and avoid building more than required.

Low-Fidelity MVP (Wireframes and Mockups)

This is the simplest form of MVP. It focuses only on structure, not functionality.

What it looks like:

  • Basic screen layouts
  • Simple wireframes
  • User flow diagrams

When to use it:

  • When your idea is still at an early stage.
  • When you want feedback on app flow and structure.
  • When you want to validate quickly with minimal effort.

Example:

Sketching app screens or creating wireframes in design tools.

Why it matters:

It helps you check if your app idea makes sense before starting mobile app development MVP.

High-fidelity MVP (Functional App Version)

This is a working version of your app with core features. Users can interact with it like a real app.

What it includes:

  • Core features
  • Basic backend
  • Real user interactions

When to use it:

  • When you want to launch your app to users.
  • When you need real feedback and usage data.

Example:

A high-fidelity minimum viable product mobile app helps you test how users actually use your app.

Single-Feature MVP Approach

This approach focuses on building only one main feature instead of multiple features.

What it includes:

  • One strong core feature
  • Simple supporting interface

When to use it:

  • When your app idea is centered around one main function
  • When you want quick validation

Why it matters:

It keeps your MVP in mobile app development simple, focused, and faster to launch.

No-Code MVP vs Custom MVP Development

This is a decision about how you build your MVP.

No-Code MVP

  • Built using tools without coding
  • Faster and more affordable
  • Limited flexibility

Best for:

  • Simple app ideas
  • Early testing

Custom MVP Development

  • Built using programming languages
  • More control and flexibility
  • Suitable for complex features

Best for:

  • Scalable apps
  • Long-term development

Why it matters:

Choosing the right method ensures your mobile app development MVP matches your timeline, budget, and future plans.

Selecting the right type of MVP helps you start in the right way. It ensures you are testing your idea effectively without adding unnecessary complexity.

Not sure which MVP type fits your app

MVP App Features Prioritization Using MoSCoW Framework

MVP App Features Prioritization Using MoSCoW Framework

One of the most common challenges in MVP app development is deciding which features to include in the first version. Without a clear method, teams often add too many features, which increases development time and cost while delaying the launch.

The MoSCoW framework provides a structured way to prioritize features. It helps you focus on what is essential for your minimum viable product mobile app. While keeping future improvements planned and controlled.

What is MoSCoW in MVP App Development

MoSCoW is a prioritization technique that divide features into four categories:

  • Must have
  • Should have
  • Could have
  • Won’t have

These methods help the product team make clear decisions during mobile app development MVP, especially when working with limited time and resources.

It also ensures that your MVP delivers core value without unnecessary complexity.

Must-Have Features in a Mobile App MVP

Must-have features are the foundation of your app. These are the features required for the app to function and solve the main user problem.

Key characteristics:

  • Directly related to the core purpose of the app.
  • Required for basic usability.
  • Cannot be delayed.

Example:

In a ride-sharing app:

  • User registration
  • Ride booking
  • Location tracking

Importance:

If these features are missing, your MVP in mobile app development will not serve its purpose.

Should-Have Features

Should-have features improve usability and user experience, but are not critical for the first release.

Key characteristics:

  • Add value to the product
  • Improve user engagement
  • Can be delayed if needed

Example:

  • Ride history
  • Fare estimation
  • Notifications

Importance:

These features can be added after launch based on user feedback and priorities.

Could-Have Features

Could-have features are optional and do not impact the core functionality of the app.

Key characteristics:

  • Nice to include
  • Low impact on initial user experience
  • Often used to differentiate later

Example:

  • Promo codes
  • Social sharing
  • Advanced filters

Importance:

These features are usually planned for later updates once the MVP is validated.

Won’t-Have Features

Won’t have features are those that are intentionally excluded from the current version.

Key characteristics:

  • Not required for MVP.
  • Can increase complexity if added early.
  • Planned for future versions.

Example:

  • AI-based recommendations
  • Multi-language support
  • Advanced analytics dashboards

Importance:

Defining what not to build helps prevent scope creep and keeps MVP app development focused.

Example:

Feature Prioritization for a Mobile App MVP

Consider a simple fitness app MVP.

Must Have:

  • User signup
  • Workout list
  • Basic tracking

Should Have:

  • Progress tracking
  • Reminders

Could Have:

  • Social sharing
  • Custom workout plans

Won’t Have:

  • AI-based coaching
  • Integration with wearable devices

Using the MoSCoW framework brings clarity to feature selection. It ensures your minimum viable product mobile app is built with the right priorities, allowing you to launch faster while keeping future improvements well planned.

Not sure which feature to build first

MVP App Development Process for Mobile Apps (Step-by-Step)

MVP App Development Process for Mobile Apps

A clear process helps you move from idea to launch without confusion. In MVP app development, each step builds on the previous one, so skipping or rushing a phase can affect the final outcome.

This step-by-step approach ensures your minimum viable product mobile app is planned, built, and launched with clarity and control.

Step 1. Discovery and MVP Planning

This is the foundation of your project. It defines what you are building and why.

Key activities:

  • Identify the core problem and business goal.
  • Define target users and use cases.
  • Conduct market and competitor analysis.
  • Finalize feature list using prioritization methods.

Why this matters:

A strong planning phase reduces uncertainty and ensures your MVP in mobile app development is aligned with user needs.

Step 2. Wireframing and UX Flow Design

Once the plan is ready, the next step is to structure the app.

Key activities:

  • Create wireframes for key screens.
  • Define navigation and user journeys.
  • Map how users will interact with features.

Why this matters:

Wireframes act as a blueprint. They help teams visualize the app before actual development begins.

Step 3. UI Design and Prototyping

This step focuses on how the app looks and feels.

Key activities:

  • Design user interface for all screens.
  • Apply branding elements like colors and fonts.
  • Build a clickable prototype for testing.

Why this matters:

Testing a prototype helps to identify usability issues early and improves the overall user experience of your mobile app development MVP.

Step 4. MVP Development (No-Code vs Custom)

This is where the actual development begins.

Key activities:

  • Choose a development approach.
  • Build frontend and backend components.
  • Integrate APIs and essential services.
  • Follow sprint-based development cycles.

Why this matters:

This phase turns your design into a working minimum viable product mobile app.

Step 5. Testing and Iteration

Before launch, your app must be tested to ensure it works as expected.

Key activities:

  • Perform functional testing
  • Check usability and performance
  • Fix bugs and errors
  • Make improvements based on feedback

Why this matters:

Testing ensures your MVP app development delivers a smooth and reliable user experience.

Step 6. Launch and Feedback Loop

Once testing is complete, the app is ready to go live.

Key activities:

  • Deploy the app on app stores.
  • Monitor user behavior and performance.
  • Collect feedback through reviews and analytics.
  • Plan updates based on user insights.

Why this matters:

Launch is not the final step. It starts the feedback cycle that helps improve your MVP in mobile app development over time.

Following this structured process ensures your MVP is built with purpose. Each step adds value and prepares your app for real users, making the transition from idea to product more efficient and reliable.

Test My App

Team Structure for MVP App Development

The outcome of your MVP app development largely depends on how well your team is structured. Even a strong idea can fail if roles are unclear or responsibilities overlap.

For a minimum viable product mobile app, the goal is not to build a large team but to create a focused team where each member contributes to a specific part of the process. This improves efficiency, reduces delays, and keeps development aligned with your timeline.

Key Roles in Mobile App MVP Development

Each role plays a defined part in building and launching the MVP. Clear responsibility ensures better coordination and faster execution.

Product Manager

  • Defines product goals and roadmaps.
  • Decides feature priorities based on user needs.
  • Ensures the project stays aligned with business objectives.

UI/UX Designer

  • Create wireframes and user flows.
  • Designs intuitive and user-friendly interfaces.
  • Ensures consistency across screens.

Mobile App Developers

  • Develop the app for Android, iOS, or both.
  • Implement core features and user interactions.
  • Optimize performance and responsiveness.

Backend Developer

  • Builds server-side logic and database structure.
  • Handles APIs, integrations, and data management.
  • Ensures the app can scale when needed.

QA Tester

  • Test the app for bugs and usability issues.
  • Validates performance across devices.
  • Ensures the app is ready for launch.

Why this matters:

A clearly defined team improves communication and ensures your mobile app development MVP progresses without confusion or rework.

In-House vs Outdated MVP Development Team

Choosing the right team model affects cost, speed, and flexibility.

In-House Team

  • Direct control over the development process.
  • Easier collaboration and communication.
  • Higher operational costs due to hiring and infrastructure.

Outsourced Team

  • Access to experienced professionals from the start.
  • Faster project initiation.
  • More cost-efficient for the MVP stage.

When to choose what:

  • Choose in-house if you plan long-term product development and have a budget.
  • Choose an outsource app development team if you need faster execution and lower initial investment.

Why this matters:

Selecting the right model helps you manage resources effectively during MVP in mobile app development.

Recommended Team Setup for Startups and Businesses

For most MVPs, a small and skilled team is enough to deliver results for app development for startups.

Typical team structure:

  • 1 Product Manager
  • 1 UI/UX Designer
  • 1-2 Mobile Developers
  • 1 Backend Developer
  • 1 QA Tester

Additional roles (if needed):

  • DevOps Engineer for deployment and infrastructure.
  • Business Analyst for detailed requirement planning.

Why this matters:

A lean team keeps costs under control while maintaining quality. It also helps you complete your minimum viable product mobile app within the planned timeline.

A well-structured team works like a coordinated system. Each role supports the other, ensuring your MVP moves from planning to launch in a smooth and organized way.

Hire MVP Experts

Minimum Viable Product Mobile App Development Cost in 2026

The cost of MVP app development depends on multiple factors such as app complexity, features, and development approach. Instead of a fixed number, it is better to understand cost ranges based on different scenarios.

Cost Based on MVP Complexity

MVP TypeFeatures IncludedComplexity LevelEstimated Cost
Basic MVPCore features, simple UI, minimal backendLow$10,000-$25,000
Mid-Level MVPMultiple features, API integrationsMedium$25,000-$60,000
Advanced MVPReal-time features, complex workflowsHigh$60,000-$120,000+

Insight:

As feature count and logic increase, the cost of mobile app development MVP also rises due to higher development effort.

Cost Based on Development Approach

Development ApproachDescriptionBest ForEstimated Cost
No-Code MVPBuilt using no-code platformsSimple apps, quick validation$5,000-$15,000
Hybrid DevelopmentMix of pre-built tools and custom codeMedium complexity apps$15,000-$40,000
Custom DevelopmentFully coded solutionScalable and complex apps$40,000-$120,000+

Insight:

Choosing the right approach helps control cost while aligning with your long-term plan for the minimum viable product mobile app.

Key Factors Affecting MVP App Development Cost

FactorImpact on Cost
Number of featuresMore features increase development time
Platform (iOS/Android/Both)More platforms increase cost
UI/UX Design ComplexityAdvanced design requires more effort
Third-Party IntegrationsAPIs add development and maintenance costs
Development Team LocationRates vary by region and expertise

Quick Cost Understanding

  • A simple idea with limited features leads to lower cost.
  • Complex workflows and integration increase the budget.

Presenting cost this way makes it easier to evaluate options and plan your MVP in mobile app development with better financial clarity.

Request Cost Estimate

Mobile App Beta Testing Strategy for MVP

Once development is complete, testing becomes a critical step before launch. Even a well-built app can fail if issues are not identified early.

A structured testing strategy ensures your MVP app development delivers a stable and usable product. It also helps you gather real feedback before making your app available to a wider audience.

Internal Testing vs External Beta Testing

Testing is usually done in two stages, each serving a different purpose.

Internal Testing

  • Conducted by your development and QA team.
  • Focuses on functionality, performance, and bug detection.

External Beta Testing

  • Conducted by a limited group of real users.
  • Focuses on functionality, performance, and bug detection.
  • Ensures all features work as expected.

Why this matters:

Combining both approaches improves the quality of your minimum viable product mobile app before launch.

How to Collect and Use User Feedback

User feedback is one of the most valuable outcomes of beta testing. It helps you understand how users interact with your app.

Ways to collect feedback:

  • In-app feedback forms.
  • Surveys and questionnaires.
  • App store beta reviews.
  • Direct user interviews.

What to analyze:

  • Common issues faced by users.
  • Features that users find useful.
  • Areas where users face confusion.

Why this matters:

Feedback helps refine your mobile app development MVP and ensures improvements are based on actual user behavior.

Tools for MVP Testing

Using the right tools can make testing more efficient and structured.

Common tools include:

  • Testing platforms for beta releases.
  • Crash reporting tools.
  • Performance monitoring tools.
  • User behavior analytics tools.

Examples of what to track:

  • App crashes
  • Load time
  • User navigation patterns

Why this matters:

Proper tools help you identify quickly and improve the overall quality of your MVP in mobile app development for non-technical founders.

Common Issues to Fix Before Launch

Before releasing your app, certain issues should be addressed to ensure a smooth user experience.

Key areas to check:

  • App crashes or errors.
  • Slow performance or loading time.
  • Broken user flows.
  • UI inconsistencies.
  • Compatibility across devices.

Why this matters:

Fixing these issues before launch improves user satisfaction and reduces the risk of negative reviews.

A well-planned beta testing strategy ensures your app is not only functional but also user-friendly. It prepares your minimum viable product mobile app for a smoother launch and better user acceptance.

App Store Submission Checklist for Mobile App MVP

Launching your app is not just about development. App stores have strict guidelines, and even small issues can lead to rejection. A proper checklist ensures your MVP app development reaches users without delays.

This step prepares your minimum viable product mobile app for a smooth approval and launch process.

iOS App Store Requirements

Apple follows strict review standards, so attention to detail is important.

Key requirements:

  • Apps must be stable and free from major bugs.
  • Clear app description and metadata.
  • High-quality screenshots and app preview.
  • Proper use of permissions like location or camera.
  • Compliance with Apple guidelines.

Things to verify:

  • App performance across iOS devices.
  • No broken links or incomplete features.
  • Privacy policy links included.

Why this matters:

Meeting these requirements improves approval chances and ensures your mobile app development MVP is ready for users.

Google Play Store Requirements

Google Play has a faster review process, but guidelines still need to be followed.

Key requirements:

  • Functional and stable app.
  • Clear app listing with description and screenshots.
  • Proper app categorization.
  • Compliance with Google Play policies.

Things to verify:

  • App performance on different Android devices.
  • Permissions are clearly explained.
  • No misleading content.

Why this matters:

A complaints app reduces rejection risk and speeds up your MVP in mobile app development launch.

Common Reasons for App Rejection

Understanding common issues can help you avoid delays.

Frequent reasons include:

  • App crashes or has poor performance.
  • Incomplete features or broken functionality.
  • Missing privacy policy.
  • Misleading app description.
  • Improper use of permissions.

Why this matters:

Avoiding these mistakes ensures your minimum viable product mobile app gets approved without multiple resubmissions.

Final Pre-Launch Checklist

Before submitting your app, review everything carefully.

Checklist:

  • All core features are working properly.
  • App is tested across devices.
  • No critical bugs or crashes.
  • App description and keywords are optimized.
  • Screenshots and icons are ready.
  • Privacy policy is added.
  • Analytics tools are integrated.

Why this matters:

A final check ensures your MVP app development effort leads to a successful and timely launch.

Following this checklist reduces the chances of rejection and helps your app go live smoothly, allowing you to focus on user feedback and future improvements.

Real Examples of Minimum Viable Product Mobile Apps

Understanding theory is helpful, but real examples make the concept clearer. Many successful apps started as simple versions with limited features. Their early focus was not perfection, but solving one core problem well.

These examples show how MVP app development works in practice and how a minimum viable product mobile app evolves over time.

Example 1: Social Networking App MVP

Initial MVP focus:

  • User signup and login
  • Profile creation
  • Basic friend connection

What was not included initially:

  • Advanced feeds
  • Stories or media sharing
  • Complex algorithms

Key learning:

The first version focused only on connecting users. Once engagement increased, more features were added.

Insight:

This approach helped validate user interest before scaling the platform through mobile app development MVP.

Example 2: Ride-Sharing App MVP

Initial MVP focus:

What was not included initially:

  • Fare splitting
  • Ride scheduling
  • Advanced driver features

Key learning:

The goal was to make booking a ride simple and reliable. Once users adopted the service, additional features were introduced.

Insight:

A focused MVP in mobile app development helped test demand in a specific location before expanding globally.

Example 3: Fitness App MVP

Initial MVP focus:

  • User signup
  • Workout library
  • Basic progress tracking

Key learning:

Users first needed simple and accessible workouts. Advanced features were added later based on feedback.

Insight:

Starting with a simple minimum viable product mobile app allowed the app to grow based on real user needs.

What These Examples Show

Across all these cases, a clear partner emerges:

  • Start with one core problem.
  • Build only essential features.
  • Launch early and collect feedback.
  • Improve based on user behavior.

This is the core idea behind MVP app development. It is not about building less. It is about building the right features at the right time.

These examples make one thing clear. A successful app does not start as a complete product. It starts as a focused solution that grows with user feedback and real-world usage.

Common Mistakes in MVP App Development

Building an MVP is about focus and clarity. However, many teams make avoidable mistakes that slow down the progress or reduce the chances of success.

Understanding these mistakes helps you improve your MVP app development process and build a more effective minimum viable product mobile app.

Adding Too Many Features Too Early

One of the most common mistakes is trying to include too many features in the first version.

What happens:

  • Development time increases.
  • Costs go beyond the planned budget.
  • Core functionality loses focus.

Better approach:

  • Prioritize only essential features.
  • Use frameworks like MoSCoW.
  • Plan additional features for later updates.

Why this matters:

A focused mobile app development MVP helps you launch faster and test your idea effectively.

Skipping User Feedback

Some teams rely on internal assumptions and skip real user input.

What happens:

  • Features may not match user needs.
  • Low engagement after launch.
  • Difficulty in improving the product.

Better approach:

  • Collect feedback during testing.
  • Monitor user behavior after launch.
  • Make updates based on real insights.

Why this matters:

User feedback is essential for improving your MVP in mobile app development.

Poor Planning and Undefined Goals

Starting development without clear goals leads to confusion and delays.

What happens:

  • Teams lack direction.
  • Features are added without pressure.
  • Timelines become unpredictable.

Better approach:

  • Define a clear objective.
  • Identify the core problem.
  • Set measurable goals for MVP.

Why this matters:

Good planning ensures your minimum viable product mobile app stays aligned with its.

Ignoring Testing Phase

Rushing to launch without proper testing can harm your app’s reputation.

What happens:

  • App crashes or performance issues.
  • Poor user experience.
  • Negative reviews.

Better approach:

  • Conduct thorough testing.
  • Fix bugs before launch.
  • Test across devices and scenarios.

Why this matters:

A well-tested app improves user trust and strengthens your MVP app development outcome.

Lack of Clear Post-Launch Strategy

Some teams treat launch as the final step instead of the beginning of improvement.

What happens:

  • No clear plan for updates.
  • Missed opportunities for growth.
  • Slow response to user feedback.

Better approach:

  • Track performance metrics.
  • Plan regular updates.
  • Continue improving based on user data.

Why this matters:

A strong post-launch plan ensures your mobile app development MVP continues to evolve.

Avoiding these mistakes helps you stay focused, reduce risks, and build an MVP that delivers real value. It ensures your app is not only launched successfully but also positioned for long-term growth.

When to Scale Beyond MVP in Mobile App Development

Launching your MVP is only the first step. The next decision is equally important. When should you move from MVP to a full product?

Scaling too early can increase cost without clear returns. Scaling too late can slow down growth. The goal is to use data from your MVP app development phase to make the right decision at the right time.

Key Metrics to Track After MVP Launch

Your minimum viable product mobile app provides real user data. This data helps you understand whether your app is ready for the next stage.

Important metrics to monitor:

  • User acquisition: Number of downloads or signups.
  • User retention: How many users return to the app?
  • Engagement rate: How often users interact with features.
  • Conversion rate: Actions like purchases or subscriptions.
  • User feedback: Reviews, ratings, and direct responses.

Why this matters:

These metrics give clear signals about what is working and what needs improvement in your mobile app development MVP.

Signs Your MVP is Ready for Full Development

Not every MVP should be scaled immediately. You need clear indicators.

Strong signs include:

  • Users are actively using your app.
  • Retention rate is stable or improving.
  • Core features are performing well.
  • Positive feedback from users.
  • Demand for additional features.

Why this matters:

These signals show that your MVP in mobile app development has achieved initial validation and is ready for expansion.

Next Steps After MVP Success

Once your MVP shows positive results, the focus shifts to scaling and improving the product.

Recommended steps:

  • Add features based on user demand.
  • Improve performance and scalability.
  • Strengthen UI and user experience.
  • Expand to additional platforms if needed.
  • Invest in marketing and user acquisition.

Why this matters:

Scaling is not just about adding features. It is about building on what works and improving the overall value of your minimum viable product mobile app.

When Not to Scale Yet

Sometimes, the data shows that your app needs improvement before scaling.

Common signals:

  • Lower user retention.
  • Limited engagement.
  • Negative feedback.
  • Confusion in the user flow.

What to do instead:

  • Improve core features.
  • Fix usability issues.
  • Re-evaluate your value proposition.

Why this matters:

Taking time to refine your MVP ensures that future development efforts are more effective.

Scaling beyond MVP is a data-driven decision to ensure your app grows in the right direction, based on real user behavior rather than assumptions.

Conclusion

Building a successful mobile app does not start with a complete product. It starts with the right approach.

MVP app development gives you a practical way to test your idea, understand user needs, and make informed decisions without overinvesting. Instead of guessing what users want, you build a minimum viable product mobile app that delivers real value from the beginning.

From idea validation and feature prioritization to development, testing, and launch, each step plays a role in shaping a product that is both useful and scalable. A structured mobile app development MVP approach also helps you stay within budget, reduce risks, and move faster in a competitive market.

The key is to stay focused. Build only what is necessary, learn from real users, and improve continuously. This is what makes MVP in mobile app development effective.

If you approach your MVP with clarity and a well-defined plan, you are not just building an app. You are building a product that evolves based on real demand and has a stronger chance of long-term success.

Ready to turn your app idea into reality

eCommerce Subscription Platform: Features, Tech Stack & Cost Guide

Introduction

Selling once is easy. Getting customers to come back every month is where real growth happens. That’s why many DTC brands are moving towards subscription models powered by an eCommerce subscription platform.

A well-built subscription box eCommerce platform helps you move beyond one-time transactions. It allows you to deliver products on a recurring basis, manage subscriptions smoothly, and give customers more control over what they receive and when.

From curated boxes of essential product refills, subscriptions create consistency for both the businesses and the buyer.

In this guide, you will learn how a subscription platform works, what features are required, how to choose the right approach, and what it costs in terms of eCommerce development to build a scalable eCommerce subscription box solution. If you are planning to launch or upgrade your subscription offerings, this will help you make clear and practical decisions.

Let’s discuss it all.

What Is a Subscription Box Platform?

What Is a Subscription Box Platform

A subscription box platform is a type of eCommerce system designed to handle recurring orders instead of one-time purchases. It allows businesses to deliver products to customers on a fixed schedule, such as weekly, monthly, or quarterly, while managing payments automatically.

Unlike a traditional online store, an eCommerce subscription box platform is built around continuity. Customers do not need to place an order every time. Once they subscribe, the platform takes care of billing, order creation, and the delivery cycle. This creates a smoother experience for both the business and the customer.

At its core, a subscription box platform includes three essential components.

  • A recurring billing system that charges customers at set intervals.
  • A subscription management system that allows users to pause, skip, or modify their plans.
  • A box configuration setup that lets businesses define what goes into each delivery, whether it is fixed, customizable, or curated.

Well-known examples of this model include brands like Birchbox, Dollar Shave Club, and HelloFresh. Each of them uses subscriptions differently, but all rely on a platform that can manage recurring relationships instead of single transactions.

In simple terms, if a regular eCommerce store is like a one-time purchase at a shop, a subscription box platform works like a monthly service that keeps running in the background while the customer stays subscribed.

Curated vs Replenishment vs Access – Which Model Fits

Curated vs Replenishment vs Access

When evaluating subscription commerce business model types, choosing the right model is one of the most important early decisions. Each model shapes how your platform works, how customers interact with it, and how predictable your revenue becomes.

1. Curated Subscription (Surprise Box)

This model focuses on discovery. Customers receive a selection of products chosen by the brand, often without knowing the exact content in advance.

Examples include brands like Birchbox.

Key characteristics:

  • High excitement and engagement.
  • Strong brand storytelling.
  • Flexible product combinations.

Challenges:

  • Higher churn due to unpredictability.
  • Requires strong personalization to retain users.

2. Replenishment Subscription (Auto-Refill)

This model is built around convenience. Customers subscribe to receive essential products at regular intervals without needing to reorder.

A well-known example is Dollar Shave Club.

Key characteristics:

  • Predictable demand
  • Lower churn rates
  • Simple user experience

Challenges:

  • Limited upsell opportunities.
  • Less excitement compared to curated models.

3. Access-Based Subscription (Membership Model)

In this model, customers pay for ongoing access to benefits such as discounts, exclusive products, or faster delivery.

A common example is Amazon Prime.

Key characteristics:

  • Strong customer retention.
  • High perceived value over time.
  • Encourages frequent engagement.

Challenges:

  • Requires continuous value delivery.
  • Needs integration across multiple services.

Comparison Overview

ModelChurn RateAverage Order ValueBest IndustriesTech Complexity
CuratedHigh (10-15%)Medium to HighBeauty, lifestyle, fashionMedium
ReplenishmentLow (5-8%)Low to MediumPersonal care, groceriesLow
AccessVery Low (3-6%)High (long-term value)Retail, services, marketplaceHigh

Most businesses start with one model and later combine elements from others as they grow. The right approach depends on your product type, how often customers need it, and how much flexibility you want to offer within your web app development practices.

DTC Subscription Platform – Feature Checklist

When planning a recurring revenue platform development for DTC brands, features are not just technical components. They directly impact how customers subscribe, stay engaged, and continue paying over time. A well-structured platform should balance operational efficiency with customer control.

Below is a practical feature checklist to guide your platform development.

Core Features

These are the essentials for running any subscription-based business.

  • Recurring billing engine: Automate payments on a fixed schedule to ensure consistent revenue without manual intervention.
  • Subscription management dashboard: Allows businesses to create plans, manage pricing, and control subscriptions.
  • Customer self-service portal: Let users pause, skip, cancel, or modify their subscriptions without support dependency.
  • Box customization builder: Enable customers to choose products, variants, or preferences within their subscription.
  • Variable product inventory management: Handles changing product combinations and prevents stock mismatches.

Growth Features

These features help to improve retention and increase customer value over time:

  • Churn prediction analytics: Identify users likely to cancel so proactive actions can be taken.
  • Referral program engine: Encourages existing customers to bring in new subscribers.
  • Gift subscriptions: Allows users to purchase subscriptions for others, increasing acquisition channels.
  • Multi-currency support: Helps expand into global markets with localized pricing.
  • Dunning management: Automatically retries failed payments and recovers lost revenue.

Integrations

A subscription platform does not operate in isolation. These integrations ensure smooth operations.

  • Shipping APIs: Automate order fulfillment and delivery tracking.
  • CRM Systems: Manage customer data and communication workflows.
  • Email marketing tools: Send lifecycle emails such as onboarding, reminders, and win-back campaigns.
  • Analytics dashboards: Track metrics like churn rate, monthly recurring revenue, and customer lifetime value.

A strong feature set acts like the backbone of your subscription business. If the foundation is weak, even the best marketing efforts will struggle to retain customers. Getting these features right from the start helps to reduce friction, improve retention, and support long-term growth.

Get Your Free Feature Plan

Billing Engine – Stripe vs ReCharge vs Bold Subscriptions

Billing Engine - Stripe vs ReCharge

Choosing the right billing system is a core part of subscription billing integration, Stripe ReCharge for eCommerce. This layer controls how payments are processed, how subscriptions renew, and how failed transactions are handled. A weak billing setup can lead to revenue loss, while a well-configured system keeps cash flow stable and predictable.

These are three commonly used options, each suited for a different type of business.

Stripe Billing

Stripe is widely used for custom-built subscription platforms. It offers full control over billing logic, pricing models, and payment workflows.

Best for:

  • Custom platforms.
  • Business with complex subscription rules.
  • Multi-region or multi-currency setups.

What to consider:

  • Requires development effort.
  • Standard pricing is around 2.9% + $0.30 per transaction.

ReCharge

ReCharge is designed specifically for Shopify-based subscription businesses. It connects directly with the store and manages recurring billing without heavy development.

Best for:

  • Shopify users
  • Quick subscription setup
  • DTC brands launching fast

What to consider:

  • Monthly fee starts around $99.
  • Additional transaction percentage.
  • Limited flexibility compared to custom setups.

Bold Commerce Subscriptions

Bold offers a simple subscription solution that works well for basic use cases. It is easier to set up, but not as flexible as Stripe or ReCharge.

Best for:

  • Small businesses
  • Basic subscription models
  • Quick implementation

What to consider:

  • Starts around $49.99 per month.
  • Limited advanced customization.

Comparison Overview

FeatureStripeReChargeBold
FlexibilityHighMediumLow
Setup EffortHighLowLow
Custom Logic SupportFullLimitedBasic
Platform fitCustom buildsShopifyShopify/Basic setups
Pricing ModelPer transactionMonthly + %Monthly

In most cases, businesses using Shopify choose ReCharge for speed, while brands building a custom platform prefer Stripe for control. The right choice depends on how complex your subscription model is and how much flexibility you need in the long run.

Get Billing Guidance

Build Custom vs Shopify + ReCharge – Decision Framework

Choosing between a ready-made setup and a custom solution is a key step in build vs buy subscription eCommerce platform decisions. The right choice depends on your budget, growth plans, and how complex your subscription model is.

Many founders ask: What is the best eCommerce platform for subscription box businesses?

The answer depends on how much control and scalability you need.

1. Budget

Your budget often decides the starting point.

  • Shopify + ReCharge setup typically ranges from $5K to %20K.
  • Custom-built platforms can range from $50K to $150K or more.

If you are validating an idea or launching quickly, a ready-made setup is more practical. If you are building for long-term scale, custom development becomes a stronger option.

2. Customization

Flexibility is where the difference becomes clear.

  • Shopify with ReCharge offers limited customization.
  • Custom platforms allow full control over subscription rules, pricing logic, and user experience.

If your business requires unique workflows like advanced box customization or dynamic pricing, a custom build is more suitable.

3. Scale

Your expected growth should guide your decision.

  • Shopify works well for businesses up around $5M in annual revenue.
  • Custom platforms are better suited for scaling beyond $10M or managing large subscriber bases.

As operations grow, limitations in a ready-made platform can start affecting performance and flexibility.

4. Speed to Market

Time plays a major role, especially for startups.

  • Shopify + ReCharge can be launched within 2 to 4 weeks.
  • A custom platform usually takes 3 to 6 months, depending on complexity.

If speed is critical, a pre-built solution helps you go live faster.

5. Unique Business Logic

Some subscription models require more than standard features.

  • Fixed subscription plans work well with Shopify.
  • Advanced needs like AI-driven personalization, multi-region billing, or complex bundling require custom development.

If your goal is to launch quickly with a proven setup, Shopify-based solutions are a practical starting point. If your focus is long-term scalability, deeper customization, and control over every part of the subscription experience, investing in a custom platform becomes the better choice.

Best eCommerce Platforms for Subscription Boxes

Choosing the right eCommerce subscription platform is the key decision for your brand planning to run recurring orders. The platform you select directly impacts how smoothly subscriptions are managed, how customers experience their plans, and how easily the business can scale over time.

For most businesses, the goal is to find the right balance between speed, flexibility, and long-term control over their subscription box eCommerce platform setup.

Below are the most widely used options, explained with practical use cases.

Shopify + ReCharge

This is one of the most common setups used in the eCommerce subscription box industry is Shopify app development. Shopify handles the store operations, while ReCharge manages recurring billing and subscription workflows.

Why brands choose this setup:

  • Fast setup for launching a subscription model.
  • Business testing product-market fit.
  • Simple to moderately complex subscription model.

Best suited for:

  • Early-stage subscription box brands.
  • Businesses testing product-market fit.
  • Simple to moderately complex subscription models.

Limitations:

  • Limited flexibility for advanced subscription logic.
  • Dependence on third-party apps for customization.
  • Scaling can require additional paid tools.

WooCommerce + Stripe

This setup is often used by businesses that prefer more control over their eCommerce subscription platform. WooCommerce provides store flexibility, while Stripe manages secure recurring payments.

Why brands choose this setup:

  • Greater customization control compared to SaaS platforms.
  • Suitable for content-heavy or SEO-driven stores.
  • Flexible subscription configuration using plugins.

Best suited for:

  • WordPress-based businesses.
  • Teams with technical support or development resources.
  • Medium complexity subscription setups.

Custom-Built Subscription Platform

A custom-built subscription box eCommerce platform is designed from scratch based on business requirements. It removes platform limitations and allows full control over subscription logic, user experience, and integrations.

Why brands choose this setup:

  • Complete control over subscription workflows.
  • Ability to build advanced features like personalization engines.
  • Easier integration with internal systems and enterprise tools.

Best suited for:

  • Large-scale subscription businesses.
  • Brands with unique subscription models.
  • Companies are planning long-term expansion.

Limitations:

  • Higher development cost.
  • Longer build time.
  • Requires ongoing technical management.

Quick Comparison

PlatformBest ForLimitation
Shopify + ReChargeFast launch, simple setupLimited customization
WooCommerce + StripeFlexible, WordPress-basedRequires technical management
Custom PlatformScalable, fully controlledHigh cost and development time

Most businesses start with a ready-made eCommerce subscription platform to validate their idea quickly. As they grow, many transition toward custom solutions when they need more control over their subscription box eCommerce platform and advanced business logic.

In simple terms, the right best eCommerce platform for subscription box depends on your stage of growth, technical capacity, and how complex your subscription experience needs to be.

Get Platform Recommendation

Tech Stack for Subscription Box Platforms

Once you have selected the right eCommerce subscription platform, the next step is understanding the technology that powers it. The tech stack defines how your platform performs, how flexible it is, and how easily it can scale as your eCommerce subscription box business grows.

Broadly, there are two approaches. A ready-made stack using pre-built platforms, and a custom stack built from the ground up.

Shopify-Based Tech Stack

A Shopify stack is the fastest way to launch a subscription box eCommerce platform without heavy development. It combines hosted infrastructure with plug-and-play integrations.

Typical setup includes:

  • Shopify for storefront, checkout, and product management.
  • ReCharge for recurring billing and subscription workflows.
  • Apps for shipping, email marketing, and analytics.

Why this works:

  • No need to manage hosting or backend systems.
  • Quick implementation with minimal technical effort.
  • Reliable performance for small to mid-scale businesses.

Limitations:

  • Customization is restricted to available apps and APIs.
  • Complex subscription logic can be difficult to implement.
  • Long-term costs increase with multiple app dependencies.

Custom Tech Stack

A custom stack is built based on your specific business requirements. It offers complete flexibility and control over how your eCommerce subscription platform operates.

Typical setup includes:

  • Front-end frameworks like React or Vue for the user interface.
  • Backend system using Node.js or Laravel.
  • Payment processing via Stripe.
  • Database systems for managing subscriptions, users, and orders.

Why this works:

  • Full control over subscription workflows and user experience.
  • Ability to build advanced features like dynamic pricing or AI-driven personalization.
  • Easier integration with internal tools such as ERP or custom CRM systems.

Limitations:

  • Higher development time and cost.
  • Requires ongoing technical maintenance.
  • Needs a dedicated development team.

How to Choose the Right Stack

  • Choose a Shopify-based stack if you want speed and simplicity.
  • Choose a custom stack if you need flexibility and long-term scalability.
  • Consider your growth plans before finalizing the architecture.

The tech stack acts like the engine of your platform. A simple setup works well at the start, but as your subscription model becomes more complex, the need for a more flexible and scalable system becomes clear. Picking the right stack early can save both time and cost in the long run.

How Much Does Subscription Platform Development Cost?

The cost of building an eCommerce subscription box platform development cost and features setup depends on how complex your requirements are, the level of customization needed, and the technology you choose. A simple setup can be launched quickly, while a fully custom platform requires more time and investment.

Below is a realistic breakdown to help you estimate your budget.

Cost by Platform Type

Platform TypeEstimated CostTimelineWhat You Get
Basic (SHopify + ReCharge)$5K – $20K2-4 weeksReady-made store, subscription setup, basic customization
Mid-Level Custom$50K – $80K3-4 weeksCustom features, box logic, integrations
Enterprise Custom$100K – $200K5-8 monthsAdvanced workflows, multi-region, high scalability

Cost Breakdown by Component

Understanding where your budget goes helps in planning better:

  • Backend development (30%): Handles subscription logic, billing workflows, and database structure.
  • Frontend development (25%): Builds the customer-facing experience and user interface.
  • Billing integration (15%): Setup and configuration of recurring payments using systems like Stripe.
  • Admin dashboard (15%): Internal tools for managing subscriptions, users, and reports.
  • Quality assurance (15%): Testing subscription flows, payments, and edge cases.

Ongoing Costs to Consider

Building the platform is only part of the investment. Ongoing costs are equally important for maintaining performance and stability.

  • Hosting and infrastructure: $200 – $2000 per month, depending on scale.
  • Maintenance and updates: 15-20% of the initial development cost per year.
  • Third-party tools: Subscription apps, analytic tools, and integrations.

What Increases Development Cost

Several factors can push your costs higher:

  • Complex subscription logic or dynamic pricing models.
  • Advanced box customization features.
  • Multi-currency and multi-region support.
  • Integration with CRM, ERP, or external systems.
  • High scalability requirements.

In most cases, businesses start with a lower-cost setup to validate their idea and then invest in a more advanced platform as they grow. The key is to align your budget with your current stage and future expansion plans.

Request Cost Breakdown

Reducing Subscriber Churn – Retention Strategies That Work

Reducing Subscriber Churn

Acquiring subscribers is only half the job. Retaining them is what makes a subscription business profitable. This is where subscription box churn reduction strategies become critical. Even a small improvement in retention can significantly increase lifetime value and recurring revenue.

On average, subscription businesses see monthly churn rates between 10% and 15%, while top-performing brands keep it close to 5% to 7%. The difference comes down to how well the platform and customer experience are designed.

Below are practical strategies that consistently improve retention.

1. Offer Pause Instead of Cancel

Many users cancel because they want a temporary break. Giving them a pause option keeps them in your system instead of losing them completely.

Impact:

  • Reduces cancellations by 15% to 20%.
  • Keeps customers engaged for future reactivation.

2. Enable Skip-a-Month Flexibility

Customers may not always need a delivery every cycle. Allowing them to skip shipments without canceling reduces friction.

Why it works:

  • Gives users more control.
  • Prevents unnecessary cancellations due to timing issues.

3. Use Personalization Surveys

Understanding customer preferences helps deliver better product experiences. Simple onboarding or periodic surveys can guide box customization.

Result:

  • Higher satisfaction.
  • Lower churn due to irrelevant products.

4. Set Up Win-Back Email Flows

Not all cancellations are permanent. Automated email sequences can bring users back.

Recommended timing:

  • Day 3 after cancellation
  • Day 7 reminder
  • Day 14 incentive offer

5. Introduce Loyalty Programs

Reward long-term subscribers with exclusive benefits, discounts, or early access.

Why it matters:

  • Encourages long-term commitment.
  • Increases perceived value over time.

6. Surprise Upgrades and Rewards

Occasionally, adding a premium product or bonus item can improve customer experience.

Effect:

  • Builds positive emotional connection.
  • Encourages continued subscriptions.

Retention is not just a marketing effort. It depends heavily on how your platform is built. Features like flexible controls, personalization, and automated communication play a direct role in reducing churn and improving customer lifetime value.

Conclusion

Building a successful subscription business goes beyond recurring payments. It requires the right combination of model, platform features, billing setup, and long-term scalability. From choosing the right eCommerce subscription platform to deciding between ready-made solutions and custom builds, each step directly impacts how your subscription business performs.

As the demand for eCommerce subscription box businesses continues to grow, brands that invest in the right technology early are better positioned to scale, retain customers, and create consistent revenue streams. The key is to align your platform decisions with your current stage while keeping future growth in mind.

If you are planning to build or upgrade your subscription platform, having a clear roadmap can save both time and cost.

Ready to build your subscription platform

Offline-First Mobile App Architecture: Complete Guide for Field Teams, Data Sync & Local Databases

Introduction: Why Offline-First Architecture is Critical for Field Apps

Why do field service apps fail the moment internet connectivity becomes unreliable?

Because most reliable applications are still built with an online-first approach, assuming constant network access, something field environments rarely guarantee.

This is where offline-first mobile app architecture becomes critical.

In an offline-first system, the application is designed to store and operate on data locally first, allowing users to continue working without interruption. Data is then synchronized with the server once connectivity is restored. This approach ensures reliability, consistency, and uninterrupted workflows for teams operating in construction sites, remote agricultural fields, logistics routes, or healthcare environments.

For businesses investing in mobile app development, this is not just a technical enhancement; it is a decision that directly impacts productivity, data accuracy, and operational continuity.

In this guide, you will learn how offline-first architecture works, how to choose the right local database (SQLite, Realm, Hive), what data sync strategies actually perform in poor connectivity, and how to evaluate whether your business truly needs this approach.

Get a Free App Architecture Consultation

What is Offline-First Mobile App Architecture (And Why it Matters Now)

At its core, offline-first mobile app architecture is a design approach where your application is built to function completely without internet connectivity, using the network only as a secondary layer for synchronization, not as a dependency.

In simple terms, the app works first, and the internet helps later.

A Clear, Practical Definition

An offline-first architecture ensures that:

  • Data is stored locally on the device (using databases like SQLite, Realm, or Hive)
  • All user actions (create, update, delete) are processed instantly on the device
  • Changes are queued and synchronized with the server when connectivity is available.
  • The system handles conflicts and consistency automatically

This means your application does not “break” when the internet disappears; it continues operating as expected.

Offline-First vs Online-First vs Cache-First (Critical Buyer Distinction)

Most businesses confuse these models, and that leads to wrong architectural decisions.

1. Online-First Architecture

  • App depends on APIs for most operations
  • Limited or no functionality without internet
  • Common on basic apps

Risk: Complete workflow failure in poor connectivity

2. Cache-First Approach

  • Some data is cached locally for faster access
  • Still relies on the backend for key actions

Risk: Partial functionality, inconsistent experience

3. Offline-First Approach

  • Local database acts as the primary data source
  • Server becomes a sync layer, not a dependency

Outcome: Reliable, uninterrupted operations.

The Core Principle: Local Database as the Source of Truth

This is the shift most teams struggle with.

  • In traditional systems: Server = source of truth
  • In offline-first systems: Local database = source of truth (temporarily)

The app writes and reads from the local database first.

The backend later reconciles and syncs this data across systems.

This architectural shift is what enables:

  • Real-time responsiveness (no API wait times)
  • Seamless offline functionality
  • Better user experience in unpredictable environments

Why This Matters Now (Not Later)

If your users operate in controlled environments with stable internet, offline-first may feel optional.

But for industries like:

  • Construction (basements, remote sites)
  • Logistics (on-road, rural routes)
  • Agriculture (low-connectivity zones)
  • Healthcare (field operations, remote visits)

Connectivity is not just inconsistent; it is unreliable by default.

And when your app depends on connectivity in these environments, you are not building a digital solution; you are introducing operational friction.

What Businesses Get Wrong at This Stage

Most companies do not ignore offline-first; they underestimate it. They treat it as:

  • A “feature to add later”
  • A fallback mode
  • A minor enhancement

In reality, Offline-first is not a feature. It is a system-level decision that affects database design, sync logic, and user experience from day one.

Where This Connects to Your Development Decision

If you are evaluating mobile app development for field teams, this is the point where your direction gets locked:

  • Choose online-first because it is faster to build and more fragile in real-world use
  • Choose offline-first because it is a more thoughtful architecture and is significantly more reliable

And this decision impacts development cost, timeline, long-term scalability, and user adoption.

Where Traditional Mobile Apps Break for Field Teams

Most businesses do not realize their app is flawed until it is used in the real-world. On paper, everything looks right:

  • Clean UI
  • All required features
  • API integrations working perfectly

But once the app reaches field teams, a different reality shows up.

The Core Problem: Dependency on Real-Time Connectivity

Traditional mobile apps are built with a simple assumption: “The device will always be connected to the internet.”

That assumption quietly drives key decisions:

  • Data is fetched from APIs in real time
  • Actions require immediate server confirmation
  • Very little data is stored locally

This works fine in offices or urban environments. But field teams do not operate there.

What Actually Happens on the Ground

In real usage scenarios, connectivity is intermittent, slow, and completely unavailable at times.

Now, combine that with an online-first architecture, and you get failure points like:

  1. Data Entry Failures: A user fills out a form, hits submit, the network drops, and the data disappears. This leads to rework, frustration, and lost productivity.
  2. Incomplete Workflows: A task requires multiple steps, and your API fails midway. As a result, work remains partially done, causing confusion and delays.
  3. Delayed Updates: A field worker updates task status, but the sync fails silently. As a result, the managers operate on outdated information.
  4. Duplicate or Conflicting Data: Users retry actions due to failed responses. This causes duplicate entries and inconsistent records.

Why Features Do Not Solve This Problem

This is where many businesses go wrong. They try to “fix” the issue by adding:

  • Retry buttons
  • Loading indicators
  • Error messages

But these are surface-level solutions.

If your architecture depends on connectivity, no UI improvement will fix the core issue.

The Hidden Business Cost (That Does Not Show Up in Estimates)

This is where the real damage happens, not in development but in operations.

  • Teams start using manual workarounds (calls, messages, spreadsheets)
  • Data quality drops, affecting reporting and decisions
  • Adoption decreases because the app becomes unreliable
  • Support and maintenance costs increase

Over time, the app becomes a liability instead of an asset.

The Gap Between “Built Right” and “Works in Reality”

From a technical perspective, your app may be perfectly built. From a field perspective, it’s failing.

The gap exists because:

  • The architecture was designed for ideal conditions
  • The users operate in unpredictable environments

The Turning Point for Most Businesses

This is usually the moment when decision-makers realize that “We don’t need more features, we need a more reliable system.”

And that is exactly where offline-first architecture becomes not just relevant, but necessary.

Core Components of Offline-First Mobile App Architecture

By now, the problem is clear: traditional architectures fail because they depend on connectivity.

So what actually makes an offline-first system work?

It’s not one feature; it is a combination of tightly connected components that ensure your app can operate independently and sync intelligently.

A Simple Way to Think About It

An offline-first app is built around one key idea: “Capture, store, and process data locally; sync later.”

To make that happen reliably, your architecture needs the following core layers:

1. Local Database Layer (Your App’s Foundation Layer)

This is where everything starts.

  • Stores all application data on the device
  • Handles reads and writes instantly (no API delay)
  • Powers the entire offline experience

Without a strong local database, offline-first simply does not exist.

This is where choices like SQLite, Realm, or Hive come into play.

2. Sync Engine (The Brain of the System)

The sync engine is responsible for keeping your local and server data aligned. It decides:

  • When to sync
  • What to sync
  • How to handle failures

Key responsibilities:

  • Detect connectivity changes
  • Push local changes to the server
  • Pull updated data from the backend
  • Retry failed sync attempts

A weak sync engine = inconsistent data across devices.

3. Conflict Resolution System

When multiple users or devices update the same data offline, conflicts are inevitable. Your system must decide:

  • Which version is correct?
  • Should data be merged or overwritten?

Common strategies include:

  • Last-write-wins
  • Timestamp-based resolution
  • Versioning systems

This directly impacts data accuracy and trust.

4. Offline Queue Management

Every action performed offline needs to be tracked. That is where the offline queue comes in.

It stores:

  • Form submissions
  • Status updates
  • Media uploads

And ensures:

  • Actions are not lost
  • Tasks are retired automatically
  • Execution order is maintained

Without this, offline actions simply disappear.

5. API & Backend Layer (Sync Target, Not Dependency)

In offline-first systems, the backend plays a different role:

  • It is not required for immediate functionality
  • It acts as a central sync and aggregation layer

Responsibilities include data validation, conflict handling (server-side), multi-device synchronization, and reporting and analytics.

6. Background Sync & Connectivity Handler

Your app must intelligently respond to network conditions. This layer:

  • Detects connectivity changes
  • Triggers sync automatically
  • Handles partial sync failures
  • Optimizes sync frequency

Ensures a smooth experience without user intervention.

Architecture Overview (How It All Connects)

Offline-First Mobile App Architecture Overview

How to Read This Architecture

  • Device Layer: The mobile app where users interact and data is created
  • Local Database: Stores and processes all data first
  • Sync Manager/Engine: Handles communication between the device and the server
  • Cloud Backend: Acts as the central system for aggregation and consistency

The Real Advantage of This Architecture

When these components are implemented correctly:

  • Your app does not break without internet
  • Users can complete workflows without interruption
  • Data remains consistent across devices over time
  • System becomes resilient, not fragile

Where Most Implementations Fail

Even when businesses choose offline-first, they often:

  • Underestimate sync complexity
  • Ignore conflict resolution
  • Build weak queue mechanisms
  • Treat backend like a real-time dependency again

Which brings us to the next critical decision: “Choosing the right local database.” Because everything in this architecture depends on choosing the right database.

Local Database Options for Mobile Apps: SQLite vs Realm vs Hive

If offline-first architecture is the strategy, your local database is the foundation.

Everything, including data storage, speed, sync efficiency, and conflict handling, depends on this choice. And this is where most businesses make a costly mistake:

They pick a database based on familiarity, not based on use-case fit.

Let’s break this down from a buyer decision perspective, not just technical specifications.

1. SQLite – Stable, Proven, and Universally Supported

SQLite is the most widely used local database in mobile applications.

Why businesses choose it:

  • Built into Android and iOS
  • Extremely stable and reliable
  • Works well for structured, relational data
  • No external dependencies

Where it works best:

  • Apps with clearly defined data relationships
  • Systems requiring strong data integrity
  • Long-term, scalable applications

Limitations you should consider:

  • Requires manual handling for sync logic
  • No built-in reactive data updates
  • More development effort for complex use case

SQLite is a safe, enterprise-grade choice, but it requires stronger engineering effort to make it truly offline-first.

2. Realm – Real-Time, Reactive, and Developer-Friendly

Realm is an object-based database designed for modern mobile apps.

Why businesses choose it:

  • Real-time data updates (reactive architecture)
  • Built-in support for synchronization (in some setups)
  • Easier to work with complex data models
  • Faster development cycles

Where it works best:

  • Apps requiring real-time UI updates
  • Complex data structures
  • Teams prioritizing speed of development

Limitations you should consider:

  • Larger app size compared to SQLite
  • Can introduce vendor dependency
  • Advanced configurations may increase complexity

Realm accelerates development and improves responsiveness, but requires careful planning for scalability and control.

3. Hive – Lightweight and Optimized for Flutter Apps

Hive is a lightweight, NoSQL database designed specifically for Flutter applications.

Why businesses choose it:

  • Extremely fast (key-value storage)
  • No native dependencies
  • Simple and easy to implement
  • Ideal for cross-platform apps

Where it works best:

  • Flutter-based applications
  • Lightweight data storage needs
  • MVPs or fast deployment scenarios

Naturally fits into Flutter app development environments where speed and simplicity matter.

Limitations you should consider:

  • Limited support for complex queries
  • Not ideal for highly relational data
  • Requires additional planning for large-scale systems

Hive is perfect for speed and simplicity, but may not scale well for data-heavy enterprise use cases.

SQLite vs Realm vs Hive – How to Choose (Buyer Decision Framework)

Instead of asking “Which database is best?”, ask:

“Which database fits my app’s complexity, scale, and long-term vision?”

Choose SQLite if:

  • You need reliability and full control
  • Your app handles structured, relational data
  • You are building for long-term scalability

Choose Realm if:

  • You want faster development with a reactive UI
  • Your app has complex, evolving data models
  • Real-time responsiveness is important

Choose Hive if:

  • You are building with Flutter
  • Your app is lightweight or mid-scale
  • Speed and simplicity are top priorities

The Mistake to Avoid

Many businesses:

  • Choose Hive for speed -> struggle later with complexity
  • Choose SQLite -> underestimate development effort
  • Choose Realm -> don’t plan for long-term control

The result?

Re-architecture costs later, which are significantly higher than choosing right upfront.

Where This Connects to Your Development Decision

Your database choice directly impacts sync complexity, app performance, development cost and timeline, and future scalability.

This is not just a technical decision; it is a business decision.

And once your local database is set up, the next critical layer comes into play: How data actually moves between the device and the server.

Talk to Our Mobile App Experts

Data Sync Strategy for Mobile Apps with Poor Connectivity

Choosing the right database sets the foundation, but the data sync strategy determines whether your offline-first app actually works in real-world conditions.

But the reality is that Offline is easy. Sync is where systems fail.

If your sync logic is weak, you will face:

  • Data mismatches across devices
  • Duplicate or missing records
  • Delayed updates impacting decisions
  • Loss of user trust in the system

So the goal is not just syncing data; it is syncing reliably, efficiently, and predictably.

Sync Patterns Explained (And When to Use Them)

Different apps require different sync approaches. There is no one-size-fits-all.

1. One-Way Sync (Server -> Device)

  • Data flows only from the backend to the app
  • Useful for read-only or reference data

Example: Product catalogs, pricing data

2. Two-Way Sync (Device <-> Server)

  • Data flows in both directions
  • Most common in field service applications

Example: Task updates, form submissions

3. Delta Sync (Only Changes are Synced)

  • Instead of syncing full datasets, only modified data is transferred
  • Reduces bandwidth and improves speed

Critical for apps used in poor connectivity environments.

4. Batch Sync (Grouped Data Transfer)

  • Data is synced in chunks at intervals
  • Useful when handling large volumes of data

Helps optimize performance and reduce server load.

Eventual Consistency (The Core Concept You Most Understand)

In offline-first systems, expecting real-time consistency is unrealistic.

Instead, systems follow:

“Eventual consistency – data becomes consistent across systems over time, not instantly.”

This means:

  • Users may see slightly outdated data temporarily
  • System ensures consistency after sync completes

Why This Matters for Business Decisions

If your operations require:

  • Instant global updates, then offline-first needs careful design
  • High tolerance for slight delays, then offline-first works perfectly

Most field operations fall into the second category.

When Should Sync Happen?

Timing your sync correctly is just as important as how you sync.

  1. On Reconnect: Trigger syncs automatically when the internet is restored. This is the most common and essential approach.
  2. Scheduled Sync: Sync at fixed intervals. This is useful for predictable workloads.
  3. User-Initiated Sync: Manual “Sync Now” option. This sync adds control in critical workflows.
  4. Background Sync (Recommended): Sync runs silently without interrupting user actions. This is best for a seamless experience.

What a Strong Sync Strategy Includes

A reliable sync system is not just about moving data; it must handle edge cases. Your strategy should include:

  • Retry mechanisms for failed sync attempts
  • Data validation before pushing to the server
  • Conflict detection triggers
  • Sync prioritization (critical vs non-critical data)
  • Logging for debugging and monitoring

The Mistake Most Businesses Make

They assume that “Sync is just an API call.” However, it is not.

It is a system-level workflow that must handle:

  • Network interruptions
  • Partial failures
  • Data conflicts
  • Performance constraints

Ignoring this leads to apps that work fine in testing and fail in real-world usage.

Where This Connects to the Next Layer

Once data starts syncing between devices and servers, one problem becomes unavoidable: “What happens when the same data is modified in different places?”

That is where conflict resolution strategies come in, and they directly impact your data accuracy and system reliability.

Conflict Resolution Strategies in Offline-First Systems

Once your app allows users to work offline and sync later, one challenge becomes unavoidable:

“What happens when the same data is updated in different places at different times?”

This is not a rare edge case; it is a normal scenario in offline-first systems. If not handled correctly, it leads to:

  • Data inconsistencies
  • Overwritten information
  • Loss of critical updates
  • Reduced trust in the system

So conflict resolution is not just technical; it directly impacts business accuracy and decision-making.

What Causes Data Conflicts?

Conflicts occur when:

  • Two users modify the same record while offline
  • A user updates data offline while another updates it online
  • Sync delays cause overlapping updates

Example:

A construction manager updates task status on-site (offline), while the office team updates the same task in real-time. When sync happens, which version is correct?

Types of Conflict Resolution Strategies

There is no universal “best” strategy. The right approach depends on your business priorities – speed vs accuracy vs control.

1. Last-Write-Wins (LWW)

The most recent update overwrites previous ones. This is based on timestamps.

Best for:

  • Non-critical data
  • High-speed systems

Risk: Important data can be lost without visibility.

2. Timestamp-Based Resolution (With Validation)

Compares timestamps but includes validation rules. It prevents invalid overwrites.

Best for: Systems needing a balance between speed and accuracy

Risk: Slightly more complex implementation.

3. Version-Based Conflict Handling

Each record has a version number. Conflicts are detected when versions mismatch.

Best for: Structured systems with critical data.

Advantage: Clear tracking of changes

4. Field-Level Merging

Instead of overwriting entire records, only changed fields are merged.

Best for: Complex forms or multi-field updates.

Advantage: Preserves maximum data.

Challenge: Requires careful implementation.

5. Manual Conflict Resolution (User Intervention)

System flags conflicts and lets users decide.

Best for: High-stakes data (eg, Healthcare, compliance systems)

Trade-off: Slower, but highly accurate.

Choosing the Right Strategy (Buyer Decision Lens)

Instead of asking “Which method is best?”, ask:

“What level of data accuracy does my business require?”

  • If speed matters more, last-write-wins may work
  • If accuracy matters more, versioning and manual resolution may work
  • If data is complex, field-level merging is the best.

The Real Trade-Off You Must Accept

Every conflict strategy involves a trade-off:

  • Speed vs accuracy
  • Automation vs control
  • Simplicity vs complexity

Trying to maximize all three usually leads to a fragile system.

What Most Businesses Get Wrong

They either ignore conflict resolution completely or apply a default strategy without considering business impact.

Result?

Silent data corruption, confusing user experience, and increased operational errors.

Why This Matters for Your App’s Success

Conflict resolution directly affects data reliability, user trust, reporting accuracy, and decision-making quality.

A poorly handled conflict system can make even a well-built app unreliable.

Where This Connects Next

Now that conflicts are handled, the next question is “How do we ensure user actions performed offline are never lost in the first place?”

That is where offline queue management becomes critical.

Offline Queue Management: Handling Actions Without Internet

Even with the right database and sync strategy in place, one question remains critical: “What happens to user actions when there is no internet?”

Because in field environments, users don’t stop working when connectivity drops. They continue creating data – forms, updates, uploads, and status changes.

If your system does not capture and manage these actions properly, you risk:

  • Lost data
  • Broken workflows
  • Duplicate submissions
  • User frustration

This is where offline queue management becomes essential.

What is an Offline Queue?

An offline queue is a system that:

  • Stores user actions performed without connectivity
  • Maintains execution order
  • Retires actions when the network is available

Think of it as a temporary holding system for all offline operations.

What Gets Stored in the Queue?

Typical queued actions include:

  • Form submissions
  • Task updates
  • Media uploads (images, videos, documents)
  • Location on tracking data
  • API requests that failed due to connectivity

Every action that would normally require a server call must be queued.

How a Reliable Offline Queue Works

A well-designed offline queue does not just store data; it manages it intelligently.

  1. Action Capture: Every user action is immediately saved locally, and there is no dependency on API response.
  2. Structured Storage: Each action is stored with metadata, like timestamp, action type, payload data, and retry count.
  3. Ordered Execution: Actions are processed in sequence and ensure logical consistency (eg, create -> update -> submit)
  4. Retry Mechanism: Failed actions are retried automatically. Supports exponential backoff to avoid server overload.
  5. Failure Handling: After multiple failed attempts, action is flagged, the user may be notified, and a manual retry option is provided.

Priority-Based Queueing (Advanced but Valuable)

Not all data is equally important.

A robust system allows:

  • High-priority actions (eg, critical updates) -> synced first
  • Low-priority actions (eg, logs, analytics) -> deferred

This improves both performance and user experience.

Common Mistakes Businesses Make

Most offline queue implementations fail because they:

  • Don’t persist the queue data properly (lost on app restart)
  • Ignore retry logic
  • Don’t handle partial features
  • Overload the system with unoptimized requests

Result: Users think actions are completed, but data never reaches the server.

Why This Matters For Business Operations

Offline queue management directly impacts data reliability, workflow continuity, and system trust.

If users cannot trust that their actions are saved, they will:

  • Repeat actions (creating duplicates)
  • Switch to manual processes
  • Lose confidence in the app

Where This Connects Next

Once the actions are queued and synced, another challenge emerges:

How do you keep performance fast and data usage efficient, especially in low-bandwidth environments?

That is where data optimization techniques like compression and storage management come in.

Data Optimization: Compression, Storage, & Performance

By this stage, your app can:

  • Work offline
  • Store data locally
  • Sync intelligently
  • Handle conflicts
  • Queue actions reliably

But there is still a practical constraint don’t disappear, your architecture has to work within them.

If not optimized, even a well-designed offline-first app can become:

  • Slow on low-end devices
  • Storage-heavy
  • Inefficient during sync
  • Costly in terms of data usage

That is why data optimization is not optional; it is essential for real-world performance.

Why Optimization Matters More in Offline-First Apps

Unlike online-first apps, offline-first systems:

  • Store significant amounts of data locally
  • Perform frequent read/write operations
  • Sync data in unpredictable network conditions

Without optimization:

  • App performance degrades over time
  • Sync becomes slower and more expensive
  • Users experience lag and delays

Key Optimization Techniques You Should Consider

1. Data Compression

When syncing data, especially media-heavy content, size matters.

What to optimize:

  • Images (compress before upload)
  • JSON payloads (minify or compress)
  • File attachments

Why it matters:

  • Faster sync in low bandwidth
  • Reduced data costs for users
  • Improved backend performance

Especially critical for industries like construction and healthcare, where media uploads are frequent.

2. Lazy Loading (Load Only What’s Needed)

Instead of loading entire datasets, load data on demand, fetch only relevant records.

Example: Instead of loading all project data, load only current tasks.

Impact: Faster app performance, lower memory usage, and better user experience.

3. Pagination & Chunking

Large datasets should never be processed at once. Break data into smaller chunks and sync or load incrementally.

Benefits:

  • Prevents app crashes
  • Improves responsiveness
  • Reduces sync failures

4. Smart Data Storage Management

Offline-first apps must control how much data is stored locally. Strategies include:

  • Archiving old data
  • Auto-cleanup policies
  • Storing only essential fields locally

Prevents storage overflow on user devices.

5. Media Optimization (Often Ignored, Always Costly)

Media files are the biggest performance bottleneck. Optimize by:

  • Compressing images before saving
  • Using lower resolutions where acceptable
  • Uploading media in the background

6. Sync Optimization (Efficiency Over Frequency)

More sync does not always mean better performance. Optimize by:

  • Syncing only changed data (delta sync)
  • Avoiding redundant API calls
  • Scheduling sync intelligently

The Mistake Most Businesses Make

They focus on features, UI, and backend scalability. But ignore:

“How efficiently data moves and lives within the app.”

Result?

  • Sluggish performance
  • High data consumption
  • Poor user retention

Why This Matters for Your Business?

Optimization directly impacts:

  • App speed (user experience)
  • Device compatibility (especially low-end devices)
  • Data usage costs (critical in many regions)
  • Long-term scalability

An unoptimized offline-first app can become just as problematic as an online-only one.

Where This Connects Next

Now that we have covered architecture, database, sync, conflict handling, queue management, and optimization, it is time to translate all of this into what your app should actually include.

Because ultimately, buyers don’t just evaluate architecture, they evaluate features and outcomes.

Field Service Mobile App Features Checklist (Buyer-Focused)

By now, you understand the architecture behind reliable field apps.

But when it comes to making a decision, most buyers shift focus to a more practical question:

“What exactly should my field service app be able to do?”

This section translates everything we have covered into a feature-level checklist, so you can evaluate whether your app idea (or current solution) is actually built for real-world conditions.

Must-Have Features (Non-Negotiable for Field Operations)

These are not “nice-to-have” features. If your app lacks these, it will struggle in offline environments.

1. Offline Data Capture & Storage

Users should be able to create and update data without an internet connection. All actions must be saved locally instantly.

This is the foundation of offline-first mobile app architecture.

2. Seamless Data Synchronization

Automatic sync when connectivity is restored. Clear sync status visibility (pending, failed, completed).

Prevents confusion and duplicate work.

3. Task & Workflow Management

Assign, update, and track tasks in real time (or offline). Support multi-step workflows.

Critical for construction, logistics, and service teams.

4. GPS Tracking & Location Tagging

Capture real-time or last-known location. Tag tasks, reports, or activities with geo-data.

Essential for accountability and tracking.

5. Offline Notifications & Alerts

Notify users of pending sync, failed actions, or updates. Ensure users are aware of the system status.

Advanced Features (High Impact, Competitive Advantage)

These features differentiate a basic app from a high-performing field system.

6. IoT Integration for Real-Time Data

Connect devices for automated data capture (eg, sensors, equipment) and reduce manual input errors.

Strong use case of IoT app development in industries like logistics and agriculture.

7. Role-Based Dashboards

Customize views based on user roles (manager, technician, admin). Show only relevant data and actions.

Improves usability and decision-making.

8. Media Capture & Annotation

Upload images, videos, and documents. Add notes or annotations.

Widely used in construction and inspection workflows.

9. Audit Logs & Activity Tracking

Track who did what and when. Maintain history for compliance and analysis.

10. Smart Search & Filtering (Offline Included)

Allow users to search data even without connectivity. Enable filters for faster access.

What This Checklist Helps You Evaluate

Instead of asking, “Does my app have features?” You should ask, “Are these features designed to work reliably in offline conditions?”

Because:

  • A feature that fails without internet is not truly usable in field environments
  • A well-architected feature continues working regardless of connectivity

The Gap Most Businesses Miss

Many apps list all the right features, works perfectly in demos, but fail in real-world usage because:

  • Features depend on APIs
  • Offline behavior is not considered
  • Sync states are not visible

Result? Poor adoption despite strong feature lists.

Where This Connects to Real-World Use

Now that you know what features matter, the next logical question is: “How do these features actually play out in real industries?”

Because requirements vary significantly across domains.

Industry Use Cases: Where Offline-First Architecture Delivers ROI

At this point, the architecture, database, and feature discussions are clear. But buyers don’t invest in architecture; they invest in outcomes.

So the real question is:

“Where does offline-first mobile app architecture actually deliver measurable ROI?”

Let’s look at how this translates into real-world impact across key industries.

1. Construction: Real-Time Site Management Without Connectivity

Construction environments are one of the most challenging for connectivity:

  • Basements
  • Remote project sites
  • Large structures blocking signals

How offline-first helps:

  • Site supervisors log daily progress without internet
  • Safety incidents are recorded instantly
  • Images and reports are captured and synced later

Key features in action:

  • Offline data capture
  • Media uploads
  • Task tracking

Directly supports mobile app for construction site management features and improves reporting accuracy.

2. Agriculture: Data Collection in Low-Connectivity Zones

Agriculture operations often happen in areas with:

  • Weak or no internet connectivity
  • Large geographic spread

How offline-first helps:

  • Farmers or field agents record crop data on-site
  • Weather observations and soil data are logged offline
  • Sync happens later when connectivity is available

Business Impact:

  • Better planning decisions
  • Reduced dependency on manual tracking

3. Logistics: Continuous Tracking Across Unstable Networks

Logistics teams operate across:

  • Highways
  • Rural routes
  • Cross-region deliveries

How offline-first helps:

  • Drivers update delivery status without interruption
  • GPS data is stored locally and synced later
  • Proof of delivery (photos, signatures) captured offline

Result:

  • Fewer missed updates
  • Better tracking visibility
  • Improved customer experience

4. Healthcare: Reliable Data Capture in Critical Environments

Healthcare field operations demand:

  • Accuracy
  • Reliability
  • Immediate data capture

How offline-first helps:

  • Patient data recorded during field visits
  • Medical observations logged without delay
  • Sync ensures central systems are updated later

Why it matters:

  • Reduces risk of data loss
  • Ensures continuity of care
  • Supports compliance and reporting

The Common Pattern Across All Industries

Despite different use cases, the core benefits remain the same:

  • Work continues without dependency on connectivity
  • Data is captured at the moment it is created
  • Systems become resilient and reliable

What This Means for Your Business

If your operations involve field teams, distributed workforce, and unpredictable network conditions.

Then offline-first is not industry-specific; it is operationally essential.

Where This Connects Next

Now that you have seen real-world applications, the next step is:

“How do you evaluate whether your business truly needs offline-first architecture?”

Because not every app requires it; but if your does, missing it can be costly.

How to Decide if You Need an Offline-First App (Step-by-Step)

At this stage, most buyers are thinking:

“This sounds valuable, but do I actually need offline-first architecture for my app?”

The mistake is trying to answer this based on features.

The right way is to evaluate your operational reality, data flow, and risk tolerance.

Here is a clear, decision-focused framework you can use.

Step 1: Assess Real-World Connectivity Conditions

Start with where your app will actually be used, not where it is developed.

  • Do your users operate in low-network or no-network areas?
  • Are there frequent signal drops or unstable connections?
  • Is connectivity unpredictable across locations?

If connectivity is not guaranteed, offline-first becomes a strong requirement, not an option.

Step 2: Identify How Critical Data Capture Is

Ask yourself:

  • Can users afford to lose data if submission fails?
  • Does delayed data impact operations or decisions?
  • Is real-time entry important for compliance or tracking?

If data loss or delay creates business risk, you need local-first data handling.

Step 3: Evaluate User Workflows in the Field

Understand how your users interact with the app:

  • Do they perform multi-step tasks?
  • Do workflows depend on continuous input?
  • Are tasks time-sensitive?

If workflows are interrupted by connectivity issues, productivity drops immediately.

Step 4: Estimate Sync Complexity (Often Underestimated)

Now think beyond the device:

  • Will multiple users update the same data?
  • Do you need near real-time visibility across teams?
  • Are there dependencies between different data points?

Higher complexity means you need a well-planned sync and conflict resolution strategy.

Step 5: Decide Based on Risk vs Investment

This is the final decision layer.

Offline first requires:

  • More thoughtful architecture
  • Higher initial development effort

But it deliver:

  • Reliability
  • Better adoption
  • Long-term scalability

The real question is: “Is the cost of failure higher than the cost of building it right?”

A Quick Decision Snapshot

You likely need offline-first if:

  • Your users operate in the field
  • Connectivity is unreliable
  • Data accuracy and continuity are critical
  • Workflows cannot pause

You may not need it if:

  • Your app is used in controlled, always-online environments
  • Data is non-critical or easily recoverable

The Cost of Getting This Wrong

Choosing the wrong architecture leads to:

  • Rebuilding the app later (expensive)
  • Low user adoption
  • Operational inefficiencies
  • Data inconsistencies

And these costs are significantly higher than building the right foundation upfront.

Where This Connects Next: Even when businesses decide to go offline-first, many implementations still fail, not because of intent, but because of avoidable mistakes.

Request a Custom App Strategy

Common Mistakes Businesses Make When Building Offline Apps

Deciding to go offline-first is the right move, but execution is where most projects fail.

And not because teams lack effort. It is because offline-first systems are deceptively complex.

They look like feature problems, but they are actually architecture problems.

Here are the most common mistakes that lead to unreliable apps, rework, and wasted investment.

Mistake 1: Treating Offline as a Feature, Not an Architecture

Many teams approach offline support like this:

  • “We will add offline mode later”
  • “Let’s build APIs first, then handle offline”

This is the biggest mistake.

Offline-first affects database design, data flow, sync logic, and UI behavior.

Impact:

  • Major rework later
  • Increased development cost
  • Fragile system behavior

Mistake 2: Understanding Sync Complexity

Sync is often reduced to: “Push data when internet is available”

In reality, it involves retry logic, partial failure handling, data validation, and conflict detection.

Impact:

  • Missing or duplicated data
  • Inconsistent records across devices

Mistake 3: Ignoring Conflict Resolution Early

Teams often assume that conflicts are rare and the default logic will handle it.

But in offline systems, conflicts are expected, not exceptions.

Impact:

  • Silent data overwrites
  • Loss of critical updates
  • Poor decision-making due to incorrect data

Mistake 4: Weak Offline Queue Implementation

A basic queue is not enough. Common issues include:

  • Actions not persisted properly
  • No retry strategy
  • No visibility into failed actions

Impact:

  • Lost user actions
  • Broken workflows
  • Lack of user trust

Mistake 5: Overloading the App with Unoptimized Data

Teams often store too much data locally, or sync entire datasets instead of just changes.

Impact:

  • Slow performance
  • Increased storage usage
  • Poor experience on low-end devices

Mistake 6: Poor Visibility of Sync State

Users don’t know what’s synced, what’s pending, or what failed.

Impact:

  • Confusion
  • Duplicate actions
  • Operational inefficiencies

Mistake 7: Choosing Technology Without Long-Term Thinking

Examples:

  • Picking a database just because it is easy
  • Ignoring scalability needs
  • Not planning for future integrations

Impact:

  • Re-architecture costs
  • Limited flexibility
  • Performance issues at scale

The Pattern Behind These Mistakes

All these issues stem from one core problem: Designing for ideal conditions instead of real-world usage.

Why This Matters for Your Investment

If these mistakes are not addressed early:

  • Development costs increase over time
  • Time-to-market gets delayed
  • User adoption drops
  • System reliability suffers

And fixing these later is significantly more expensive than building correctly from the start.

Where This Connects Next

At this point, the technical complexity is clear. Which brings us to a critical business decision:

“Should you build this in-house or work with a development partner who understand offline-first systems?”

How the Right Development Partner Impacts Offline App Success

By now, one thing should be clear:

“Offline-first apps are not just built, they are architected.”

And that difference is exactly why the choice of development partner has a direct impact on whether your app succeeds or struggles post-launch.

Why Offline-First Requires Special Expertise

Unlike standard apps, offline-first systems demand:

  • Thoughtful data modeling (local-first approach)
  • Robust sync engine design
  • Conflict resolution planning
  • Efficient offline queue management
  • Performance optimization across devices

This is not something that can be “figured out during development.”

It needs to be designed from day one.

What Happens When the Expertise is Missing

Many businesses either:

  • Assign this to a general development team
  • Or treat it as a standard mobile app development project

The result?

  • Sync failures in real-world usage
  • Data inconsistencies across users
  • Frequent bug fixes post-launch
  • Higher long-term maintenance costs

The app may launch, but it won’t scale reliably.

What to Look for in a Development Partner

If you are evaluating vendors, don’t just assess UI capabilities or past apps.

Focus on their ability to handle system-level complexity.

1. Proven Experience with Offline-First Architecture

  • Have they built apps that work reliably without connectivity?
  • Can they explain their sync strategy clearly?

2. Strong Data & Sync Understanding

  • Do they talk about conflict resolution, queries, and consistency?
  • Or only about APIs and frontend features?

3. Cross-Platform Expertise

If you are building for both Android and iOS:

  • Do they have experience in flutter app development or cross-platform frameworks?
  • Can they ensure consistent offline behavior across devices?

4. Scalability Thinking (Not Just MVP Delivery)

A good partner plans for:

  • Future data growth
  • Increased user load
  • Integration with other systems

Not just quick delivery

5. Ability to Align Technology with Business Goals

The right partner does not just ask:

  • “What features do you need?”

They ask:

  • “What problems are your field teams facing?”
  • “Where can your operations break?”
  • “What level of reliability do you need?”

Where WEDOWEBAPPS Fits In

At WEDOWEBAPPS, the focus is not just on building apps, but on building reliable, real-world-ready systems.

  • We approach projects with an architecture-first mindset
  • Design apps that work seamlessly in low or no-connectivity environments
  • Build scalable systems aligned with long-term business needs

Whether it is:

  • Full-scale mobile app development
  • Cross-platform solutions using Flutter
  • Or integrating connected systems through IoT app development

The goal remains the same:

Build applications that perform reliably where they are actually used, not just where they are tested.

The Real Decision You are Making

Choosing a development partner is not about cost or speed alone. It is about:

“Reducing risk while building a system your team can depend on daily.”

Conclusion: Offline-First is a Business Decision, Not Just a Technical One

Offline-first mobile app architecture is not just a technical choice; it’s a business decision that determines how reliably your operations run in real-world conditions. If your teams work in environments with unstable or no connectivity, relying on traditional online-first systems introduces constant friction, delays, and data risks.

By designing your app to function independently of the internet, you ensure uninterrupted workflows, accurate data capture, and consistent performance across environments. This directly improves productivity, user trust, and long-term scalability.

Ultimately, the goal is simple: build an application that works where your users actually operate; not just where connectivity is ideal.

Start Your Mobile App Project

BigCommerce Headless Development With NextJS for Scalable eCommerce

Introduction

Is your eCommerce platform limiting speed, flexibility, or growth?

If your storefront is tightly coupled with your backend, you are already hitting invisible growth ceilings. Most eCommerce businesses don’t realize this early. They start simple. You launch quickly, customize a theme, plug in a few tools, and everything works. Until growth begins to expose cracks. Pages slow down, custom features become harder to implement, and even small changes start requiring disproportionate effort. What once felt like a solution gradually turns into a constraint.

This is where many businesses hit an invisible ceiling. Not because demand is not there, but because their platform cannot keep up with it.

Headless commerce is emerging as a response to this exact problem.

Instead of relying on a tightly coupled system where frontend and backend are locked together, a headless approach separates them. This allows businesses to build faster, more flexible storefronts without being restricted by backend limitations. And in that shift, BigCommerce headless paired with NextJS has become a preferred stack for teams that want both scalability and control.

But adopting headless is not just about following a trend. It is a decision that impacts how you build, scale, and optimize your eCommerce experience long-term.

In this guide, you will get a clear, practical understanding of how BigCommerce headless development works, from architecture and APIs to frontend setup, checkout integration, performance, and SEO. More importantly, you will be able to evaluate whether this approach actually makes sense for your business.

And if you are already considering this shift, working with an experienced BigCommerce development company like WEDOWEBAPPS can help you avoid the common pitfalls that slow teams down during implementation.

Talk to a Headless Commerce Expert

What is BigCommerce Headless (And Why Businesses Are Moving to It)

At a surface level, Headless commerce sounds like a technical upgrade. In reality, it is a response to a very practical business problem – lack of flexibility.

In a traditional eCommerce setup, your frontend (what users see) and backend (where products, orders, and logic live) are tightly connected. That means every design change, feature update, or performance improvement is limited by what the platform allows.

This works fine until your business needs something the platform was not built for.

That is when teams start facing friction:

  • Custom experience becomes difficult or expensive
  • Performance optimization hits platform limits
  • Omnichanne; expansion feels restricted
  • Marketing ideas get blocked by technical constraints

Headless commerce removes that dependency.

Instead of relying on a fixed frontend, you build your own while using the platform purely as a backend via APIs. This gives you full control over how your storefront behaves, looks, and performs.

Where BigCommerce Fits in a Headless Setup

BigCommerce is particularly strong in headless commerce because it was built with APIs at its core.

It allows you to:

  • Manage products, categories, and orders from the backend
  • Expose data through APIs (GraphQL + REST)
  • Integrate with any frontend framework, like NextJS

So instead of forcing your business into a predefined structure, BigCommerce becomes a flexible commerce engine.

What Changes When You Go Headless?

This shift is simple in concept but powerful in impact.

Instead of this:

Traditional Commerce: Frontend + Backend tightly connected

You move to this:

Headless Commerce: Custom Frontend (NextJS) + API-driven Backend (BigCommerce)

This separation unlocks:

  • Faster page performance
  • Unlimited UI/UX customization
  • Easier integration with third-party tools
  • Better scalability as your business grows

Why Businesses are Actively Moving to Headless in 2026

This is not just a developer trend; it is a business-driven shift.

Companies are moving to BigCommerce headless because they need:

  • Speed -> Faster sites directly improve conversion rates
  • Flexibility -> Build experiences that match their brand, not templates
  • Scalability -> Handle growth without rebuilding the system
  • Omnichannel Readiness -> Sell across web, mobile, apps, and more

And importantly, they want to future-proof their technology decisions.

The Real Decision You Are Making

Choosing headless is not about technology; it is about control.

  • Do you want to adapt your business to your platform?
  • Or adapt your platform to your business?

If your roadmap includes advanced customization, performance optimization, or rapid scaling, headless becomes less of an option or more of a necessity.

This is where working with a specialized NextJS development Company or a team experienced in headless architecture, like WEDOWEBAPPS, can significantly reduce risk and accelerate implementation.

BigCommerce Headless Architecture Explained (How it Actually Works)

Before you decide whether headless is right for you, you need to understand one thing clearly:

Where does everything live, and how does it connect?

Because this is where most businesses either gain clarity or get overwhelmed.

The Simplified View (Without Overengineering It)

In a headless BigCommerce setup, your system is split into three clear layers:

  • Frontend (NextJS) -> What users see and interact with
  • Backend (BigCommerce) -> Where products, carts, orders, and logic live
  • APIs (GraphQL / REST) -> The bridge connecting both

Instead of relying on a monolithic system, everything communicates through APIs.

Visualizing the Structure

BigCommerce Headless Architecture Explained

Breaking it Down (What Each Layer Actually Does)

  1. Frontend – NextJS (Your Customer Experience Layer)

This is where your entire storefront lives.

  • Product pages
  • Category listings
  • Landing Pages
  • UI/UX Interactions

NextJS gives you:

  • Server-side rendering (better SEO)
  • Static generation (faster performance)
  • Flexibility to build any experience you want

Themes no longer limit you; you are building your storefront from scratch.

  1. Backend – BigCommerce (Your Commerce Engine)

BigCommerce handles everything critical behind the scenes:

  • Product catalog
  • Inventory
  • Pricing
  • Orders
  • Customer data

The key difference? You are not using its frontend anymore, only its capabilities.

  1. API Layer – The Connector (Where the Magic Happens)

This is what makes headless work.

  • GraphQL Storefront API -> Fetch products, categories, carts
  • REST APIs -> Additional operations when needed
  • Checkout APIs -> Manage checkout flows

Your frontend calls these APIs to:

  • Display products
  • Add items to cart
  • Manage checkout

API Layer The Connector

How a Typical User Journey Works (Step-by-Step Flow)

Here is what happens when a user visits your site:

  • User opens your storefront (NextJS frontend loads instantly)
  • Frontend requests product data via GraphQL API
  • BigCommerce sends structured product data
  • Frontend renders the page dynamically
  • User adds product to cart > API call updates cart
  • Checkout is triggered via the Checkout API

All of this happens in milliseconds, but the architecture behind it is what enables speed and flexibility.

Why This Architecture Matters for Business Growth

This is not just a technical improvement; it directly impacts outcomes:

  • Faster pages -> Better conversion rates
  • Custom UX -> Higher engagement
  • API flexibility -> Easier integrations (CRM, ERP, AI Tools)
  • Scalable frontend -> No rebuild when you grow

Where Most Implementations Go Wrong

Here is the honest part: this setup is powerful, but not trivial.

Common mistakes:

  • Poor API structuring -> Slow performance
  • Over-fetching data -> unnecessary load times
  • Weak frontend architecture -> hard to scale later
  • Checkout misconfiguration -> conversion drop

This is why businesses often choose to Hire BigCommerce Development Company instead of building everything in-house, especially when performance and scalability are critical.

Teams like WEDOWEBAPPS focus on structuring this architecture correctly from day one, so you don’t end up rebuilding it later.

BigCommerce Headless API Overview (What You Actually Need to Use)

Once the architecture is clear, the next question most teams ask is:

“Which APIs do we actually need, and how complex is this going to get?”

The honest answer: You don’t need everything. But you do need to use the right APIs in the right places.

Because this is where many headless projects either stay efficient or become unnecessarily complicated.

Start With This Mental Model

Think of BigCommerce APIs as three functional layers:

  • Storefront APIs (GraphQL): Power your frontend experience
  • Management APIs (REST): Handle backend/admin operations
  • Checkout APIs: Control the checkout experience

Each serves a different purpose. Mixing them incorrectly leads to performance issues and messy architecture.

1. GraphQL Storefront API (Your Primary Workhorse)

If you are building a NextJS storefront, this is the API you will use the most.

It allows you to fetch:

  • Products
  • Categories
  • Variants
  • Pricing
  • Cart data

The biggest advantage?

Instead of making multiple requests, you can fetch exactly the data you need in a single query.

That is a major reason why the BigCommerce GraphQL Storefront API is preferred for headless builds; it keeps your frontend fast and efficient.

Example: Fetching Products with GraphQL

</> GraphQL

query getProducts {

site {

products(first: 5) {

edges {

node {

entityId

name

prices {

price {

value

currencyCode

}

}

defaultImage {

url(width: 500)

}

}

}

}

}

}

Using It in NextJS

</> JavaScript

const fetchProducts = async () => {

const res = await fetch(process.env.BC_GRAPHQL_ENDPOINT, {

method: “POST”,

headers: {

“Content-Type”: “application/json”,

“Authorization”: `Bearer ${process.env.BC_STOREFRONT_TOKEN}`,

},

body: JSON.stringify({

query: `query {

site {

products(first: 5) {

edges {

node {

entityId

name

}

}

}

}

}`

}),

});

const data = await res.json();

return data;

};

2. REST APIs (Use Only When Necessary)

BigCommerce still provides REST APIs, but in a headless setup, they are not your primary tool.

They are typically used for:

  • Admin-level operations
  • Catalog management
  • Order management
  • Store configuration

Important: Using REST APIs for frontend data fetching is a common mistake. It increases latency and reduces performance.

3. Checkout APIs (Where Things Get Serious)

This is where your implementation directly affects revenue.

BigCommerce provides:

  • Hosted checkout (default, simpler)
  • Checkout Channel API (for headless setups)

With headless checkout, you can:

  • Control the checkout UI
  • Customize flows
  • Integrate third-party payment or logic

But it also adds complexity, which we will break down in the next section.

Authentication Basics (Without Overcomplicating It)

You will mainly deal with:

  • Storefront API Token -> For frontend requests
  • API Credentials (Client ID, Secret) -> For backend/admin calls

Always:

  • Store keys in environment variables
  • Avoid exposing sensitive credentials on the client side

The Real Mistake Most Teams Make

They try to use:

  • Too many APIs
  • Or the wrong API for the job

Which leads to:

  • Slower performance
  • Hard-to-maintain code
  • Increased development time

A clean implementation focuses on:

  • GraphQL for storefront
  • REST only when required
  • Checkout APIs with clear intent

What This Means for You as a Buyer

You don’t need to master every API.

But you do need to ensure:

  • Your architecture is clean
  • Your data fetching is optimized
  • Your checkout flow is reliable

Because these directly impact:

  • Page speed
  • User experience
  • Conversion rates

This is where working with a BigCommerce Development company like WEDOWEBAPPS helps; you avoid trial and error and build a system that is efficient from day one.

Get Custom Headless Architecture Plan

Next.js eCommerce Starter Template Setup (Step-by-Step That Actually Scales)

At this stage, most teams make a critical mistake.

They jump straight into coding without thinking about structure. And what starts as a simple setup quickly becomes difficult to scale, maintain, or optimize.

So instead of just “getting it running,” this section focuses on setting it up the right way from the beginning.

What You Are Actually Building Here

You are not creating a NextJS app; you are building a scalable frontend layer that:

  • Communicates with BigCommerce APIs
  • Handles dynamic product data
  • Supports SEO and performance out of the box

That means your setup decisions matter more than your code volume.

Step-by-Step Setup (Clean, Practical, No Fluff)

Step 1 – Initialize Your NextJS Project Properly

Start with a clean, production-ready setup using the latest NextJS version.

</> Bash

npx create-next-app@latest bigcommerce-headless-store

cd bigcommerce-headless-store

npm install

Choose:

  • App Router (recommended)
  • TypeScript (for scalability)
  • ESLint (for code consistency)

Step 2 – Set Up Environment Variables (Don’t Skip This)

Create a .env.local file:

</> env

NEXT_PUBLIC_BC_GRAPHQL_ENDPOINT=https://your-store.mybigcommerce.com/graphql

BC_STOREFRONT_TOKEN=your_storefront_api_token

This ensures:

  • Secure API access
  • Clean configuration management across environments

Step 3 – Create a Central API Layer (Avoid Scattered Fetch Calls)

Instead of calling APIs everywhere, create a dedicated folder:

/lib/api.js
</> JavaScript

export async function fetchGraphQL(query, variables = {}) {

const res = await fetch(process.env.NEXT_PUBLIC_BC_GRAPHQL_ENDPOINT, {

method: “POST”,

headers: {

“Content-Type”: “application/json”,

“Authorization”: `Bearer ${process.env.BC_STOREFRONT_TOKEN}`,

},

body: JSON.stringify({ query, variables }),

});

return res.json();

}

This keeps your code:

  • Reusable
  • Maintainable
  • Easy to scale

Step 4 – Structure Your Project for Growth (Not Just MVP)

A scalable folder structure looks like:

/app

/products

/category

/components

/lib

/styles

Why this matters:

  • Clear separation of concerns
  • Easier feature expansion
  • Better team collaboration

Step 5 – Set Up Dynamic Product Routing

Use dynamic routes to handle product pages:

/app/products/[slug]/page.js
</> JavaScript

export async function generateStaticParams() {

// Fetch product slugs from BigCommerce

}

This allows:

  • SEO-friendly URLs
  • Scalable product page generation

Step 6 – Connect Your First Product Data

Use your API layer to fetch and render products:

</> JavaScript

import { fetchGraphQL } from “@/lib/api”;

export default async function ProductsPage() {

const data = await fetchGraphQL(`

query {

site {

products(first: 10) {

edges {

node {

name

entityId

}

}

}

}

}

`);

return (

<div>

{data.data.site.products.edges.map(({ node }) => (

<p key={node.entityId}>{node.name}</p>

))}

</div>

);

}

Step 7 – Test Before You Scale

Before adding complexity:

  • Check API responses
  • Validate rendering
  • Ensure environment variables work

This avoids debugging chaos later.

What Most Teams Get Wrong at This Stage

They:

  • Hardcode API calls
  • Ignore folder structure
  • Skip environment configuration
  • Build without scalability in mind

And then hit problems when:

  • Adding new features
  • Scaling product catalogs
  • Optimizing performance

The Smarter Approach

Treat your setup as infrastructure, not just initialization. Because this foundation will determine:

  • How fast can you build new features
  • How easy your code is to maintain
  • How well your storefront performs

This is why many businesses choose to work with a NextJS development company like WEDOWEBAPPS, so the setup is done right from day one, not reworked later.

BigCommerce GraphQL Product Queries (Practical, Scalable Implementation)

By now, your NextJS setup is ready.

But here is where things start to directly impact performance, scalability, and user experience:

How you fetch and structure your product data.

Most teams underestimate this part. They either:

  • Over-fetch data (slow pages)
  • Under-structure queries (multiple API calls)
  • Or build logic that does not scale with catalog growth

Let’s fix that.

What You Actually Need From the GraphQL API

At a business level, your storefront needs to answer three things efficiently:

  • What products should be shown?
  • What details does the user need to make a decision?
  • How fast can this data be delivered?

GraphQL helps you control all three, if used correctly.

A Clean Product Listing Query (What “Good” Looks Like)

Instead of pulling unnecessary data, focus only on what your UI needs.

</> GraphQL

query getProductList {

site {

products(first: 12) {

edges {

node {

entityId

name

path

prices {

price {

value

currencyCode

}

}

defaultImage {

url(width: 400)

altText

}

}

}

}

}

}

Why This Query Structure Matters

This is not just about syntax; it is about performance.

You Are:

  • Limiting product count (first : 12)
  • Fetching only required fields
  • Structuring data for direct UI rendering

Which means:

  • Faster page loads
  • Less frontend processing
  • Better scalability as your catalog grows

Fetching Product Details (For PDP Pages)

When a user clicks a product, you need deeper data, but still controlled.

</> GraphQL

query getProductBySlug($path: String!) {

site {

route(path: $path) {

node {

… on Product {

entityId

name

description

prices {

price {

value

currencyCode

}

}

images {

edges {

node {

url(width: 800)

}

}

}

}

}

}

}

}

Using It in NextJS (Dynamic Product Pages)

</> JavaScript

import { fetchGraphQL } from “@/lib/api”;

export async function getProduct(path) {

const data = await fetchGraphQL(

`query getProductBySlug($path: String!) {

site {

route(path: $path) {

node {

… on Product {

entityId

name

}

}

}

}

}`,

{ path }

);

return data.data.site.route.node;

}

Pagination (Where Most Stores Break at Scale)

If your catalog grows, loading everything at once will slow your site.

Use cursor-based pagination:

</> GraphQL

query getPaginatedProducts($cursor: String) {

site {

products(first: 12, after: $cursor) {

pageInfo {

hasNextPage

endCursor

}

edges {

node {

entityId

name

}

}

}

}

}

This allows:

  • Infinite scrolling
  • Load-more buttons
  • Better performance on large catalogs

The Hidden Performance Lever: Query Discipline

Most performance issues in headless builds don’t come from frameworks, they come from poor data querying.

Avoid:

  • Fetching full product objects everywhere
  • Repeating queries across components
  • Making multiple API calls for related data

Instead:

  • Centralize queries
  • Reuse fragments
  • Fetch only what each page needs

What This Means for Your Business

Better query design directly impacts:

  • Page speed -> affects conversions
  • UX smoothness -> affects engagement
  • Server load -> affects scalability

This isn’t just a developer concern; it’s a revenue factor.

Where Experienced Teams Make the Difference

A well-structured GraphQL layer ensures:

  • Faster storefronts
  • Cleaner codebase
  • Easier feature expansion

That’s why businesses often partner with a BigCommerce Development company like WEDOWEBAPPS, so their data layer is optimized from the start, not patched later.

Headless BigCommerce Checkout (Checkout Channel API Integration That Does Not Break Conversions)

This is where most headless projects either succeed or quietly lose revenue.

Because no matter how fast or flexible your storefront is, checkout is where money is made (or lost).

And here’s the reality:

Going headless on the storefront is easy. Going headless on checkout is where complexity begins.

The Core Decision You Need to Make First

Before writing a single line of code, you need clarity on this: Do you actually need a fully custom checkout?

Because BigCommerce gives you two options:

Option 1: Use Hosted Checkout (Recommended for Most Businesses)

  • BigCommerce handles checkout UI and logic
  • You redirect users from your NextJS frontend
  • Faster to implement
  • Lower risk
  • Optimized for conversions out of the box

Best For: Startups, SMEs, or businesses prioritizing speed and stability

Option 2: Headless Checkout (Checkout Channel API)

  • You build and control the entire checkout experience
  • Full customization of UI and logic
  • Requires deeper API integration
  • Higher development complexity

Best For: Complex checkout flows, Custom pricing logic, Unique user journeys

How Headless Checkout Actually Works

Instead of redirecting users to BigCommerce’s checkout page, you:

  1. Create a cart via API
  2. Manage cart state in your frontend
  3. Generate a checkout session
  4. Control UI interactions
  5. Process checkout using BigCommerce APIs

Everything becomes API-driven.

Step-by-Step: Basic Checkout Flow

Step 1: Create a Cart

</> JavaScript

const createCart = async () => {

const res = await fetch(“/api/cart”, {

method: “POST”,

body: JSON.stringify({

lineItems: [

{

quantity: 1,

productId: 123,

},

],

}),

});

return res.json();

};

Step 2: Retrieve Cart Data

</> JavaScript

const getCart = async (cartId) => {

const res = await fetch(`/api/cart/${cartId}`);

return res.json();

};

Step 3: Redirect to Checkout (Hybrid Approach)

Even in headless setups, many businesses use a hybrid model:

</> JavaScript

window.location.href = `https://store-url.com/cart.php?action=load&id=${cartId}`;

This combines:

When a Full Headless Checkout Makes Sense

Let’s be direct, most businesses don’t need full headless checkout.

You should consider it only if you need:

  • Multi-step custom checkout flows
  • Deep integrations (ERP, subscription logic, B2B pricing)
  • Unique UX that cannot be achieved with hosted checkout

Otherwise, you are adding complexity without a clear ROI.

The Risk Most Teams Underestimate

Custom checkout introduces:

  • Payment integration challenges
  • Compliance considerations (PCI, security)
  • Higher maintenance overhead
  • Potential conversion drops if UX isn’t optimized

This is why many high-performing stores still use BigCommerce hosted checkout, even with a headless frontend.

The Smarter Approach (What Actually Works in Practice)

A hybrid model:

  • Headless frontend (NextJS)
  • API-driven cart
  • Hosted checkout for final conversion

This gives you:

  • Flexibility where it matters
  • Stability where it counts

Where Expertise Becomes Critical

Checkout is not the place for experimentation.

Even small mistakes can:

  • Break the flow
  • Increase drop-offs
  • Impact revenue directly

BigCommerce vs Shopify for Headless eCommerce

At some point in your evaluation, this question naturally comes up:

“Should we go headless with BigCommerce or Shopify Headless?”

And this is not just a feature comparison; it is a business decision that affects flexibility, cost, and long-term scalability.

Let’s break it down the way buyers actually evaluate it.

The Real Difference (Before We Get Into Details)

  • Shopify (Headless) -> Great ecosystem, but controlled environment
  • BigCommerce (Headless) -> More open, API-first flexibility

So the decision is not “which is better,” it is:

Do you want convenience or control?

Key Comparison That Actually Matters

FactorBigCommerce (Headless)Shopify (Headless)
API FlexibilityOpen, robust GraphQL + RESTGood, but more controlled
Checkout CustomizationMore flexibility with APIsLimited unless Shopify Plus
Pricing StructureNo transaction feesTransaction fees (unless using Shopify Payments)
Vendor Lock-InLowHigher
Developer FreedomHighModerate
ScalabilityStrong for complex use casesStrong but structured

1. Flexibility: Where Most Businesses Feel the Difference

With BigCommerce Headless, you are not restricted by platform rules. You can:

  • Build fully custom frontend experiences
  • Control data flow through APIs
  • Integrate with almost any external system

Shopify, on the other hand, offers flexibility, but within boundaries.

For many businesses, that’s enough. For others, it becomes limiting over time.

2. Checkout Control (The Deciding Factor for Many)

This is where the gap becomes clearer.

  • Shopify -> Checkout customization is restricted unless you are on Shopify Plus
  • BigCommerce -> More control via Checkout APIs

If your business requires:

  • Custom pricing logic
  • B2B workflows
  • Advanced checkout experiences

BigCommerce gives you more room to build.

3. Cost Structure (Often Overlooked)

Shopify’s Cost can increase due to:

  • Transaction fees
  • App dependencies
  • Premium plans (for advanced features)

BigCommerce:

  • No transaction fees
  • More features available out of the box

Over time, this difference becomes significant, especially at scale.

4. Developer Experience (Impacts Your Speed to Market)

Shopify is easier to start with. BigCommerce is more flexible to scale with.

If your goal is:

  • Quick launch -> Shopify works well
  • Long-term scalability -> BigCommerce is often the better fit

So, Which One Should You Choose?

Choose BigCommerce Headless If:

  • You need high customization
  • You want full control over the frontend and checkout
  • You are building for scale from the start
  • You want to avoid platform lock-in

Choose Shopify Headless If:

  • You want a faster setup with less complexity
  • Your requirements are relatively standard
  • You are okay working within platform constraints

Get Platform Recommendation

The Buyer Reality Most Blogs Don’t Tell You

Both platforms are good. The real question is:

Which one aligns with your growth plan, not just your current needs?

Because switching later is always more expensive than choosing correctly now.

Where the Right Development Partner Changes the Outcome

No matter which platform you choose, execution matters more than selection.

A well-architected BigCommerce headless setup can outperform a poorly implemented Shopify build, and vice versa.

Deployment Guide (Vercel / Netlify for Headless Storefronts)

At this stage, your storefront works locally.

But here is where many teams run into unexpected issues:

  • Pages work locally but break in production
  • Environment variables fail
  • Performance drops after deployment
  • SEO elements don’t render properly

Deployment in a headless setup is not just about going live; it is about going live correctly.

What You Are Actually Deploying

You are not deploying a static site. You are deploying a dynamic, API-driven frontend that depends on:

  • BigCommerce APIs
  • Environment variables
  • Rendering strategy (SSR / SSG / ISR)

So your hosting platform needs to support this properly.

Why Vercel is the Default Choice for NextJS

Vercel is built by the creators of NextJS, which makes it the most seamless option. It gives you:

  • Native support for SSR, SSG, and ISR
  • Automatic performance optimization
  • Edge network delivery (faster global load times)
  • Simple Git-based deployments

For most use cases, it just works without extra configuration.

Netlify: When Does It Make Sense?

Netlify is also a solid option, especially if:

  • Your team already uses Netlify workflows
  • You prefer its CI/CD ecosystem
  • Your project leans more toward static generation

But for complex headless setups, Vercel usually requires less effort.

Step-by-Step Deployment (Vercel)

Step 1: Push Your Code to Git

</> Bash

git init

git add .

git commit -m “Initial headless setup”

git branch -M main

git remote add origin <your-repo-url>

git push -u origin main

Step 2: Import Project into Vercel

  • Go to Vercel dashboard
  • Import your Git repository
  • Framework will auto-detect as NextJS

Step 3: Configure Environment Variables

Add:

  • NEXT_PUBLIC_BC_GRAPHQL_ENDPOINT
  • BC_STOREFRONT_TOKEN

Important: If this step is wrong, your entire frontend will fail silently.

Step 4: Deploy

Click deploy – Vercel handles:

  • Build process
  • Optimization
  • CDN distribution

Build Configuration (What to Watch For)

Make sure your setup supports:

  • Server-side rendering where needed
  • Static generation for product/category pages
  • Incremental Static Regeneration (ISR) for updates

Example:

</> JavaScript

export const revalidate = 60; // Rebuild page every 60 seconds

This balances:

  • Fresh data
  • Fast performance

Common Deployment Mistakes (And Their Impact)

  1. Missing Environment Variables: API Calls fail -> blank pages
  2. Wrong Rendering Strategy: Slow pages or poor SEO
  3. Over-reliance on Client-Side Fetching: Poor performance and indexing issues
  4. No Caching Strategy: Increased API Load + Slower response times

Performance Reality After Deployment

Going live doesn’t guarantee speed. Your performance depends on:

  • How efficiently you fetch data
  • How well you cache responses
  • How your pages are rendered

Deployment is just the start; optimization is what follows.

The Smart Way to Think About Deployment

Don’t treat deployment as a final step.

Treat it as: The foundation of your live performance, SEO visibility, and scalability.

Performance Optimization in Headless BigCommerce (Where Revenue Actually Improves)

At this point, your storefront is live.

But here is the uncomfortable truth: Most headless builds are not automatically fast.

In fact, without proper optimization, they can be slower than traditional setups.

Because now, performance depends on:

  • How you fetch data
  • How you render pages
  • How you handle caching

And these decisions directly impact:

  • Page load time
  • User experience
  • Conversion rates

The Buyer Reality: Speed is Not a Technical Metric

Speed is a business metric. Even small delays can:

  • Increase bounce rates
  • Reduce conversions
  • Affect SEO rankings

So performance optimization is not optional; it is foundational.

Start With Rendering Strategy (This Changes Everything)

In NextJS, how you render pages determines how fast they load.

Static Generation (SSG)

  • Pages are pre-built
  • Extremely fast
  • Ideal for product and category pages

Server-Side Rendering (SSR)

  • Pages are generated on request
  • Useful for dynamic content
  • Slightly slower than SSG

Incremental Static Generation (ISR)

  • Hybrid approach
  • Pages update periodically without a full rebuild
</> JavaScript

export const revalidate = 60;

Best practice: Use SSG + ISR for most eCommerce pages, SSR only when necessary.

Optimize Your API Calls (Most Common Bottleneck)

Your frontend depends on APIs, so inefficient calls slow everything down.

What to do:

  • Fetch only required fields (GraphQL advantage)
  • Avoid duplicate queries
  • Batch requests where possible

What to Avoid:

  • Calling APIs from multiple components separately
  • Over-fetching unused data

Image Optimization (Quick Win, Big Impact)

Images are often the heaviest part of your storefront. Use:

  • NextJS <Image /> component
  • Proper sizing via BigCommerce image URLs
  • Lazy loading

This alone can significantly improve load times.

Caching Strategy (Where Advanced Performance Comes From)

Without caching, your app keeps hitting APIs repeatedly.

Use:

  • ISR for page-level caching
  • CDN caching via Vercel
  • Edge caching where possible

This reduces:

  • Server load
  • API response time
  • Overall latency

Reduce Client-Side JavaScript

Heavy JavaScript slows down rendering. Optimize by:

  • Using server components where possible
  • Avoiding unnecessary libraries
  • Splitting bundles

Measure What Actually Matters

Don’t guess performance, measure it.

Track:

  • Largest Contentful Paint (LCP)
  • Time to First Byte (TTFB)
  • First Input Delay (FID)

Tools:

  • Google PageSpeed Insights
  • Lighthouse
  • Web Vitals

Where Most Teams Go Wrong

They assume: “Headless = Fast.”

But in Reality: “Optimized headless = Fast.”

Without optimization, you are just shifting complexity, not improving performance.

The Practical Outcome for Your Business

When performance is done right, you get:

  • Faster load times -> higher conversions
  • Better UX -> more engagement
  • Improved SEO -> more organic traffic

The Smarter Approach

Treat performance as part of your architecture, not a post-launch fix.

Because optimizing later is always harder than building it right from the start.

SEO for Headless BigCommerce (How to Rank on Google and Show Up in AI Results)

This is where many headless builds quietly fail.

Not because the product is bad, not because the tech is wrong. But because SEO is no longer “handled by the platform.”

It becomes your responsibility.

The Real Concern Buyers Have (And Rightly So)

“Will going headless hurt my SEO?”

Short answer:

It can, if implemented poorly.

It can significantly improve it if done right.

Why SEO Feels Harder in Headless

In traditional platforms:

  • Meta tags are handled for you
  • URLs are predefined
  • Rendering is server-based by default

In headless:

  • You control rendering
  • You define metadata
  • You manage crawlability

Which means more control, but also more responsibility.

Start With Rendering (This Directly Impacts Rankings)

Search engines (and AI tools) rely on readable HTML.

If your content isn’t visible at load time, it may not get indexed properly.

What Works Best:

  • Server-Side Rendering (SSR) -> For dynamic pages
  • Static Generation (SSG) -> For product & category pages
  • ISR -> For keeping content fresh

Avoid relying purely on client-side rendering.

Metadata Management in NextJS (Non-Negotiable)

Every page should have:

  • Unique title
  • Meta description
  • Open Graph tags
  • Canonical URLs

Example:

</> JavaScript

export const metadata = {

title: “Buy Running Shoes Online”,

description: “Explore high-quality running shoes with fast delivery.”,

};

Without this, your pages lack context for both search engines and AI systems.

URL Structure (Often Ignored, But Critical)

Your URLs should be:

  • Clean -> /products/running-shoes
  • Consistent -> avoid unnecessary parameters
  • Keyword-aligned

Bad structure hurts both:

  • Rankings
  • AI understanding

Structured Data (Helps You Show Up in Rich Results)

Use schema markup for:

  • Products
  • Pricing
  • Reviews
  • Breadcrumbs

This helps:

  • Google displays rich snippets
  • AI tools understand your content better

Content Structure for AI Visibility

This is where SEO is evolving.

AI Tools like ChatGPT, Gemini, and Perplexity don’t just crawl, they interpret.

To improve visibility:

  • Use clear headings (H1, H2, H3 hierarchy)
  • Answer questions directly
  • Keep sections logically structured
  • Avoid fluff and ambiguity

Your content should be: Easy to extract, summarize, and cite.

Internal Linking (Supports Both SEO and AI Understanding)

Link relevant pages using contextual anchor text like:

  • BigCommerce headless development
  • NextJS storefront setup
  • API integration guides

This builds:

  • Topical authority
  • Better crawl paths

Common SEO Mistakes in Headless Builds

  • Relying on client-side rendering
  • Missing or duplicate metadata
  • Poor URL structuring
  • No structured data
  • Slow page performance

Each of these directly affects visibility.

The Bigger Shift: SEO is Now About Clarity

It’s no longer just about keywords. It’s about:

  • How clearly does your content explain a topic
  • How easily systems can extract meaning
  • How structured your information is

What This Means for Your Business

Done right, headless SEO gives you:

  • Faster pages -> better rankings
  • Cleaner structure -> better indexing
  • AI-friendly content -> higher visibility in AI tools

Done wrong, it can:

  • Reduce discoverability
  • Limit organic traffic
  • Waste your development effort

When Should You Choose BigCommerce Headless (And When You Shouldn’t)

By now, everything might sound compelling – flexibility, performance, scalability.

But here’s the decision most businesses struggle with:

“Is headless actually right for us, or are we overcomplicating things?”

This section is meant to give you clarity, not push you toward a decision.

Start With the Only Question That Matters

Are your current limitations technical or just operational?

Because if your growth is being blocked by:

  • Marketing execution
  • Product strategy
  • Traffic acquisition

Then switching to headless won’t fix that.

But if your limitations look like this:

  • You cannot implement the experience your team wants
  • Your site performance is affecting conversions
  • Your platform restricts integrations or workflows
  • Scaling requires workarounds instead of solutions

Then you are dealing with architectural limitations. And that is where headless starts making sense.

When BigCommerce Headless is the Right Choice

You should seriously consider it if:

  1. You Need Full Frontend Flexibility: Your brand experience is not standard, and templates are holding you back.
  2. Performance Directly Impacts Revenue: Even small improvements in speed can significantly affect conversions.
  3. You are Planning to Scale (Not Just Maintain): Your roadmap includes large product catalogs, high traffic, and multi-region expansion.
  4. You Want to Omnichannel Capabilities: Selling across web, mobile apps, and marketplaces, and custom interfaces.
  5. You Need Advanced Customization: Especially for B2B workflows, pricing logic, and checkout experiences.

When You Probably Shouldn’t Go Headless

Let’s be equally clear here. Headless may not be the right fit if:

  1. Your Requirements Are Standard: If your needs can be solved with themes and plugins, keep it simple.
  2. You Need a fast, Low-Cost Launch: Headless requires more upfront investment in time and development.
  3. You Don’t Have a Technical Roadmap: Without a clear plan, headless becomes complexity without direction.
  4. You Do Not Plan to Scale Aggressively: If your business is stable and not evolving rapidly, the benefits may not justify the effort.

The Trade-Off Most Businesses Overlook

Headless gives you control, flexibility, and scalability. But it also requires technical expertise, ongoing maintenance, and thoughtful architecture.

So, the real decision is:

Do the long-term benefits outweigh the short-term complexity?

A Simple Self-Assessment

If you answer “yes” to most of these, headless is worth considering:

  • Do we feel limited by our current platform?
  • Are we planning for significant growth or expansion?
  • Do we need better performance or UX control?
  • Are we ready to invest in a scalable architecture?

The Smarter Way to Approach This Decision

Don’t treat headless as a trend to follow. Treat it as an infrastructure decision that should align with:

  • Your growth strategy
  • Your technical capabilities
  • Your long-term vision

Common Challenges in BigCommerce Headless (And How to Avoid Costly Mistakes Early)

By now, you understand the upside.

But here is what most blogs won’t tell you clearly: Headless does not fail because of the idea; it fails because of execution.

And the issues usually don’t show up immediately. They appear when you try to scale, optimize, or extend your system.

The Pattern You Will Notice

Most challenges fall into one category: Decisions made early without thinking about scale.

Let’s break down where things typically go wrong and how to avoid them.

1. Poor API Strategy (Looks Fine Early, Breaks Later)

What goes wrong:

  • Multiple redundant API calls
  • Over-fetching unnecessary data
  • No central API handling layer

What it Leads to:

  • Slower pages
  • Higher server load
  • Hard-to-maintain code

How to Avoid It:

  • Centralize API logic (as discussed earlier)
  • Use GraphQL efficiently (fetch only what’s needed)
  • Plan queries based on page requirements, not convenience

2. Weak Frontend Architecture

What Goes Wrong:

  • No clear folder structure
  • Logic scattered across components
  • No separation between UI and data

What it Leads to:

  • Difficult scaling
  • Slower development over time
  • Increased bugs

How to Avoid it:

  • Define structure early (pages, components, API layer)
  • Use reusable components
  • Keep business logic separate from UI

3. Checkout Complexity (Underestimate Risk Area)

What Goes Wrong:

  • Trying to fully customize checkout without clear need
  • Poor handling of cart state
  • Broken flows during edge cases

What it Leads to:

  • Cart abandonment
  • Revenue loss
  • Frustrated users

How to Avoid It:

  • Use hosted checkout unless customization is necessary
  • Test edge cases thoroughly
  • Keep checkout logic simple and reliable

4. Performance Issues After Launch

What Goes Wrong:

  • No caching strategy
  • Excessive client-side rendering
  • Heavy JavaScript bundles

What It Leads to:

  • Slow load times
  • Poor SEO
  • Lower conversions

How to Avoid It:

  • Use SSG + ISR wherever possible
  • Optimize images and scripts
  • Implement caching early, not as a fix later

5. SEO Gaps (Often Discovered Too Late)

What Goes Wrong:

  • Missing metadata
  • Poor URL structures
  • Content not rendered properly for crawlers

What it Leads to:

  • Low visibility
  • Indexing issues
  • Missed organic traffic

How to Avoid It:

  • Plan SEO during development, not after launch
  • Ensure server-rendered content
  • Use structured data

6. Underestimating Maintenance Effort

What Goes Wrong:

  • Assuming “build once, done forever.”
  • No plan for updates or scaling

What it Leads to:

  • Technical debt
  • Slower iteration
  • Increased long-term cost

How to Avoid It:

  • Treat your storefront as a product, not a project
  • Plan for ongoing improvements
  • Document your architecture

The Bigger Insight Most Teams Miss

Headless is not harder; it’s just less forgiving.

In traditional platforms, mistakes are hidden. In the headless, they become visible.

What This Means for Your Decision

If you approach headless with:

  • Clear structure
  • Thoughtful architecture
  • Performance awareness

You unlock its full value. If not, you end up:

  • Debugging more than building
  • Fixing instead of scaling

The Practical Takeaway

Headless success is not about writing more code. It is about “Making better decisions earlier.”

How Businesses Actually Implement Headless BigCommerce (Without Overcomplicating It)

By now, you have seen the architecture, APIs, setups, and challenges. But here is the gap most guides leave:

How does this actually come together in a real business scenario?

Because no company starts with a blank slate and perfect clarity. They start with constraints, timelines, and expectations.

The Typical Implementation Journey

Most businesses don’t go “fully headless” overnight. They follow a more practical path:

Phase 1: Identify the Implementation Journey

Not everything needs to change.

  • Is performance the issue?
  • Is customization limited?
  • Is checkout too rigid?

This step defines why you are going headless, not just how.

Phase 2: Decouple the Frontend First

This is where most implementations begin.

  • Keep BigCommerce as the backend
  • Build a custom NextJS storefront
  • Use GraphQL APIs for product and category data

This alone solves performance issues, UX limitations, and branding constraints.

Phase 3: Optimize Core Experiences

Once the storefront is stable:

  • Improve product pages
  • Refine navigation and filtering
  • Optimize performance and SEO

This is where the real gains start showing, in conversion and engagement.

Phase 4: Evaluate Checkout Strategy

Only after everything else is stable:

  • Decide between hosted checkout or headless checkout
  • Introduce customization only if required

This avoids unnecessary complexity early on.

Phase 5: Scale and Integrate

As the business grows:

  • Integrate third-party systems (CRM, ERP, AI tools)
  • Expand to multiple channels
  • Enhance personalization and automation

The Key Insight Most Businesses Miss

You don’t need to build everything at once. Headless works best when implemented as a phased evolution, not a full rebuild.

Where Many Teams Lose Momentum

Not because the technology fails, but because:

  • The scope becomes too broad
  • Architecture is not clearly defined
  • Priorities shift mid-development

This leads to delays, budget overruns, and compromised performance.

The Role of the Right Development Approach

A structured implementation focuses on:

  • Starting with high-impact areas
  • Avoiding unnecessary complexity
  • Building for scalability from day one

This is where working with an experienced team becomes valuable, not just for execution, but for decision-making.

How WEDOWEBAPPS Supports Headless Commerce Builds

For businesses that want to move fast without breaking things later, a structured approach matters.

At WEDOWEBAPPS, the focus is not just on development, but on building systems that scale.

Whether you are looking to handle your backend integrations, headless transitions, or to build a high-performance storefront, the goal is the same:

“Build a solution that supports growth, not one that needs to be rebuilt when growth happens.”

What This Means for You

You don’t need to overcommit. You need to:

  • Start with clarity
  • Build with structure
  • Scale with intention

Because headless is not just a technical shift, it is a long-term growth strategy. Many businesses accelerate implementation by working with an offshore development team for startups experienced in headless commerce architecture.

Conclusion

Choosing a headless approach with BigCommerce and Next.js isn’t about adopting a modern stack; it’s about removing the limitations that slow your business down.

For some teams, those limitations are already visible: slow performance, restricted customization, or growing complexity with every new feature. For others, they appear gradually as the business scales and expectations evolve. In both cases, the underlying issue is the same: your storefront and backend are no longer aligned with your growth.

Headless architecture solves this by separating concerns. It gives you the freedom to build faster, design better experiences, and integrate systems without being constrained by platform boundaries. But that flexibility comes with responsibility. The outcomes depend entirely on how well the system is structured, from API usage and frontend architecture to checkout decisions, performance, and SEO.

That’s why this isn’t a one-size-fits-all solution.

If your business needs speed, control, and scalability, headless BigCommerce with Next.js can be a strong foundation. If your requirements are simpler, a traditional approach may still serve you better without unnecessary complexity.

The key is not choosing what’s more advanced; it’s choosing what aligns with how your business is planning to grow.

Start Your Headless Commerce Project

Flutter App Development Cost in 2026: Complete Pricing Guide

Introduction

How much does it actually cost to turn your app ideas into a real product?

If you are also exploring Flutter, this is likely the first question on your mind. And you are right to ask it early.

The Flutter app development cost in 2026 usually falls between $15,000 and $150,000+, depending on what you build. A simple MVP with core features sits on the lower end. A feature-rich platform with integrations, real-time systems, or AI capabilities can move well beyond that range.

This gap is exactly why many businesses struggle to plan their budget. The cost of Flutter app development is not fixed. It changes based on your app’s complexity, design expectations, and the development team you choose.

For startups, getting this clarity early can save both time and money. It helps you decide what to build first and how to scale later. Without it, the cost to develop a Flutter app can quickly go beyond expectations.

In this guide, you will get a structured breakdown of the Flutter app price. From app types and real-world scenarios to factors that influence the final Flutter app cost, everything is explained in a way that helps you plan your investment with confidence.

Because when you understand the number from the start, every product decision becomes more controlled and practical.

Let’s start with the most important question. What does it typically cost to build a Flutter app today?

Get Free Cost Estimate

Why Flutter is a Cost-Effective Choice for App Development

Flutter helps businesses control the Flutter app development cost without limiting product quality.

A single codebase allows developers to build apps for Android and iOS together. This reduces development hours and keeps the cost of Flutter app development lower compared to building separate native apps.

The development process is faster. Teams can launch features quickly, which reduces overall effort and helps to manage the Flutter app price more efficiently.

Flutter also works well for MVPs and long-term products. You can start with a basic version and scale it as your business grows. This flexibility helps to keep the cost to develop a Flutter app within a practical range while planning future expansion.

In simple terms, Flutter allows you to build more with less investment, making it a practical choice for startups and growing businesses managing their Flutter app cost.

What is the Average Cost to Develop a Flutter App in 2026?

The average Flutter app development cost in 2026 ranges from $15,000 to $150,000+. This wide range exists because every app is built with different goals, features, and technical requirements.

For businesses evaluating investment, this number alone is not enough. You need to understand what falls under each cost range and what you actually get at each level of spending.

Quick Cost Range Overview

Here’s the structured view of the cost to develop a Flutter app based on complexity, features, and business use:

TypeCostTimelineBest ForIncludes
Basic Flutter App$15,000 to $40,0006 to 10 weeksEarly-stage startups testing an idea
  • Simple user flows
  • Basic UI components
  • Limited backend logic
  • Minimal third-party integrations
Mid-Level Flutter App$40,000 to $80,00010 to 16 weeksGrowing startups or small businesses
  • User authentication and profiles
  • API integrations
  • Payment systems
  • Admin dashboards
  • Improved UI and responsiveness
Complex Flutter App$80,000 to $150,000+4 to 8 monthsFunded startups or enterprises
  • Real-time features
  • AI or data-driven functionalities
  • Advanced security functionalities
  • Advanced security layers
  • High-performance backend system
  • Scalable architecture

Why Flutter App Development Cost Varies

The cost of Flutter app development changes because no two applications are built the same way. Even small differences in requirements can significantly affect the final budget.

Here are the key factors that influence the Flutter app price:

  1. Feature Scope: The more features you add, the more development time is required. For example, adding real-time chat or AI recommendations can increase the overall Flutter app cost.
  2. Design Complexity: A simple design using standard components costs less. A custom-designed interface with animations and branding increases the cost to develop a Flutter app.
  3. Backend Development: Apps that require a custom backend system, databases, or cloud infrastructure will have higher development costs compared to apps using ready-made backend services.
  4. Third-party Integrations: Payment gateways, analytics tools, maps, and messaging services add both development effort and ongoing costs.
  5. Development Team Location: Hiring a developer in regions like India is more cost-effective compared to US or Europe. This directly impacts the total Flutter app development cost.

To put it simply, the cost works like a sliding scale. A focused MVP keeps your investment low and helps you launch faster. As you add features, integrations, and scalability, the Flutter app price increases accordingly.

Understanding these cost layers early helps you plan your budget more accurately and avoid unexpected expenses during development.

Flutter App Development Cost Breakdown by App Type

Flutter App Development Cost Breakdown by App Type

The Flutter app development cost becomes much clearer when you look at it based on the type of app you are planning to build. Each category represents a different level of complexity, user experience, and business goals.

Instead of thinking in numbers alone, it helps to understand what each level actually delivers.

Basic Flutter Apps (MVP or Internal Tools)

This is where most startups begin.

A basic app focuses on solving one specific problem with limited features. It is built to test an idea quickly and gather real user feedback without a large upfront investment.

You can expect:

  • Simple user flows with minimal screens.
  • Basic UI without heavy customization.
  • Limited backend or database logic.
  • Essential integrations only.

From a cost perspective, this keeps the cost to develop a Flutter app at the lower end because the development scope is controlled.

A good example would be an MVP for a new service where the goal is validation, not perfection.

Mid-Level Apps (eCommerce, Booking, Dashboards)

Once your idea is validated, the next step is building a product that users can actively engage with.

Mid-level apps introduce more structure and functionality. These apps are designed for real users and often include multiple user roles, integrations, and smoother user experiences.

You can expect:

  • User authentication and profile management.
  • API integrations for dynamic data.
  • Payment system and transactions.
  • Admin dashboards for control and analytics.
  • Better UI with improved usability.

At this stage, the cost of Flutter app development increases because the app is no longer just functional. It needs to be reliable, interactive, and scalable for growing users.

Complex Apps (Fintech, AI, Real-Time Systems)

This is where apps move from products to full platforms.

Complex apps require advanced architecture, strong security, and the ability to handle large volumes of users and data. These are built for businesses that need performance, scalability, and long-term growth.

You can expect:

  • Real-time features such as chat or live tracking.
  • AI or data-driven functionalities.
  • Advanced security and compliance layers.
  • Multi-user roles with permission control.
  • Scalable backend infrastructure.

Here, the Flutter app cost reflects more than just development time. It includes system design, performance optimization, and long-term reliability.

Each category is not separate. It is a progression. Most successful products do not start as complex platforms. They begin as simple versions, produce their value, and then expand.

This approach helps you manage the Flutter app price in stages instead of making a large investment upfront.

Know exactly what your app will cost

Flutter App Cost Table (Detailed Pricing Overview)

By now, you have a clear idea of how the Flutter app development cost changes based on app type.

This section brings everything together in a structured format so you can quickly estimate your budget from different angles.

Cost by App Type

This view helps you understand what you can expect based on the kind of products you are building.

App TypeKey FocusEstimated CostTimeline
Basic (MVP)Core functionality, idea validation$15,000 to $40,0006 to 8 weeks
Mid-LevelUser engagement, integrations$40,000 to $80,00010 to 16 weeks
ComplexScalability, performance, security$80,000 to $150,000+4 to 8 months

Cost by Development Stage

The cost to develop a Flutter app also depends on how far you take your product in the first phase.

Development StageWhat It IncludesCost Impact
MVPCore features onlyLower initial investment
Growth StageFeature expansion, integrationsModerate increase
Full ProductScalability, performance optimizationHigher total cost

Cost by Region

Where your development team is located plays a major role in the overall Flutter app price.

RegionAverage Hourly RateCost Impact
India$20 to $50Most cost-effective
Eastern Europe$40 to $90Balanced pricing
US/UK$80 to $150+Higher investment

What This Means for Your Budget

The cost of Flutter app development is not just about one number. It is a combination of what you build, how much you build, and who builds it.

A simple way to think about it:

  • App type defines your base cost.
  • Development stage defines how much you invest now vs later.
  • Team location defines your overall spending efficiency.

When you combine these three factors, you get a much more realistic view of your total Flutter app cost.

This structured approach helps you plan better and avoid unexpected budget increases as your project moves forward.

Get a precise Flutter app quote. We break down cost by feature, not by guesswork.

Book a Free Call

Flutter MVP Development Cost and Timeline for Startups

For most startups, building everything at once is not the right approach. That is why many begin with an MVP.

An MVP, or Minimum Viable Product, focuses on launching a usable version of your app with only the most important features. This helps you validate your idea without committing to a high Flutter app development cost from the start.

What a Flutter MVP Includes

A Flutter MVP is built with a clear goal. Launch fast and learn from real users.

Instead of adding every feature, the focus stays on care functionality.

A typical MVP includes:

  • Essential user flows to complete one main action.
  • Basic UI that is clean and functional.
  • Simple backend or database setup.
  • Limited integrations, such as login or basic APIs.

For example, if you are building a booking app, the MVP would include search, selection, and booking. Advanced filters or recommendations can come later.

This approach helps to keep the cost to develop a Flutter app within a manageable range.

Cost to Develop a Flutter MVP

The cost of Flutter app development for an MVP usually falls between $15,000 and $40,000.

This range depends on:

  • Number of core features.
  • Level of UI customization.
  • Backend requirements.
  • Development team location.

A well-planned MVP avoids unnecessary complexity. This ensures your Flutter app price stays aligned with your initial business goals.

Typical Development Timeline

Speed is one of the biggest advantages of building an MVP with Flutter.

A standard timeline looks like this:

  • Planning and requirement finalization: 1 to 2 weeks
  • UI design and prototyping: 1 to 2 weeks
  • Development and integration: 3 to 5 weeks
  • Testing and launch: 1 to 2 weeks

This means most MVPs can be launched within 6 to 10 weeks.

Why Start with an MVP

Starting small gives you more control over your Flutter app cost.

  • You reduce initial investment.
  • You validate your idea with real users.
  • You avoid building features that users may not need.

Think of it like testing a product in a small market before expanding. Once you have feedback and traction, you scale your app step by step.

This phased approach makes the Flutter app development cost more predictable and aligned with business growth.

Real-World Flutter App Cost Examples (Startup Scenarios)

Understanding the Flutter app development cost becomes easier when you see how it applies to real products. Instead of looking at ranges alone, these examples show what businesses typically build within a fixed budget.

Each scenario reflects a common startup use case and how the cost to develop a Flutter app is distributed.

Booking App Development Cost (Approx. $35,000)

A booking app is often the starting point of service-based startups.

Key features included:

  • User registration and login.
  • Search and filtering options.
  • Booking and scheduling system.
  • Payment gateway integration.
  • Basic admin panel.

Timeline: 8 to 12 weeks

Why this cost range: The Flutter app price stays moderate because the app focuses on structured workflows rather than complex logic. Most features are predictable and can be built using standard integrations.

AI Productivity App Cost (Approx. $55,000)

This type of app focuses on improving user efficiency using data or AI integration of features.

Key features included:

  • User dashboard and task management.
  • AI-based suggestions or automation.
  • API integration for AI services.
  • Data storage and analytics.
  • Clean and responsive UI.

Timeline: 10 to 16 weeks

Why this cost range: The cost of Flutter app development increases due to AI integration and backend processing. These features require additional development effort and testing.

Fintech App Development Cost (Approx. $90,000)

Fintech apps are among the most complex and sensitive applications.

Key features included:

  • Secure user authentication.
  • Payment and transaction systems.
  • KYC verification process.
  • Real-time data handling.
  • Admin controls and reporting.

Timeline: 4 to 6 months

Why this cost range: The Flutter app cost is higher due to strict security requirements, compliance standards, and reliable backend systems. Every feature must be built with precision and tested thoroughly.

What You Can Learn from These Examples

These scenarios show a clear pattern:

  • Simpler workflows keep the Flutter app development cost lower.
  • Advanced features like AI and real-time systems increase the budget.
  • Security and compliance significantly impact the Flutter app price.

Most importantly, you do not need to build everything at once. Start with a focused version, validate it, and expand based on user needs.

This approach helps you manage the cost to develop a Flutter app without taking unnecessary risks early on.

cost to develop a Flutter app

Flutter App Development Cost for Fintech Apps and Compliance

Fintech apps are different from standard applications. They deal with sensitive user data, financial transactions, and strict guidelines. Because of this, the Flutter app development cost for fintech products is usually higher than for other app types.

This is not just about adding features. It is about building trust, security, and compliance into every layer of the app.

Security Requirements and Their Cost Impact

Security is the foundation of any fintech app. Even a small gap can lead to serious risks.

Common security implementations include:

  • End-to-end data encryption.
  • Multi-factor authentication.
  • Secure APIs and token-based access.
  • Fraud detection mechanisms.
  • Data protection and storage standards.

Each of these adds development time and testing effort. This directly increases the cost of Flutter app development, but it is necessary for user trust and platform stability.

Compliance Costs (KYC, PCI DSS, GDPR)

Fintech apps must follow industry regulations based on the region they operate in.

Key compliance requirements include:

  • KYC (Know Your Customer) for identity verification.
  • PCI DSS for secure payment processing.
  • GDPR or similar data protection regulations.

Meeting these standards involves documentation, integrations, and regular audits. These factors increase the Flutter app price, but they are essential to operate legally and securely.

Banking and Payment Integrations

Most fintech apps rely on external systems to function.

Common integrations include:

  • Payment gateways and wallets.
  • Banking APIs.
  • Transaction processing systems.
  • Real-time financial data services.

These integrations require careful implementation and testing. They also introduce ongoing costs, which add to the total Flutter app cost over time.

Why Fintech Apps Cost More

The cost to develop a Flutter app in fintech is higher because you are not just building features. You are building a system that handles money, data, and compliance at scale.

  • Security layers increase development effort.
  • Compliance requirements add complexity.
  • Integrations require precision and reliability.

Think of it like building a secure vault instead of a regular room. The structure is similar, but the level of protection and planning is far more advanced.

For businesses entering fintech, it is important to plan the Flutter app development cost with these factors in mind. Cutting corners in this space can lead to bigger issues later, both technically and legally.

Key Factors That Affect Flutter App Development Cost

Key Factors That Affect Flutter App Development Cost

By now, you have seen different cost ranges and examples. To plan accurately, you need to understand what actually drives the Flutter app development cost.

Each of these factors below directly impacts how much time, effort, and budget your app will require.

App Complexity and Feature Scope

This is the most important factor when estimating the cost to develop a Flutter app.

Apps with basic functionality cost less. As you add advanced features, the development effort increases.

Features that impact cost include:

  • User authentication and profile management.
  • Real-time features like chat or live tracking.
  • Payment processing and transaction systems.

The broader your feature set, the higher the overall Flutter app cost.

UI/UX Design Complexity

Design plays a key role in both user experience and development effort.

A simple interface built with standard templates keeps the Flutter app price lower. Custom designs with unique layouts, branding, and animations require more design and development time.

Design levels:

  • Template-based UI for faster development.
  • Custom UI for brand consistency.
  • Advanced UI with animations and transitions.

Platform Coverage (Mobile, Web, Desktop)

Flutter allows you to build apps for multiple platforms, but each platform adds additional work.

If your app is limited to mobile, the cost of Flutter app development stays lower. Expanding to the web or desktop increases development, testing, and optimization efforts.

Backend Development and Architecture

The backend manages data, user interactions, and system logic.

Using ready-made solutions such as Backend-as-a-Service can reduce the Flutter app development cost. Building a custom backend with a scalable architecture increases both cost and development time.

Backend options:

  • BaaS for faster and cost-effective setup.
  • Customer backend for flexibility and scalability.

Third-Party Integrations

Most apps rely on external services to function efficiently.

Integrating APIs such as payment gateways, analytics tools, or communication services adds to the Flutter app price. Some services also introduce ongoing costs.

Development Team Location and Structure

Your choice of development team significantly affects the cost to develop a Flutter app.

Common options include:

  • Freelancers for smaller projects.
  • Agencies for structured development.
  • In-house teams for long-term projects.

Hiring in regions like India is more cost-effective compared to the US or Europe, which directly impacts the total Flutter app cost.

Security and Compliance Requirements

Apps that handle sensitive data require strong security measures.

Adding features such as encryption, secure authentication, and compliance standards increases the cost of Flutter app development, especially for industries like Fintech or healthcare.

Each of these factors works together to define your final budget. Understanding them early helps you prioritize features and manage your Flutter app development costs more effectively.

optimize your Flutter app cost

Flutter vs React Native Cost Comparison for Startups

Flutter vs React Native Cost Comparison for Startups

Choosing the right framework is not just a technical decision. It directly affects your budget, timeline, and long-term maintenance. For many startups, the comparison often comes down to Flutter and React Native.

Both are strong cross-platform frameworks, but their impact on the Flutter app development cost and overall investment can differ based on your project needs.

Development Cost and Time Comparison

Flutter uses a single codebase with a rich set of built-in components. This reduces dependency on external libraries and speeds up development.

React Native relies more on third-party libraries, which can sometimes increase development efforts.

What this means for cost:

  • Flutter can reduce the development hours, helping control the cost to develop a Flutter app.
  • React Native may require additional setup and integration effort in some cases.

For startups working with limited budgets, faster development often translates into better cost efficiency.

Maintenance and Long-Term Cost

Building the app is only one part of the investment. Ongoing maintenance also impacts the total Flutter app cost.

Flutter offers more consistency across platforms, which makes updates and bug fixes easier to manage. React Native apps may require more platform-specific adjustments over time.

Cost impact:

  • Flutter can reduce long-term maintenance effort.
  • React Native may involve additional work for platform-specific issues.

Which is More Cost-Effective for Startups

From a startup’s perspective, the goal is to build fast, launch early, and scale efficiently.

Flutter is often preferred when:

  • You want faster development with a single team.
  • You need a consistent UI across platforms.
  • You want to manage the Flutter app price within a controlled budget.

React Native can still be a good option if your team already has strong JavaScript expertise or specific project requirements.

Both frameworks can deliver quality apps, but Flutter often provides better control over the cost of Flutter app development due to faster development cycles and simpler maintenance.

For startups focused on speed and cost efficiency, Flutter is usually the more practical choice.

Flutter Developer Rates by Region (India vs US vs Europe)

The location of your development team has a direct impact on Flutter app development cost. The same app can cost significantly different amounts depending on where your developers are based.

Understanding regional pricing helps you make a smarter decision based on your budget and project needs.

Cost of Hiring Flutter Developers in India

India is one of the most preferred destinations for outsourcing app development or hiring Flutter developers.

Average hourly rate: $20 to $50

Why businesses choose India:

  • Cost-effective development without compromising quality.
  • Large pool of experienced Flutter developers.
  • Flexible hiring models for startups and growing businesses.

For startups, this option helps reduce the cost to develop a Flutter app while still maintaining development speed and quality.

Cost in the US and Western Markets

Developers in the US, UK, and Western Europe typically charge higher rates.

Average hourly rates: $80 to $150+

What you get at this cost:

  • Strong communication and local collaboration.
  • Access to experienced teams for complex projects.
  • Higher operational and development costs.

This significantly increases the overall Flutter app price, especially for long-term projects.

Offshore vs Onshore Development: What Works Better

Choosing between offshore and onshore development depends on your priorities.

Offshore (India, Eastern Europe):

  • Lower development cost
  • Suitable for startups with budget constraints
  • Requires proper communication and project management

Onshore (US, UK):

  • Easier collaboration
  • Faster communication
  • Higher Flutter app cost

What This Means for Your Budget

The development location can change your total cost of Flutter app development by two to three times.

  • Offshore teams help you stay within budget.
  • Onshore teams offer closer collaboration but at a higher price.

For many startups, a hybrid approach works well. You can manage strategy locally while outsourcing development to control the Flutter app development cost effectively.

What You Get at Different Flutter App Budget Levels

Understanding the Flutter app development cost becomes easier when you look at it from a budget perspective. Instead of guessing what your investment will deliver, this section shows what you can realistically expect at different price points.

$30,000 Budget

At this level, the focus is on building a functional MVP that can be launched quickly.

What you typically get:

  • Core features built around a single use case.
  • Basic but clean UI.
  • Simple backend setup.
  • Limited third-party setup.

Best suited for:

Startups testing an idea or entering the market for the first time.

At this stage, the cost to develop a Flutter app is controlled by keeping the scope limited and focused.

$50,000 to $80,000 Budget

This range allows you to build more complete and user-ready products.

What you typically get:

  • Multiple features and user flows.
  • User authentication and profile management.
  • Payment gateway integration.
  • API-based architecture.
  • Improved UI and user experience.

Best suited for:

Startups and businesses are launching a product for real users.

Here, the cost of Flutter app development reflects a balance between functionality and scalability.

$100,000+ Budget

At this level, you are building a scalable platform rather than just an app.

What you typically get:

  • Advanced features such as real-time systems or AI.
  • Strong backend architecture for scalability.
  • High-level security and performance optimization.
  • Multi-user roles and complex workflows.

Best suited for:

Funded startups, enterprises, or businesses with long-term growth plans.

The Flutter app cost in this range includes not just development but also system design and future scalability.

How to Approach Your Budget

Your budget should align with your business stage, not just your idea.

  • Start small if you are validating a concept.
  • Invest more once you see traction.
  • Scale features based on user demand.

This approach helps you manage the Flutter app price step by step instead of committing to a large upfront investment.

In simple terms, your budget defines how much of your product you build today and how much you plan for tomorrow.

Flutter App Maintenance and Ongoing Costs

Building your app is only the first step. To keep it running smoothly, you need to plan for ongoing expenses as well.

The Flutter app development cost does not end at launch. Maintenance, updates, and scaling all contribute to the long-term Flutter app cost.

Monthly and Annual Maintenance Cost

Most businesses spend 15% to 25% of the initial development cost annually on maintenance.

What this includes:

  • Bug fixes and performance improvements.
  • OS and device compatibility updates.
  • Minor feature updates.
  • Security patches.

For example, if your initial cost to develop a Flutter app was $40,000, your yearly maintenance could range between $6,000 and $10,000.

Hidden Costs You Should Plan For

Some costs are not obvious during development but become important after launch.

Common hidden costs include:

  • Cloud hosting and server changes.
  • Third-party API subscriptions.
  • Analytics and monitoring tools.
  • App store fees and renewals.

These ongoing expenses directly affect the total Flutter app price over time.

Scaling Cost as Your App Grows

As your user base increases, your app needs to handle more traffic and data.

Scaling may require:

  • Upgrading server infrastructure.
  • Improving backend performance.
  • Adding new features based on user demand.
  • Enhancing security measures.

This is where the long-term cost of Flutter app development evolves. The more your app grows, the more resources it requires.

What This Means for Your Budget

Many businesses focus only on development and overlook maintenance.

A better approach is to plan both upfront and ongoing costs together.

  • Development cost builds your app.
  • Maintenance costs keep it running.
  • Scaling cost supports growth.

When you account for all three, your Flutter app development cost becomes more predictable and easier to manage over time.

How to Estimate Your Flutter App Development Cost

How to Estimate Your Flutter App Development Cost

Estimating the Flutter app development cost is not about guessing a number. It is about breaking your idea into measurable components so you can assign realistic time, effort, and budget to each part.

A structured estimation helps to avoid under-budgeting or over-investing early.

Step 1. Define Your App Goals

Start with a clear product vision.

Ask:

  • What problem does your app solve?
  • Who will use it?
  • What is the primary action users should complete?

These steps help you avoid unnecessary features that increase the cost to develop a Flutter app without adding real value.

Example:

If your goal is booking services, your core focus should be search, selection, and booking. Not advanced analytics or AI at the start.

Step 2. Break Down Features into Modules

Instead of listing features broadly, divide them into smaller modules.

Common modules include:

  • User authentication
  • Dashboard or home screen
  • Search and filters
  • Payments or transactions
  • Notifications

Each module requires design, development, and testing. The more modules you include, the higher the Flutter app cost.

Tip:

Classify features into:

  • Must-have (for launch)
  • Nice-to-have (post-launch)

Step 3. Define Technical Requirements

Your technical choices directly impact the cost of Flutter app development.

Consider:

  • Will you use a simple backend or a custom-built system?
  • Do you need real-time features?
  • Are third-party integrations required?

Example:

Using ready-made backend services can reduce initial cost, while custom architecture increases flexibility but also increases budget.

Step 4. Estimate Development Time

Once the feature and technical scope are clear, estimate how long each module will take.

A typical breakdown looks like:

  • UI/UX design: 15% to 20% of total effort
  • Frontend development: 30% to 40%
  • Backend development: 20% to 30%
  • Testing and deployment: 15% to 20%

More time means a higher Flutter app price, especially if you are working with hourly rates.

Step 5. Apply Hourly Rates Based on Region

Multiply estimated hours by developer rates.

Example calculation:

  • Total estimated effort: 800 hours
  • Developer rate: $30 per hour

Estimated cost: $24,000

This step gives you a practical estimate of the cost to develop a Flutter app based on real effort.

Step 6. Add Buffer for Unexpected Costs

Every project has uncertainties.

Add a buffer of 10% to 20% to your estimate to cover.

  • Scope changes
  • Additional features
  • Technical challenges

This ensures your total Flutter app development cost stays realistic.

Example: Estimating a Mid-Level App

Let’s say you are building a mid-level booking app:

  • Features: Authentication, search, booking, payments
  • Backend: API-based system
  • Timeline: 12 weeks
  • Team: Offshore agency

Estimated cost range: $35,000 to $60,000

This aligns with typical market pricing and gives you a realistic expectation of the Fluuter app cost.

What This Means for Your Planning

A proper estimation is like creating a blueprint before construction.

  • It helps you control your budget.
  • It prevents feature overload.
  • It aligns development with business goals.

When you break your app into clear components, the Flutter app development cost becomes predictable instead of uncertain.

Cost-Saving Strategies for Flutter App Development

Cost-Saving Strategies for Flutter App Development


Managing the Flutter app development cost is not just about reducing expenses. It is about making smarter decisions, so you get the best outcome within your budget.

Here are practical strategies that help you control the cost to develop a Flutter app without affecting quality.

Start with an MVP Approach

Building everything at once increases risk and cost.

Start with a Minimum Viable Product that includes only the most important features. This allows you to launch faster and validate your idea before investing more.

Impact on cost:

  • Reduces initial Flutter app cost.
  • Avoids spending on unused features.
  • Helps you invest based on real user feedback.

Prioritize Business-Critical Features

Not every feature needs to be built in the first version.

Focus on what directly supports your business goal and user needs.

How to approach this:

  • Identify must-have features for launch.
  • Delay advanced or optional features.
  • Build in phases instead of all at once.

This keeps the cost of Flutter app development aligned with actual business value.

Use Pre-Built Components and Libraries

Flutter has a strong ecosystem with reusable components.

Instead of building everything from scratch, use existing libraries for common functionalities.

Examples:

  • UI components
  • Authentication systems
  • Payment integrations

This reduces development time and lowers the overall Flutter app price.

Choose the Right Development Partner

Your development team can either control or increase your costs.

An experienced team will:

  • Estimate accurately.
  • Avoid unnecessary rework.
  • Deliver within timelines.

Choosing the right partner helps you manage the Flutter app development cost more effectively.

Optimize Development Timeline

Time directly costs, especially with hourly billing.

Ways to optimize:

  • Finalize requirements before development.
  • Avoid frequent scope changes.
  • Maintain clear communication with the team.

A well-managed timeline helps to keep the Flutter app cost predictable.

Plan for Scalability in Phase

Instead of building a fully scalable system from day one, scale gradually.

  • Start with a basic infrastructure.
  • Upgrade as user demand grows.

This approach spreads the cost to develop a Flutter app over time and reduces initial investment.

What This Means for Your Budget

Cost-saving is not about cutting corners. It is about building smart.

  • Focus on what matters first.
  • Use available resources efficiently.
  • Scale based on real demand.

When you follow these strategies, the Flutter app development cost becomes easier to manage while still delivering a strong product.

Is Flutter Worth the Cost for App Development in 2026?

After understanding the full Flutter app development cost, the real question is whether the investment delivers value.

The answer depends on what you expect from your app. For most startups and businesses, Flutter offers a strong balance between cost, speed, and scalability.

Where Flutter Justifies Its Cost

Flutter is not just about saving money upfront. It helps to reduce overall development effort across the product lifecycle.

Key advantages include:

  • Single codebase for multiple platforms reduces duplication.
  • Faster development cycles lower the total project cost.
  • Consistent UI across devices improves user experience.
  • Easier updates help to control the long-term Flutter app cost.

This means the cost of Flutter app development often delivers more output compared to traditional approaches.

ROI from a Business Perspective

The real value of any app lies in how quickly it reaches users and starts generating returns.

Flutter helps in:

  • Faster time to market.
  • Lower initial investment for MVPs.
  • Easier scaling as your business grows.

For startups, this makes the cost to develop a Flutter app more manageable and aligned with growth stages.

When Flutter Makes the Most Sense

Flutter is a strong choice if:

  • You want to launch on Android and iOS together.
  • You are working with a limited or controlled budget.
  • You plan to start with an MVP and scale gradually.
  • You need a consistent user experience across platforms.

In these scenarios, the Flutter app price remains justified because you reduce both development time and future costs.

When to Reconsider

While Flutter fits most use cases, there are situations where alternatives may be considered:

  • Highly platform-specific applications.
  • Projects requiring deep native integrations.
  • Extremely complex hardware-level interactions.

Even in these cases, the decision should be based on technical needs, not just the Flutter app development cost.

Final Thoughts

The Flutter app development cost is not just an expense. It is an investment in how fast you can launch, how well your app performs, and how easily you can scale.

If your goal is to build a high-quality app without doubling development effort, Flutter offers a practical path. It helps you move from idea to launch faster while keeping the cost to develop a Flutter app under control.

For most startups and growing businesses, this balance makes the cost of Flutter app development a smart and sustainable choice.

Now the real question is how much it costs. It is how efficiently you want to build.

If you are planning your app, this is the right time to get clarity on your budget and scope.

  • Get a tailored Flutter app cost estimate based on your ideas and features.
  • Know your exact investment, timeline, and roadmap before you start.

The sooner you define your budget, the faster you can move from planning to launch.

Start Your Project

eCommerce PWA Development: Benefits, Cost, and Platform Comparison

Introduction

Is your eCommerce store delivering the fast and smooth experience that today’s users expect?

Most online stores struggle to maintain performance, especially on mobile devices. Pages take too much time to load, navigation feels slow, and users often leave before completing a purchase. Even a small delay can affect engagement and conversions.

This is where progressive web app eCommerce offers a practical approach. It combines the speed of modern web technology with the experience of a mobile application, without requiring users to install anything.

Businesses are increasingly choosing eCommerce PWA development to improve site performance and create a better user journey. It allows faster loading, supports offline browsing, and keeps users engaged across sessions.

In this blog, you will understand how progressive web apps for eCommerce work, what benefits they offer, how they compare with other options, and how to decide if this approach fits your business goals.

ecommerce progressive web app solution focused on speed and conversion improvement

What is Progressive Web App eCommerce?

A progressive web app eCommerce solution is a web-based store that works like a mobile application while running in a browser. It combines fast loading, smooth navigation, and app-like interaction without requiring users to download anything.

In simple terms, it turns your regular eCommerce industry website into a faster and more responsive experience, especially for mobile users.

Example: A user visits your store, browses products, adds items to the cart, and returns later. With a PWA, the site loads instantly, remembers their activity, and continues the experience without delays.

How It Works

A PWA uses modern web technologies to improve performance and reliability.

  • Loads pages quickly using cached data.
  • Works even with slow or unstable internet.
  • Runs in the browser but feels like a mobile app.
  • Can be accessed directly without app store installation.

Key Characteristics of Progressive Web Apps for eCommerce

FeatureWhat It Means for Your Store
Fast LoadingPages open quickly, reducing bounce rate
Offline AccessUsers can browse limited content without an internet connection
App-like ExperienceSmooth navigation similar to mobile apps
No Installation NeededUsers access directly through the browser
Cross-Device CompatibilityWorks on mobile, tablet, and desktop

Why It Matters

Traditional websites often struggle to deliver consistent performance across devices. On the other hand, native apps require installation, which many users avoid.

This is where progressive web apps for eCommerce provide balance. They offer speed, accessibility, and usability without adding friction to the user journey.

Why Businesses Are Investing in eCommerce PWA Development

diagram showing benefits of ecommerce progressive web apps including speed seo and user experience

Many eCommerce businesses are rethinking how their websites perform, especially on mobile. Slow loading, high bounce rates, and poor user engagement are common issues that directly affect sales.

This is why eCommerce PWA development is becoming a preferred choice. It helps businesses improve performance without forcing users to install an app.

Key Reasons Behind This Shift

Businesses are moving towards progressive web app eCommerce for practical and measurable benefits.

  • Faster page loading improves user retention.
  • A better mobile experience increases time spent on the site.
  • Reduced dependency on app downloads.
  • Lower development and maintenance costs compared to native apps.
  • Improved conversion rates due to smoother navigation.

Business Impact of Progressive Web Apps for eCommerce

AreasImpact on Business
User ExperienceFaster browsing and smoother interactions
Conversion RateHigher chance of completing purchases
EngagementUsers stay longer and explore more products
Cost EfficiencyOne solution works across all devices
ScalabilityEasier to handle growing traffic and features

Real Problem It Solves

Most users leave a website if it takes more than a few seconds to load. A PWA reduces this delay and keeps this delay and keeps the experience consistent.

Think of it like upgrading from a slow-moving queue to a fast checkout counter. The process becomes quicker, and users are more likely to complete their purchase.

Why It Matters Now

Mobile traffic dominates eCommerce. If your store is not optimized for speed and usability, you risk losing potential customers.

By adopting progressive web apps for eCommerce, businesses can provide a faster, more reliable experience that meets modern user expectations.

Key Benefits of Progressive Web Apps for eCommerce

key features of progressive web apps for ecommerce such as fast loading offline access and smooth navigation

Adopting progressive web apps for eCommerce improves more than just loading speed. It changes how users interact with your store from the first visit to checkout. A faster and smoother experience often leads to better engagement and stronger conversion performance.

Below are the key benefits explained with more clarity and context.

Faster Loading Experience

Speed directly affects user behavior. Even a short delay can cause users to leave before exploring products.

PWAs use caching techniques to store important data in the browser. This allows pages to load much faster after the first visit.

  • Reduces initial load time and repeat visit delays.
  • Improves product page access speed.
  • Helps lower bounce rates.

Faster loading creates a strong first impression and keeps users engaged.

Smooth App-Like Navigation

Traditional websites reload pages frequently, which slows down browsing. PWAs avoid this by loading content dynamically.

  • Users can move between pages without interruptions.
  • Navigation feels quick and responsive.
  • Product browning becomes more comfortable.

This creates an experience similar to using a mobile app, which users are already familiar with.

Offline Browsing Capability

One of the practical advantages of PWAs is their ability to work with limited connectivity.

PWAs store previously accessed data, allowing users to continue browsing even when the internet is slow or temporarily unavailable.

  • Users can view saved product pages.
  • Reduces drop-offs due to network issues.
  • Improve accessibility in low-connectivity areas.

This ensures users are not completely disconnected from your store.

Improved User Engagement

A better experience encourages users to stay longer and interact more.

PWAs support features like push notifications, which help bring users back to your store.

  • Send updates about offers and new products.
  • Remind users about abandoned carts.
  • Encourage repeat visits.

Consistent engagement increases the chances of conversion over time.

Higher Conversion Potential

When the buying process feels simple and fast, users are more likely to complete their purchase.

PWAs reduce friction across the user journey.

  • Faster product discovery.
  • Smooth cart and checkout process.
  • Fewer interruptions during browsing.

This leads to improved conversion rates and better overall performance.

Cost Efficiency Compared to Native Apps

With eCommerce PWA development, businesses can avoid building separate applications for different platforms.

ApproachCost and EffortBusiness Impact
PWAOne-time development for all devicesBalanced cost and performance
Native AppsSeparate apps for Android and iOSHigher cost and maintenance
Traditional WebsiteLower cost but limited featuresLower engagement

PWAs offer a balanced approach between cost and functionality.

Cross-Device Compatibility

PWAs are designed to work across all screen sizes and devices.

  • Mobile phones
  • Tablets
  • Desktop systems

This ensures a consistent experience for every user without additional development effort.

Each benefit supports a single outcome. Creating a faster, smoother, and more reliable shopping experience. When users can browse delays and interact easily with your store, they are more likely to stay longer and complete their purchase.

improving ecommerce website speed and user experience using progressive web app technology

eCommerce PWA Performance and Core Web Vitals Improvement

Performance is not just a technical metric. It directly shapes how users experience your store and whether they stay long enough to make a purchase. This is one of the main reasons businesses invest in eCommerce PWA development.

A faster website improves engagement, reduces drop-offs, and also supports better search visibility.

What Are Core Web Vitals

Core Web Vitals are performance metrics defined by Google. They measure how real users experience your website in terms of loading speed, responsiveness, and visual stability.

Here are the three key metrics:

  • Largest Contentful Paint (LCP) – Measures how quickly the main content of a page becomes visible. Ideal target: within 2.5 seconds
  • Cumulative Layout Shift (CLS) – Tracks unexpected layout movement while the page is loading. Ideal target: less than 0.1
  • Interaction to Next Paint (INP) – Measures how quickly the site responds when a user clicks or interacts. Lower values indicate better responsiveness.

These metrics are important because they reflect actual user experience, not just backend performance.

How Progressive Web App eCommerce Improves Performance

A progressive web app eCommerce setup uses modern technologies to improve how quickly and smoothly your site works.

Key improvements include:

  • Smart Caching – Stores important assets in the browser so repeat visits load instantly.
  • Lazy Loading – Loads only the required content first, reducing initial load time.
  • Service Workers – Handle background processes like caching and offline access.
  • Dynamic Rendering – Updates content without reloading the entire page.

Together, these reduce delays and create a more responsive browsing experience.

Performance Benchmark Comparison

MetricTraditional WebsitePWA-Based Store
Initial Load Time3-6 seconds1-2 seconds
Repeat Visit SpeedModerateVery fast due to caching
LCPOften delayedFaster content display
CLSLayout shifts possibleStable layout
INPSlower interaction responseQuick interaction feedback
Bounce RateHigher due to delaysLower due to a smooth experience

Note: Results vary based on the implementation quality and optimization.

Real Impact on eCommerce Performance

Improving Core Web Vitals leads to measurable business outcomes:

  • Faster pages keep users engaged longer.
  • Stable layouts reduce accidental clicks and frustration.
  • Quick response improves trust during checkout.
  • Better performance supports higher rankings in search results.

Even a one-second improvement in load time can increase conversions significantly.

Practical Example

Imagine a user opens your product page on a mobile device.

  • On the traditional site, images load slowly, layout shifts, and buttons respond late.
  • On a PWA, the page loads quickly, elements stay stable, and interactions feel instant.

This difference directly affects whether the user continues browsing or leaves.

Performance is a key driver of user experience and revenue. By using progressive web apps for eCommerce, businesses can improve Core Web Vitals, deliver faster interactions, and create a more reliable shopping experience that encourages users to stay and convert.

PWA vs Native App vs Responsive Website for eCommerce

Choosing the right approach for your eCommerce store depends on performance, cost, and user experience. Many businesses struggle to decide between a traditional website, a native mobile app, or a PWA.

This is where eCommerce PWA development stands out as a balanced option.

  • Responsive Website: A standard responsive website that adjusts to different screen sizes. Easy to build, but limited in performance and engagement.
  • Native Mobile App: Built separately for Android and iOS. Offers strong performance but requires installation and a higher investment.
  • Progressive Web App (PWA): Runs in the browser but delivers an app-like experience with better speed and usability.

Detailed Comparison

FactorResponsive WebsitePWANative App
User AccessDirect via browserDirect via browserRequires app installation
PerformanceModerateHighVery high
Development CostLowMediumHigh
MaintenanceSimpleModerateComplex (multiple platforms)
Offline AccessNot supportedSupported (limited)Fully supported
User ExperienceBasicApp-likeFully app-like
UpdatesInstantInstantRequired app updates
EngagementLowerHigherHighest

Cost Comparison Overview

ApproachEstimated Cost Range
Responsive WebsiteLower cost option
PWA$20,000-$60,000
Native App$50,000-$150,000

Note: Cast depends on feature, complexity, and development approach.

When to Choose Each Option

A responsive website is suitable when:

  • You have a limited budget.
  • You need a basic online presence.
  • Advanced features are not required.

PWA is suitable when:

  • You want better performance without building a full app.
  • Your audience is mostly mobile users.
  • You want faster loading and improved engagement.

Native App is suitable when:

  • You need advanced device features.
  • Your business relies heavily on app-based interactions.
  • Budget is not a constraint.

Why Many Businesses Prefer PWA

A progressive web app eCommerce approach offers a practical middle ground.

It combines:

  • The accessibility of a website.
  • The performance of an app.
  • And a more manageable development cost.

This makes it a strong choice for businesses looking to improve user experience without the complexity of native app development.

Simple Way to Understand It

A responsive website is like a basic store.

A native app is like a premium in-store experience, but requires effort to enter.

A PWA offers a fast and smooth experience without adding extra steps for users.

Each option has its place, but for many growing businesses, progressive web apps for eCommerce provide the right balance of performance, cost, and usability.

comparison between progressive web app and native app for ecommerce decision making

Cost of eCommerce PWA Development

Understanding the cost of eCommerce development helps you plan better and avoid unexpected expenses. While PWAs are more affordable than native apps, the final cost depends on how advanced your store needs to be.

Instead of looking at cost as a fixed number, it’s better to understand what you are paying for and how it impacts your business.

Average Cost Range

The investment varies based on eCommerce features, integrations, and scalability requirements.

Solution LevelEstimated CostWhat You Get
Basic PWA$20,000-$30,000Simple store, limited features, basic UI
Mid-level PWA$30,000-$60,000Custom UI, integrations, better performance
Advanced PWA$60,000+Scalable architecture, advanced features, high performance
Native App (for comparison)$50,000-$150,000Separate apps for Android or iOS

These ranges give a realistic view of where your project might fall.

What Drives the Cost

factors influencing progressive web app development cost including design backend and integrations

The cost of progressive web app eCommerce development depends on multiple layers. Each layer adds value but also increases effort.

1. Features and Functionality

More features require more development time.

  • Product filters and advanced search.
  • User accounts and order tracking.
  • Wishlist and personalization.
  • Multi-language or multi-currency support.

2. Design and User Experience

A well-designed interface improves usability and conversions.

  • Custom layouts
  • Mobile-first design approach
  • Smooth navigation and transitions

3. Backend and Integrations

Your PWA needs to connect with other systems.

  • Payment gateways
  • Inventory management
  • CRM and order systems
  • Third-party APIs

4. Platform and Architecture Choice

Your technical approach affects both cost and flexibility.

  • Shopify with a headless setup.
  • Magento with PWA Studio.
  • Fully custom-built solution.

5. Performance Optimization

Improving speed and Core Web Vitals requires additional work.

  • Code optimization
  • Image and asset compression
  • Caching strategies

Cost Breakdown by Development Area

Development AreaCost ImpactWhy It Matters
Frontend DevelopmentMedium to highControls user experience and speed
Backend DevelopmentHighManages data, logic, and integrations
API IntegrationMediumConnects external tools and services
UI/UX DesignMediumImproved usability and engagement
Testing and OptimizationMediumEnsures stability and performance
MaintenanceOngoingKeeps the system updated and secure

PWA vs Native App: Cost Perspective

One of the biggest advantages of progressive web apps for eCommerce is cost efficiency over time.

  • A single PWA works across all devices.
  • No need for separate Android and iOS development.
  • Updates are easier and faster to deploy.

In contrast, native apps require separate builds, higher maintenance, and ongoing updates for each platform.

Long-Term Business Value

The initial cost is only one part of the decision. A well-built PWA can easily generate returns over time.

  • Faster performance can increase conversion rates.
  • A better user experience can improve retention.
  • Scalable architecture supports future growth.

This makes PWA a practical investment rather than just a development expense.

Simple Way to Understand It

Think of it like building a store.

A basic setup gets you started. A well-designed and optimized more customers and keeps them engaged.

The same applies to eCommerce PWA development. The more you invest in performance and experience, the better the outcome.

The cost of progressive web app eCommerce development depends on your goals, features, and scale.

However, it offers a balanced approach with strong performance, lower long-term costs, and flexibility across devices.

estimated cost of building a progressive web app for an ecommerce store based on features and platform

Shopify PWA Development Options

Many businesses follow effective Shopify development to run their online store. To build a progressive web app eCommerce experience, you need to use specific approaches.

The good part is that there are multiple ways to implement PWA on Shopify, depending on your business needs and budget.

Why Shopify Needs Additional Setup for PWA

Shopify themes are designed for responsive websites, not full PWA functionality.

This means:

  • Limited offline support.
  • No built-in service workers.
  • Basic performance optimization.

To achieve true eCommerce PWA development, you need to extend Shopify using modern techniques.

Shopify PWA Development Approaches

Here are the most common ways to build a PWA on Shopify:

1. Headless Shopify (Recommended for Scalability)

In this approach, Shopify is used as a backend while the frontend is built separately using modern frameworks.

  • Frontend built using React or similar technologies.
  • Uses APIs to fetch data from Shopify.
  • Full control over performance and user experience/

Best for:

Businesses that need flexibility, speed, and advanced features.

2. PWA Themes and Plugins

Some tools and themes add partial PWA functionality to Shopify stores.

  • Faster setup compared to headless.
  • Adds basic features like caching and push notifications.
  • Limited customization options.

Best for:

Small to mid-sized businesses looking for a quicker solution.

3. Custom PWA Layer Over Shopify

This involves building a custom frontend layer while keeping Shopify as the core system.

  • Combines performance with existing Shopify features.
  • Allows better control than plugins.
  • Requires moderate development effort.

Best for:

Businesses that want improved performance without a full headless setup.

Comparison of Shopify PWA Options

ApproachFlexibilityCostPerformanceBest Use Case
Headless ShopifyHighMedium to highHighGrowing and large stores
PWA Plugins/ThemesLowLowModerateSmall businesses
Custom PWA LayerMediumMediumHighMid-sized businesses

Challenges to Consider

While Shopify PWA development offers benefits, there are some challenges:

  • Requires technical expertise for setup.
  • Higher initial cost for the headless approach.
  • Dependency on APIs for data handling.

Understanding these factors helps in making the right decision.

Why Businesses Choose Shopify PWA

Despite the extra setup, many businesses prefer Shopify for PWA because:

  • Strong backend and ecosystem.
  • Reliable payment and order management.
  • Easy scalability with the right architecture.

When combined with progressive web apps for eCommerce, Shopify can deliver a fast and modern shopping experience.

Shopify can support PWA development, but it requires the right approach.

Choosing between headless, plugins, or a custom setup depends on your business goals, budget, and performance expectations.

Magento Progressive Web App Development with PWA Studio

For businesses that need more flexibility and control, Magento is often a preferred choice. It offers built-in support for PWA through its official tool called Magento PWA Studio.

This makes progressive web app eCommerce development more structured compared to other platforms.

What is Magento PWA Studio

Magento PWA Studio is a set of tools and libraries designed to help developers build fast and scalable PWAs on top of Magento.

It includes:

  • Pre-built components for storefront development.
  • Tools for managing data and APIs.
  • Support for modern frontend frameworks.

In simple terms, it acts as a foundation for building a high-performance PWA store.

How it Works

Magento follows a headless approach for PWA development.

  • Backend handles products, orders, and data.
  • Frontend is built separately using modern technologies.
  • APIs connect both layers smoothly.

This setup improves speed, flexibility, and user experience.

Key Features of Magento PWA Development

Magento provides strong capabilities for eCommerce PWA development, especially for complex stores.

  • Advanced product management
  • Support for large catalogs
  • Flexible customization options
  • Strong API support
  • Scalable architecture for high traffic

Benefits for eCommerce Businesses

Using Magento with PWA Studio offers several advantages:

  • Better performance for large and complex stores.
  • More control over frontend design and functionality.
  • Ability to handle high traffic and transactions.
  • Improved user experience across devices.

When to Choose Magento PWA

Magento PWA is a good fit when:

  • Your store has a large product catalog.
  • You need advanced customization.
  • Your business expects high traffic,
  • You require strong backend capabilities

Comparison with Shopify PWA Approach

FactorMagento PWAShopify PWA
FlexibilityHighMedium
CustomizationAdvancedLimited to approach
Setup ComplexityHighMedium
ScalabilityStrongModerate to high
Development EffortHigherLower compared to Magento

Things to Consider

While Magento offers strong capabilities, it also comes with:

  • Higher development complexity.
  • Need for experienced developers.
  • Longer setup time.

These factors should be considered before choosing the platform.

Magento, combined with PWA Studio, provides a powerful solution for businesses that need scalability and deep customization.

For advanced progressive web apps for eCommerce, it offers flexibility and performance that can support long-term growth.

How Push Notifications in PWA Improve eCommerce Conversions

process of sending push notifications from server to user device in ecommerce progressive web app

Push notifications are one of the most practical features of progressive web apps for eCommerce. They allow you to connect with users even after they leave your website.

Unlike emails, which often go unread, push notifications appear directly on the user’s device. This makes them more visible and timely.

What Are PWA Push Notifications

Push notifications are short messages sent to users who have allowed notifications from your website.

They can appear on:

  • Mobile devices
  • Desktop browsers

Users do not need to install an app. Once they opt in, you can send updates anytime.

How They Work in eCommerce PWA

In a progressive web app eCommerce setup:

  • Users visit your store and allow notifications.
  • Their browser stores permissions using service workers.
  • You can send messages based on user behavior.

This creates a direct communication channel with your audience.

Key Use Cases for eCommerce

Push notifications can be used at different stages of the customer journey.

  • Cart Reminders: Remind users about products left in the cart.
  • Offers and Discounts: Share limited-time deals to drive quick action.
  • Product Updates: Keep users informed about delivery status.
  • New Arrivals: Bring users back to explore new products.

Impact on Conversions

Push notifications help to improve conversions by bringing users back at the right time.

Use CaseImpact on Business
Cart RecoveryReduces abandoned carts
OffersIncreases purchase intent
Re-engagementDrives repeat visits
Timely UpdatesBuilds user trust

Why They Are Effective

Push notifications work because they are:

  • Immediate and direct
  • Easy to Access
  • Based on user actions and preferences

This makes them more effective than many traditional channels.

Best Practices to Follow

To get the best results from eCommerce PWA development, notifications should be used carefully:

  • Send relevant and timely messages.
  • Avoid sending too many notifications.
  • Personalized based on user behavior.
  • Use clear and simple language.

Simple Example

A user adds a product to the cart but leaves without buying. Later, they receive a notification with a reminder or a small discount. This increases the chances of them returning and completing the purchase.

Push notifications are a strong engagement tool within progressive web app eCommerce. When used correctly, they help bring users back, improve interaction, and increase overall conversions.

When Should You Choose Progressive Web Apps for eCommerce

Choosing progressive web apps for eCommerce should be based on business needs, not trends. A PWA is most useful when your current store setup starts limiting performance, user experience, or growth.

Instead of asking “Should I build a PWA?”, a better question is “Is my current store holding back conversions or engagement?”

Key Indicators Your Store Needs a PWA

Certain performance and user behavior signals clearly show the need for eCommerce PWA development.

  • High mobile traffic but low conversions: Users visit from mobile but do not complete a purchase due to a slow experience.
  • Slow page load time: Product pages take time to open, leading to early drop-offs.
  • High bounce rate: Users leave after viewing only one page.
  • Cart abandonment issues: Delays or friction during checkout reduce complete orders.
  • Low repeat visits: Users do not return after their first interaction.

If you notice two or more of these issues, a PWA can directly improve performance.

Business Scenarios Where PWA Delivers Strong Value

A progressive web app eCommerce approach works best in the following cases:

1. Mobile-first Audience

If more than 60 percent of your traffic comes from mobile devices, speed and responsiveness become critical. PWAs are optimized for mobile performance.

2. Growing or Medium to Large Stores

As your catalog grows, traditional websites struggle with speed and navigation. PWAs handle large amounts of data more efficiently.

3. Performance-Driven Businesses

If your focus is on improving Core Web Vitals, user experience, and engagement metrics, PWA is a strong upgrade.

4. Businesses Avoiding Native App Costs

PWAs provide an app-like experience without the cost of building separate Android or iOS applications.

When You May Not Need a PWA Immediately

In some situations, investing in a PWA may not be the first priority.

  • New or Small Stores: Limited traffic does not justify the investment yet.
  • Basic Product Catalog: A simple store can perform well with optimized websites.
  • Testing Business Ideas: Early-stage businesses should validate demand before scaling.

In these cases, improving the existing website can be a better first step.

Decision Table for Quick Evaluation

Business ConditionWhat It MeansRecommendation
High mobile trafficUsers rely on mobile browsingConsider PWA
Slow loading speedPoor user experienceConsider PWA
High bounce rateUsers are not engagingConsider PWA
Low budgetLimited resourcesStart with optimization
Early-stage businessStill validating dataDelay PWA

Practical Example

Consider two eCommerce stores:

  • Store A loads in 5 seconds and has frequent drop-offs.
  • Store B loads in 2 seconds with smooth navigation.

Store B will naturally retain more users and generate more sales.

A PWA helps move your store closer to that faster, smoother experience.

Long-Term Perspective

A PWA is not just a performance upgrade. It supports long-term growth by:

  • Handling higher traffic without performance drops.
  • Improving user retention through a better experience.
  • Reducing dependency on multiple platforms.

This makes it a strategic investment for scaling businesses.

Progressive web apps for eCommerce are most useful when your store needs better speed, engagement, and scalability.

If performance issues are affecting user experience or conversions, moving to a PWA can deliver measurable improvements.

analysis of ecommerce store performance to determine readiness for progressive web app upgrade

Common Mistakes to Avoid in eCommerce PWA Development

common mistakes in ecommerce progressive web app development such as poor optimization and weak integration

While eCommerce PWA development offers strong advantages, the results depend on how well it is implemented. Many businesses invest in PWAs but fail to achieve expected performance due to common mistakes.

Understanding these issues early can help you avoid unnecessary cost and rework.

Ignoring Performance Optimization

Some businesses assume that simply building a PWA will automatically improve speed. In reality, performance depends on proper website optimization.

  • Poor image handling slows down pages.
  • Unoptimized code affects loading time.
  • Lack of caching reduces efficiency.

A PWA must be carefully optimized to deliver real results.

Focusing Only on Technology, Not User Experience

A fast site is not enough if users find it difficult to navigate.

  • Complicated menus confuse users.
  • Poor layout affects product discovery.
  • Slow checkout process reduces conversions.

User experience should be a priority along with performance.

Choosing the Wrong Architecture

Selecting the wrong setup can limit scalability and flexibility.

  • Using plugins when a custom build is needed.
  • Overcomplicating small projects with heavy architecture.
  • Ignoring future growth requirements.

The architecture should match your business size and goals.

Weak Integration with Backend Systems

A PWA relies on smooth communication between the frontend and backend.

  • Poor API integration causes delays.
  • Inventory or order sync issues affect operations.
  • Payment gateway problems reduce trust.

Strong backend integration is essential for a stable system.

Overusing Push Notifications

Push notifications are useful, but excessive use can frustrate users.

  • Too many messages lead to opt-outs.
  • Irrelevant notifications reduce engagement.
  • Poor timing affects user experience.

Notifications should be controlled and meaningful.

Skipping Testing and Optimization

Launching without proper testing can lead to performance issues.

  • Bugs affect user experience.
  • Inconsistent behavior across devices.
  • Poor Core Web Vitals scores.

Testing ensures stability and smooth performance.

Lack of Ongoing Maintenance

A PWA is not a one-time setup. It requires continuous updates.

  • Performance can drop over time.
  • Website security risks may increase.
  • Features may become outdated.

Regular monitoring and updates are necessary.

Quick Overview of Mistakes

MistakeImpact
Ignoring performance optimizationSlow loading and high bounce rates
Poor user experience designLow engagement and conversions
Wrong architecture choiceLimited scalability
Weak backend integrationOperational issues
Overuse of notificationsUser frustration
Lack of testingBugs and instability
No maintenance planLong-term performance decline

Avoiding these mistakes ensures that your progressive web app eCommerce solution delivers real value. A well-planned and properly executed PWA can improve performance, user experience, and conversions. But without the right approach, it may not deliver expected results.

Conclusion

A fast and smooth shopping experience is no longer optional for eCommerce businesses. Users expect quick loading, easy navigation, and a reliable checkout process across every device.

This is where progressive web app eCommerce stands out. It brings together the accessibility of a website and the performance of a mobile app, without adding extra steps for users.

Through this guide, you have seen how eCommerce development improves speed, supports better Core Web Vitals, and creates a more engaging user journey. You have also explored cost, platform options like Shopify and Magento, and how features like push notifications help increase conversions.

For businesses aiming to improve performance and retain users, progressive web apps for eCommerce offer a practical and scalable solution. The key is to choose the right approach based on your business needs, budget, and growth plans.

custom progressive web app solution designed to improve ecommerce speed and user engagement