



Introduction
Building a web application is no longer the difficult part. Building one that remains fast, maintainable, and easy to scale as features, users, and business requirements grow is where most projects succeed or struggle.
Many development teams begin with a clear vision and a solid technology stack, only to face challenges later due to poor code organization, inefficient rendering, and growing complexity. This is why ReactJS has become one of the most widely adopted technologies for modern web application development. Developed by Meta, React enables developers to build interactive user interfaces using reusable components, making applications easier to manage and expand over time.
If you are looking to understand how to create a web application using ReactJS, knowing how to write React code is only one part of the process. Creating a production-ready application requires a well-planned ReactJS project structure, efficient component organisation, routing, state management, API integration, testing, and deployment strategies.
In this ReactJS web application tutorial, you will learn how to build a web app with ReactJS step by step. From setting up your development environment to implementing the key ReactJS web app development steps, this guide will help you create a scalable application that supports both current requirements and future growth.

What Is React JS and Why Is It Used for Web Application Development?
ReactJS is an open-source JavaScript library developed by Meta for building user interfaces. Instead of creating an entire page as a single block, React encourages developers to build applications from reusable components such as navigation bars, product cards, dashboards, forms, and modals. Each component manages its own logic and can be reused across different parts of an application.
One of React’s biggest advantages is its component-based architecture. This approach makes large applications easier to organize, maintain, and expand. When a new feature is added, developers can update or replace individual components without rewriting the entire interface.
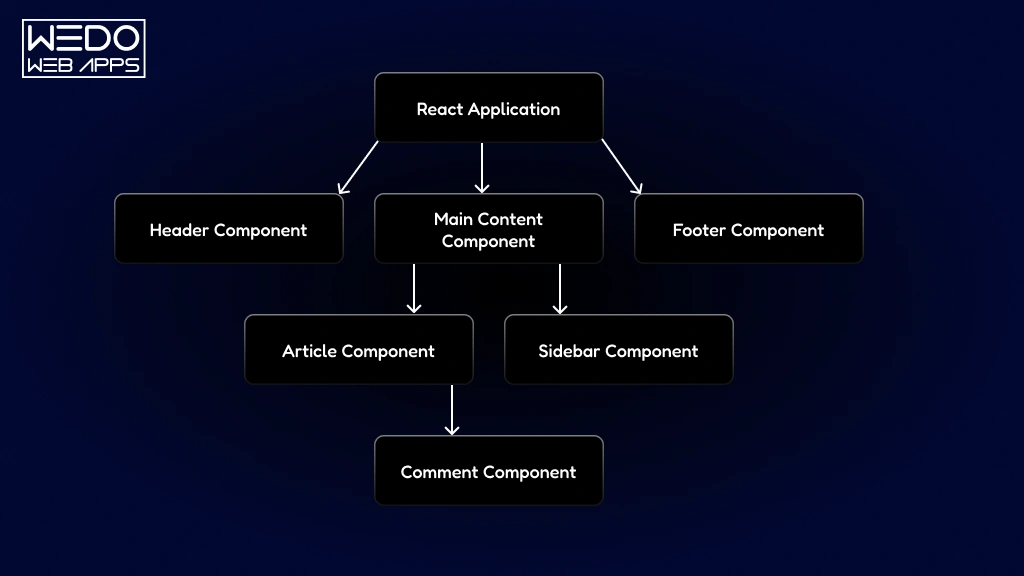
React also uses a virtual DOM, which updates only the parts of the page that change instead of reloading the entire page. This improves performance and creates a smoother user experience, especially in applications with frequent data updates or user interactions.
Why Developers Choose React
- Reusable components: Write a component once and use it in multiple places, reducing duplicate code.
- Efficient rendering: The virtual DOM minimizes unnecessary updates and improves application responsiveness.
- Scalable architecture: React works well for both small projects and large enterprise applications.
- Strong ecosystem: Developers can easily add routing, state management, testing, and deployment tools.
- Large community support: Extensive documentation, tutorials, and third-party libraries make development faster and easier.
These benefits are why React is commonly used for single-page applications, SaaS platforms, eCommerce websites, dashboards, and other interactive web applications. When combined with a well-planned ReactJS project structure, it becomes easier to build applications that remain maintainable as they grow in size and complexity.
| Example An eCommerce web app built with React can reuse the same product card component across category pages, search results, and recommendation sections. This saves development time and keeps the interface consistent throughout the application. |
Prerequisites Before Building a React Web Application
Before you start building a React application, it is important to set up the right development environment. While React simplifies the process of creating interactive user interfaces, a successful project still depends on having the proper tools, foundational knowledge, and workflow in place.
The first requirement is Node.js, which provides the runtime environment needed to install packages and run React applications locally. Alongside Node.js, developers use npm (Node Package Manager) to manage dependencies, install libraries, and execute development scripts throughout the project lifecycle.
A reliable code editor is equally important. Many developers prefer Visual Studio Code (VS Code) because it offers features such as code completion, debugging tools, extension support, and Git integration that help streamline development tasks.
You should also have a basic understanding of the following concepts:
- HTML for structuring web page content.
- CSS for styling and layout customization.
- JavaScript fundamentals, including variables, functions, arrays, and ES6 syntax.
- Basic command line usage for installing packages and running development commands.
Having these prerequisites in place will make it easier to understand the ReactJS web app development steps covered in this tutorial and help you focus on building application features rather than resolving setup-related challenges.
React JS Web Application Development Steps
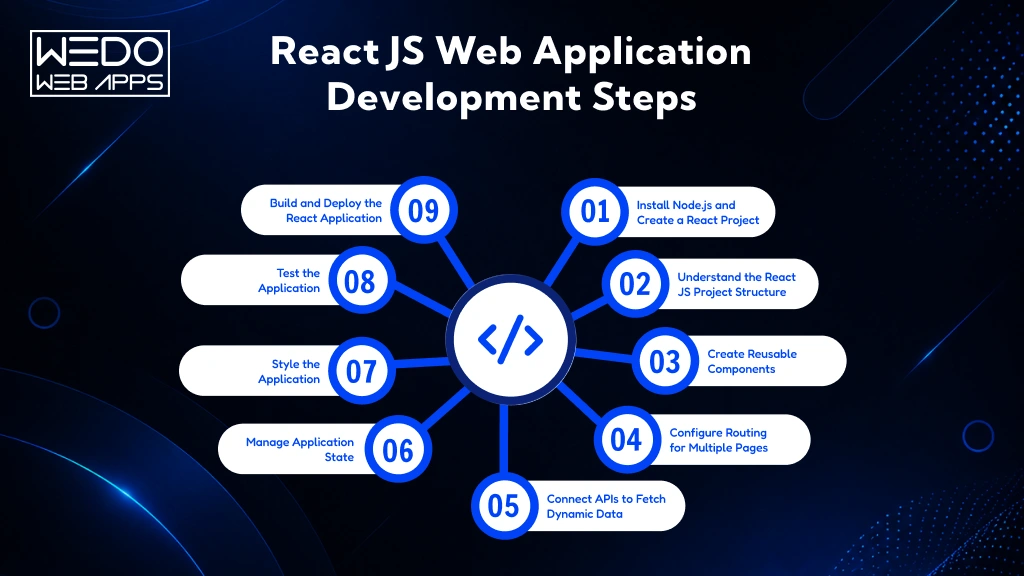
Creating a React application involves more than setting up a project and writing components. A well-structured development process helps maintain code quality, simplifies future updates, and supports application growth as new features are introduced.
From configuring the development environment and organising files to managing application state and deploying the final product, each stage contributes to the overall performance and maintainability of the application.
The following ReactJS web app development steps provide a structured approach to building a modern web application. Whether you are creating a simple business website, an eCommerce platform, or a feature-rich SaaS solution, these steps will help you establish a strong foundation for development.
Step 1: Install Node.js and Create a React Project
The first step of how to create a web application using ReactJS is setting up a development environment that supports React development. Before creating your application, you will need a few essential tools that help manage dependencies, run local servers, and streamline the development process.
Start by installing the following:
- Node.js to run JavaScript outside the browser and supports React development tools.
- npm (Node Package Manager) to install and manage project dependencies.
- Visual Studio Code (VS Code) or another code editor for writing and managing application code.
Once Node.js is installed, verify the installation by running the following commands in your terminal:
node – v npm – v |
After confirming the installation, create a new React project. This will generate the initial application files and install the required packages automatically.
npx create-react-app-my-react-app cd my-react-app npm start |
When the setup process is complete, React will launch a local development server and open the application in your browser. At this stage, you will have a working React environment ready for development.
Before moving to the next step, make sure you can:
- Access the application in your browser.
- View the default React welcome screen.
- Make a simple code change and see it update automatically.
- Navigate through the generated project files.
With the development environment successfully configured, the next step is understanding the ReactJS project structure and organizing your application for maintainability and future growth.
Step 2: Understand the React JS Project Structure
A React application can quickly become difficult to manage if files, components, and business logic are placed without a clear structure. While a small project may only contain a handful of files, larger applications often include hundreds of components, API integrations, utility functions, and assets. Organizing these elements from the beginning helps improve maintainability, collaboration, and future scalability.
When you create a React project, you will notice several default folders and files. As the application grows, developers typically organize the project into dedicated directories based on functionality.
A commonly used ReactJS project structure looks like this:
src/ ├── assets/ ├── components/ ├── pages/ ├── services/ ├── hooks/ ├── utils/ ├── App.js └── index.js |
Here’s the purpose of each history:
- assets/ stores images, icons, fonts, and other static resources.
- components/ contains reusable UI elements such as buttons, navigation bars, cards, and forms.
- pages/ includes page-level components that can be reused across multiple components.
- services/ manages API calls and external data integrations.
- hooks/ stores custom React hooks that can be reused across multiple components.
- utils/ contains helper functions and reusable business logic.
- App.js serves as the main application component.
- index.js acts as the application’s entry point.
Benefits of using a structured project organization include:
- Easier code maintenance as the application grows.
- Faster onboarding for new developers.
- Better separation of concerns.
- Simplifies debugging and testing.
- Improved scalability for future feature additions.
Think of your project structure as the blueprint of a building. A well-planned structure makes it easier to add new rooms, make renovations, and maintain the property without disrupting the entire foundation. The same principle applies when building a scalable React application.
Step 3: Create Reusable Components
One of the primary reasons ReactJS developers choose React is its ability to create reusable components. Instead of writing the same code repeatedly across multiple pages, React allows you to build self-contained UI elements that can be used wherever they are needed. This approach reduces duplication, improves consistency, and makes future updates significantly easier.
For example, elements such as navigation bars, buttons, forms, product cards, and footers often appear throughout an application. Rather than recreating these elements for every page, you can build them once and reuse them across the project.
A typical component structure may look like this:
components/ ├── Header/ ├── Footer/ ├── Navbar/ ├── ProductCard/ └── Button/ |
When creating reusable components, follow these best practices:
- Keep each component focused on a single responsibility.
- Use props to pass dynamic data between components.
- Avoid placing complex business logic directly inside a UI component.
- Create generic components that can be reused in different sections of the application.
- Maintain consistent naming conventions across the project.
Consider an eCommerce application as an example. A single ProductCard component can display product information on category pages, search results, featured product sections, and recommendation widgets. Any design update made to the component will automatically be reflected wherever it is used.
Benefits of reusable components include:
- Faster development cycles.
- Cleaner and more organized code.
- Consistent user interface design.
- Easier maintenance and updates.
- Improve scalability for larger applications.
By building reusable components early in the development process, you establish a foundation that supports efficient growth and simplifies future feature development.
Step 4: Configure Routing for Multiple Pages
Most web applications consist of multiple pages or views, such as home page, about page, user dashboard, and profile section. To navigate between these views without reloading the entire application, React uses client-side routing.
Routing helps create a smoother user experience by allowing users to move between different sections of the application while maintaining speed and responsiveness. The most commonly used library for this purpose is React Router.
Before configuring routes, install React Router in your project:
| npm install react-router-dom |
Once installed, you can define routes that connect specific URLs to individual pages within your application.
A typical routing structure may include:
- Home page (/)
- About page (/about)
- Contact page (/contact)
- Dashboard page (/dashboard)
- Profile page (/profile)
Benefits of implementing routing include:
- Faster page navigation without full page reloads.
- Improved user experience and application performance.
- Better organization of page-level components.
- Easier management of application navigation.
- Support for scalable multi-page applications.
As your application grows, you can further organize routes by creating a dedicated routing directory within your project structure. This helps centralize route management and simplifies updates when new pages are added.
For example, a SaaS application might include separate routes for user authentication, account settings, subscription management, analytics dashboards, and support pages. With proper routing in place, users can access these sections efficiently while maintaining a consistent experience throughout the application.
Once the routing structure is configured, the next step is connecting your application to external data sources through APIs, allowing you to display dynamic content and real-time information.
Step 5: Connect APIs to Fetch Dynamic Data
Most modern web applications rely on external data rather than displaying static content. Whether you are building an eCommerce platform, booking system, social networking application, or business dashboard, you will likely need to retrieve and display information from external services or databases. This is where APIs become an important part of React application development.
An API acts as a bridge between your React application and the backend system, allowing data to be exchanged securely and efficiently. Instead of manually updating content, the application can request and display real-time information whenever users interact with specific features.
Common API use cases include:
- Retrieving product listings from a database.
- Displaying user profile information.
- Processing login and authentication requests.
- Fetching analytics and reporting data.
- Managing orders, bookings, or transactions.
React applications commonly use the Fetch API or libraries such as Axios to communicate with APIs and handle data requests.
When integrating APIs into your application, consider the following best practices:
- Store API related logic in a dedicated services folder.
- Handle loading and error states to improve user experience.
- Avoid placing API requests directly inside multiple components.
- Secure sensitive credentials and API keys.
- Optimize requests to reduce unnecessary network calls.
A typical API workflow follows these steps:
- Send a request from the React application.
- Receive data from the server.
- Process the response.
- Update the application’s state.
- Display the data within the user interface.
By connecting APIs effectively, you can transform a static React application into a dynamic platform capable of delivering real-time information and personalized user experiences. Once your application can retrieve and display data, the next step is managing that data efficiently through React state management.

Step 6: Manage Application State
As your React application grows, managing data becomes increasingly important. Simple applications may only need to display static content, but larger projects often involve user authentication, shopping carts, form submissions, notifications, and real-time updates. Managing this information efficiently is known as state management.
In React, state represents data that can change during the application’s lifecycle. Whenever the state changes, React automatically updates the relevant parts of the user interface, ensuring users always see the most current information.
Common examples of application state include:
- User login status.
- Shopping cart items.
- Form input values.
- User preferences and settings.
- Dashboard statistics and reports.
- Notification messages.
React provides several ways to manage state depending on the application’s complexity:
- useState for handling local component data.
- useContext for sharing data across multiple components.
- State management libraries for large-scale applications with complex data flows.
When managing state, follow these recommended practices:
- Keep the state as close as possible to where it is needed.
- Avoid storing unnecessary or duplicate data.
- Separate UI state from business logic whenever possible.
- Group related state values together for better organization.
- Use shared state only when multiple components require access to the same data.
For example, in an eCommerce application, product information may come from an API, while cart items, user preferences, and checkout details are managed through application state. Proper state management ensures these features remain synchronized and function correctly across different pages.
Benefits of effective state management include:
- Improved application performance.
- Better user experience.
- Easier debugging and maintenance.
- Consistent data across components.
- Greater scalability for future development.
Once your application’s data is properly managed, the next step is designing and styling the user interface to create a polished and engaging user experience.
Step 7: Style the Application
Functionality is important, but the way users interact with your application can significantly influence engagement and satisfaction. A well-designed interface helps users complete tasks more efficiently, understand information more clearly, and navigate the application with confidence.
React gives developers the flexibility to implement different styling approaches based on project requirements. The right choice often depends on the application’s complexity, design requirements, and development workflow.
Popular styling options in React include:
- CSS for traditional stylesheet management.
- CSS Modules for component-specific styling.
- Tailwind CSS for utility-first design implementation.
- Bootstrap for responsive layouts and pre-built UI components.
- Styled Components for styling directly within React components.
When designing your application’s interface, consider the following best practices:
- Maintain consistent colors, typography, and spacing.
- Prioritize responsive design for different screen sizes.
- Keep navigation simple and intuitive.
- Use a clear visual hierarchy to guide user attention.
- Optimize images and assets for faster loading times.
A typical React application may include styled elements such as:
- Navigation menus
- Landing pages
- Forms and input fields
- Product listings
- User dashboards
- Data visualization components
Benefits of implementing a well-structured design system include:
- Improved user engagement.
- Better accessibility and usability.
- Consistent branding across the application.
- Faster development through reusable design patterns.
- Easier maintenance and future design updates.
For example, a business dashboard with clear navigation, responsive layouts, and consistent styling allows users to access reports, manage data, and perform tasks without unnecessary confusion or friction.
With the user interface in place, the next step is testing the application to ensure features work as expected and deliver a reliable experience across different environments.
Step 8: Test the Application
Building features is only part of the development process. Before releasing a React application, it is important to verify that every component, page, and user interaction works as intended. Testing helps identify issues early, reduces the risk of unexpected errors, and improves the overall reliability of the application.
Even a small issue in navigation, form validation, or data handling can affect the user experience. Regular testing allows developers to detect and resolve these problems before they reach production.
Key areas to test include:
- Component functionality
- Form submissions and validations
- Route navigation
- API integrations
- User authentication flows
- Responsive behavior across devices
- Error handling scenarios
React developers commonly perform different types of testing based on project requirements:
- Unit Testing to verify individual functions and components.
- Integration Testing to ensure multiple components work together correctly.
- User Interface Testing to validate user interactions and workflows.
- Performance Testing to identify bottlenecks that may affect application speed.
When testing your React application, follow these best practices:
- Test components independently before combining them into larger features.
- Validate both successful and failed user actions.
- Check application behavior across multiple browsers and devices.
- Monitor loading states and error messages.
- Review application performance before deployment.
Benefits of thorough testing include:
- Improved application stability.
- Faster issue resolution.
- Better user experience.
- Reduced maintenance costs.
- Greater confidence during deployment.
Think of testing as a quality checkpoint before launch. Just as a product undergoes inspection before reaching customers, a React application should be tested thoroughly to ensure it performs reliably under real-world conditions.
Once testing is complete and all critical issues have been addressed, the application is ready for the final stage of the development process: deployment.
Step 9: Build and Deploy the React Application
After completing development and testing, the final step is preparing your React application for production. Deployment makes your applications accessible to users by hosting them on a live server where they can be accessed through a web browser.
Before deployment, React application should be optimized to improve loading speed, performance, and overall user experience. This process creates a production-ready version of your application by minimizing file sizes and removing unnecessary development resources.
To generate a production build, run the following command:
| npm run build |
This command creates an optimized build folder containing the files required for deployment.
Before publishing your application, make sure you have completed the following:
- Verified that all features are functioning correctly.
- Tested the application across different devices and browsers.
- Checked API integrations and data flows.
- Optimized images and static assets.
- Removed unused code and dependencies.
- Reviewed application security settings.
Popular deployment platforms for React applications include:
- Vercel for fast and simplified deployments.
- Netlify for frontend hosting and continuous deployment.
- AWS for enterprise-grade hosting and scalability.
- Microsoft Azure for cloud-based application hosting.
- Google Cloud Platform for large-scale application deployment.
Benefits of deploying a production-ready React application include:
- Faster page load times.
- Improved application performance.
- Better user experience.
- Enhanced security and reliability.
- Greater scalability as traffic increases.
At this stage, you have completed the core process of how to create a web application using ReactJS. From setting up the development environment and organizing the ReactJS project structure to creating components, configuring routes, managing state, integrating APIs, testing, and deployment, each step contributes to building a scalable and maintainable web application.

Recommended React JS Project Structure for Large Applications
As a React application grows, managing files and directories becomes increasingly challenging. What starts as a simple project with a few components can quickly expand into a complex application containing hundreds of files, multiple integrations, and numerous user workflows. Without a well-planned structure, maintaining and scaling the application can become time-consuming.
A scalable ReactJS project structure helps development teams keep code organized, improve collaboration, and reduce the effort required to introduce new features. It also makes debugging, testing, and long-term maintenance more manageable.
A commonly used project structure for medium to large React applications looks like this:
src/ ├── assets/ ├── components/ ├── pages/ ├── layouts/ ├── routes/ ├── services/ ├── hooks/ ├── context/ ├── utils/ ├── constants/ ├── styles/ ├── App.js └── index.js |
Each discovery serves a specific purpose:
- assets/ store images, icons, fonts, and other static resources.
- components/ contain reusable UI components used across multiple pages.
- pages/ manages page-specific components and screens.
- layouts/ defines shared page layouts such as dashboards and authentication screens.
- routes/ centralizes application routing and navigation logic.
- services/ handles API requests and third-party integrations.
- hooks/ stores custom React hooks for reusable functionality.
- context/ manages shared application state.
- utils/ contains helper functions and reusable logic.
- constants/ stores application-wide configuration values.
- styles/ manages global styling and theme-related files.
Why use a structured project architecture?
- Improve code maintainability as the application grows.
- Simplifies onboarding for new developers.
- Reduces code duplication across the project.
- Support faster debugging and testing.
- Makes feature additions more efficient.
For example, if a new payment module needs to be added to an eCommerce application, developers can quickly identify where APIs, components, pages, and utilities should be placed without disrupting the existing codebase.
A well-organized project structure acts as the backbone of a React application, helping development teams build applications that remain manageable, scalable, and easier to maintain over time.
Common Mistakes to Avoid When Building a React Web App
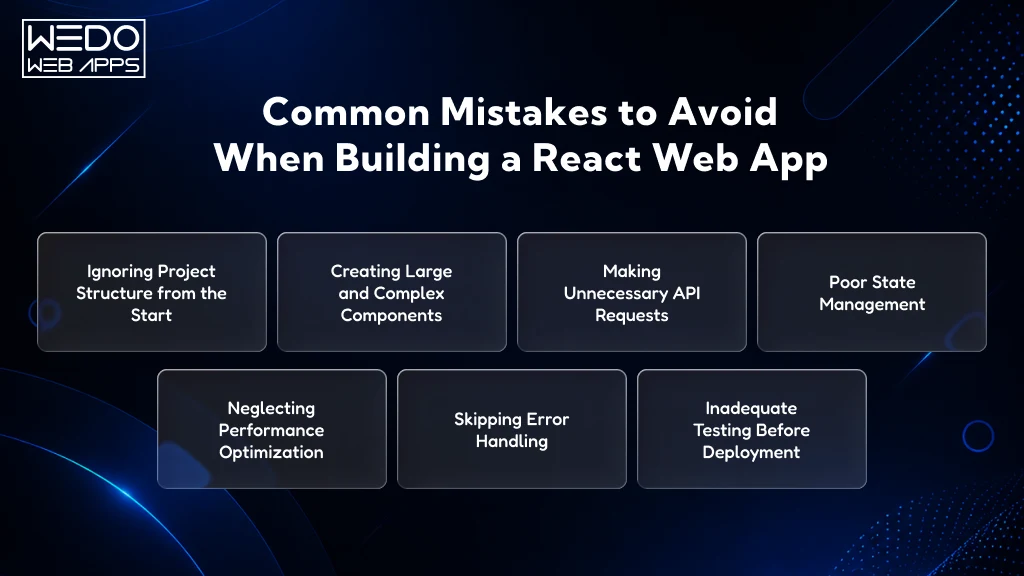
Even with the right tools and development process, certain mistakes can affect the performance, scalability, and maintainability of a React application. Identifying these issues early can save significant development time and help prevent challenges as the project grows.
Here are some of the most common mistakes developers make when building React applications:
1. Ignoring Project Structure from the Start
Many developers begin by placing components, services, and utility functions in the same directory. While this may work for small projects, it often creates confusion as the application expands.
Best Practice: Establish a clear ReactJS project structure early in the development process and organize files based on their responsibilities.
2. Creating Large and Complex Components
Components that handle multiple responsibilities can become difficult to understand, test, and maintain. They also increase the likelihood of bugs during future updates.
Best Practice: Break large components into smaller, reusable components with a single responsibility.
3. Making Unnecessary API Requests
Excessive API calls can slow down application performance and create a poor user experience, especially when users navigate between pages frequently.
Best Practice: Fetch data only when necessary and implement efficient data management strategies to reduce redundant requests.
4. Poor State Management
Storing too much data in a single component or sharing state incorrectly across the application can lead to inconsistent behavior and unnecessary re-renders.
Best Practice: Use React’s state management features strategically and keep state as close as possible to where it is required.
5. Neglecting Performance Optimization
As applications grow, performance issues such as slow rendering and increased load times can become more noticeable.
Best Practice: Optimize components, reduce unnecessary re-renders, and implement techniques such as code splitting and lazy loading when appropriate.
6. Skipping Error Handling
Many applications focus on successful user interactions while overlooking scenarios where API requests fail or unexpected errors occur.
Best Practice: Implement proper error handling, fallback messages, and loading states to improve reliability and user experience.
7. Inadequate Testing Before Deployment
Launching an application without thorough testing can result in broken features, navigation issues, and inconsistent behavior across devices.
Best Practice: Test components, user workflows, API integrations, and responsive layouts before moving the application to production.
Building a successful React application involves more than following development steps. Maintaining a clean codebase, organizing files effectively, managing data properly, and prioritizing performance are equally important. By avoiding these common mistakes, developers can create React applications that are easier to scale, maintain, and improve over time.
Why Businesses Choose React for Web Application Development
Businesses today need a web application that can support growing user demands, changing business requirements, and continuous feature enhancements. This is one of the key reasons why React remains a preferred technology for modern web application development. Its flexible architecture and extensive ecosystem help organizations build applications that are easier to maintain, scale, and improve over time.
Reusable Components Accelerate Development
React allows developers to create reusable components that can be implemented across multiple sections of an application. Rather than rebuilding the same interface elements repeatedly, teams can create them once and use them wherever required.
Benefits of reusable components include:
- Faster ReactJS web app development.
- Reduced code duplication.
- Consistent user experience across pages.
- Easier maintenance and future updates.
For example, a single product card component can be used across product listings, search results, and recommendation sections without requiring separate development efforts.
Faster and More Responsive User Experiences
Application speed directly affects user engagement and satisfaction. React uses a virtual DOM that updates only the necessary elements on a page, helping applications respond more efficiently to user interactions.
This approach helps businesses:
- Improve application responsiveness.
- Reduce unnecessary page updates.
- Deliver smoother user experiences.
- Support dynamic content more effectively.
These advantages make React particularly suitable for businesses looking to build web app with ReactJS that handles frequent user interactions.
Scalability for Long-Term Growth
Many applications start with a limited feature set but gradually expand as business needs evolve. React’s component-based architecture supports this growth by allowing developers to introduce new functionality without disrupting the existing application.
Key scalability benefits include:
- Easier feature expansion.
- Better code organization.
- Simplified collaboration among development teams.
- Improved maintainability for large projects.
When combined with a structured ReactJS project structure, React can support both small applications and enterprise-level platforms.
Strong Ecosystem and Community Support
React has one of the largest developer communities in the frontend development industry. This provides businesses with access to a wider range of tools, libraries, and technical resources.
Organizations benefit from:
- Extensive documentation.
- Regular updates and improvements.
- Third-party libraries for additional functionality.
- Faster issue resolution through community support.
This ecosystem helps reduce development complexity and supports efficient ReactJS web application development.
Suitable for Multiple Business Applications
React’s flexibility allows it to be used across various industries and business models. Whether the goal is customer engagement, operational efficiency, or digital transformation, React can support a wide range of application requirements.
Common use cases include:
- eCommerce platforms
- SaaS applications
- Customer portals
- Healthcare management systems
- Learning management platforms
- Business dashboards
- Financial service applications
This versatility is one of the reasons businesses continue to create web app using React for different operational and customer-facing needs.
Simplified Maintenance and Future Enhancements
As applications evolve, maintenance becomes an ongoing requirement. React’s modular structure allows developers to update individual components without affecting unrelated areas of the application.
This helps businesses:
- Reduce maintenance efforts.
- Accelerate feature updates.
- Improve application stability.
- Minimize development costs over time.
A well-structured React application is easier to manage, making it more practical for long-term business use.
Supports Modern Development Requirements
Modern web applications often require API integrations, cloud deployment, real-time data processing, and responsive user experiences. React works effectively with these technologies, making it a reliable choice for businesses planning future growth.
Organizations can benefit from:
- API driven architecture.
- Cloud-based deployment options.
- Responsive design capabilities.
- Integration with modern development tools.
These capabilities make React a practical technology choice for businesses seeking scalable and future-ready web applications.

Conclusion
Building a successful web application requires more than selecting the right technology. It involves creating a solid foundation that supports performance, scalability, maintainability, and future growth. ReactJS helps achieve this by providing a flexible development approach that simplifies the creation of dynamic and interactive user interfaces.
Throughout this guide, we have covered how to create a web applications using ReactJS, from setting up the development environment and organizing the ReactJS project structure to creating reusable components, configuring routing, integrating APIs, managing application state, testing, and deployment. Each step plays an important role in building an application that can support both current business requirements and future expansion.
Whether you are planning to build web app with ReactJS for a startup, an enterprise platform, an eCommerce business, or a SaaS product, following a structured application development process can help reduce complexity and improve long-term project success.
As React continues to be a leading choice for modern web application development, understanding these React JS web app development steps will help you create applications that deliver better user experiences while remaining easier to maintain and scale over time.